I saw these glasses while watching the latest season of The Orville. They were conical on the top and cylindrical on the bottom. These are my first attempts at making them in clay. They leave a little to be desired.
I made this one first. It is the same top as a mug that I tried out from a class I took recently. I think the bottom this one is both too tall and too straight. I feel like asthetically the two pieces don't go together well. I carved in the lavender on the bottom and that actually helped make it more cohesive.

Initially I thought the problem was that the bottom was too tall for the top. It wasn't until later that I realized that there was a shape issue. When I realized the shape issue I flared out the bottom. Instead of carving this one my plan is to make the bottom a solid color (Lavender Mist) and see if that balances it out. More on this concept to come.

I had forgotten about this jewelry until I was cleaning up. I made it back in December, but needed to add the neclace and earring hardware. The picture is a bit messy, but I love how the actual pieces turned out.


I mentioned earlier in the week the class that I have been taking. There's been a lot of focus on texture in that class. In the class we were shown how the texture can just be joined together. I'm finding that in my work I either don't want a seam at all (like in the lavender earlier this week) or I want to accentuate the seam like I've done here. I'm learning a lot, but also finding my style. January was a really busy month for work so I'm really behind on the class, but finding time to catch up and experiment now.
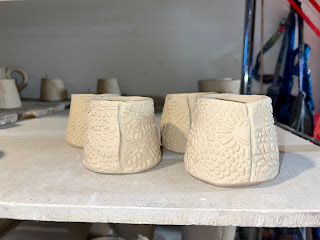
I had saved the last of the lavender from my garden last year. Threw it in a baggy in the freezer. It only took 10 minutes or so for it to thaw out enough to use. Lavender is pretty hearty when it comes to pressing it into clay. I made some of my normal mug size for this. The fun thing about the lavender is that even though I'm using the same 12 or so pieces - I never put them down exactly the same so each piece is unique.

I've been taking a virtual cups class in January and got this cute little shot glass template from it. It's the reverse of most shot glasses since it has a larger base, but I think it's going to be really sweet. With the lavender on it I think it could also be a really sweet tiny bud vase.

Also from the cups class comes this new truncated cone mug shape. I only made a couple because I'm worried its a little tippy. Going to see how the finished product comes out and decide whether I modify it any. I have an idea for a wine/drink cup that has this shape on the top and then a cone bottom. I'm experimenting now to get the right shape.

When I was dropping items off last fall at the Carrol County Gallery of Gifts I picked up a handful of ginko leaves. Literally picked them up off the ground. We don't have any ginko near me that I'm aware of, but the street there was lined with them. I put them in a baggy in the fridge when I got home intending to use them "soon."

Well, time got away from me. This weekend when I pulled the leaves out they had dried out. Still usable, but now one time use vs being able to use them again. The leaves provided a nice texture, but were not easy to get off the platter. I ended up using tweezers and still didn't get all the pieces off. They will burn off in the bisque kiln.

I'm still thinking on how to glaze this. I think I want the leaves to be the golden color from when they fall, but I don't think I have a glaze that's that color golden that will keep the fine line detail from the leaf texture. Maybe I'll go opposite and leave the leaves and do the gold around. Any suggestions?

No one tells you how difficult it is to clean a hollow die. When it comes out you can barely even see the metal.

The extruder is fun. The teeth on this one make it so that I'm never exerting too much force. I saw videos of people who are like standing on the wall and still struggling. This isn't no effort, but it is somewhat light effort to get things through.
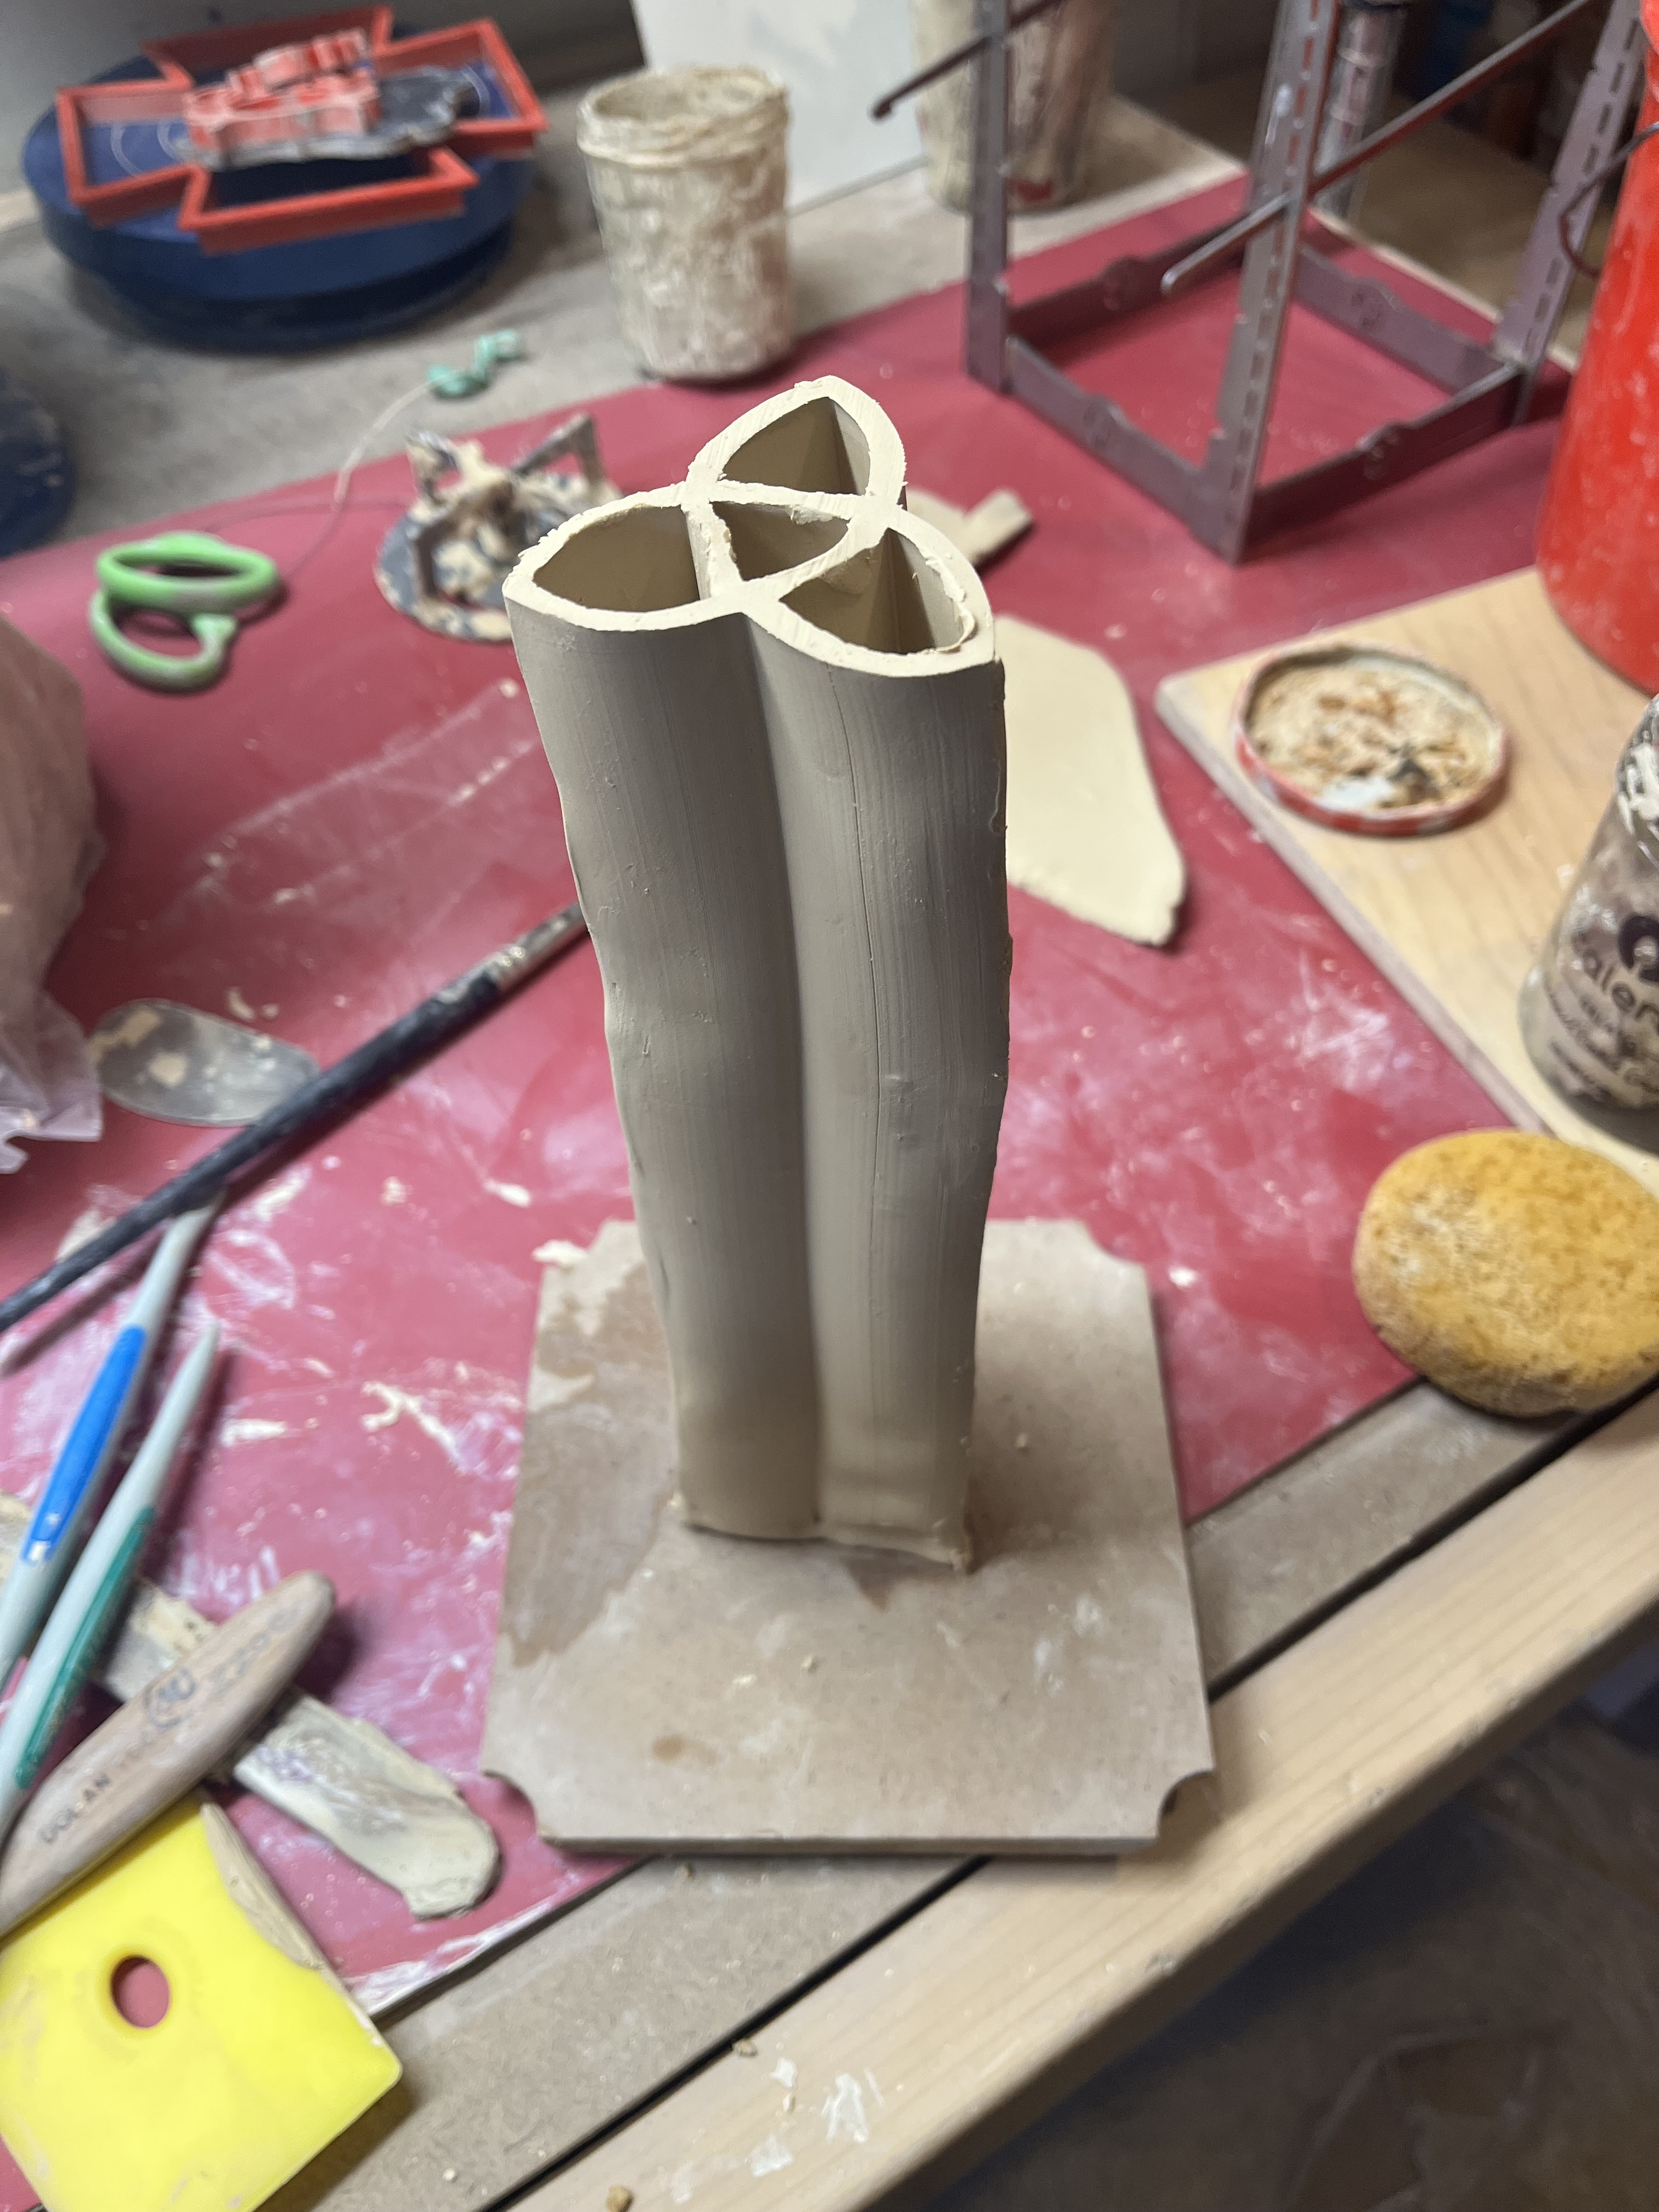
I made all of these into vases by cutting a bottom and adding it on. I'll get fancier as I experiment more.
This reminds me of the symbol from the TV show Charmed, but I think it will make a really cool bud vase.
This die is like a giant noodle. I think it's going to look awesome with a glaze that breaks.

This one came out with some personality

There's something about a hexagon. I think this shape might make a really nice size mug.

I bought myself an extruder for the holidays. Just got it mounted. Craig decided it needed to be mounted to a board then to the wall so that it was attached to two studs. It might be overkill or it might be saving the walls. I went with one from Steel Potter at The Ceramic Shop. It's not well known, but I was obsessed with their dies.

I love the bowls that I make and how big they are, but they don't stack very well. I wanted to play with some stackable bowls. I made 4 blank and 4 crab. This is the last crab one I made that I feel like came out the best. I've gotten really good at mug shapes, but definitely struggle more with bowls. This one is interesting because the diameter of the top and bottom are much different. I still have to clean up the rim once it's leather hard.

I bought a set of these molds for myself over the holidays. There's no texture on them now because I want to play with glaze techniques later. These two vases are the small and the medium, haven't had a chance to make the large yet.
I feel like I'm getting better at smoothing the clay in the puzzling molds.


I got these balloon stamps not too long after my hot air balloon ride. This fall was such a whirlwind that I didn't get a chance to use them. I wanted to make them a bit 3D. I'm hoping the baloons really pop with the glaze.
Making my way through all the blog posts. I've got a routine down to fix all the pages, but there are just so many that it takes a long time. I am going to cry if Google breaks this too at some point. I'm travelling for work for the next few days so my progress will likely slow.

I found a feasible work around for the broken images where I don't have to migrate everything. I'm hoping that Google won't break this as well, but they've been rather close lipped about it so who knows. The process isn't hard this way - copy the code, paste into word, find and replace, copy, paste back, and then publish. I fixed all the glaze pages this morning. The blog pages will take more time, I have almost 500 blog posts - how did that happen?!
When I was looking at the reindeer mold this tree popped up and I wanted to try it out. What I coudln't see in the picture on Amazon is that there are non-colored dots outside of the tree. I'm also not sure if the texture is deep enough. It doesn't help that I over corn starched a bit. I will keep you posted how this comes out (if it comes out).


I've found a couple of work arounds for the broken images, but I'm not really happy with any of them. Also I have nearly 500 posts and pages and updating every one individually is a daunting task. Google suggested a work around using a slightly different format for linking than I've used in the past. I tried it out on my post on the reindeer ornament and while it works, it looks terrible. It makes it look like all the photos are slightly out of focus.
The other alternative I've found is uploading directly in Blogger which is the tool that I use to host this web site. It works and it's what I'm using for the photo below, but while uploading an image is fairly easy, it doesn't actually give me a way to manage photos. I also haven't found a way to upload more than one image at a time which would mean real slow going for fixing all previous posts. I've been looking into other photo hosting sites, but it seems like all of them almost act like social media sites posting your videos out to the community. Not that I think I produce things that people are going to want to steal on a daily basis, having them in that arena feels like it's more likely that people will take my photos and use them for another context.
I'm exhausted by this whole thing and I haven't even had to do any migration of photos yet. This all just feels like it should be simpler. sigh.
In other news I am still making things even though I haven't been posting. This is the first time I've used coils of Laguna 60. I kept putting off cleaning my handheld extruder becuase it felt difficult. I ended up buying a second extruder on sale during the holidays. Problem solved, no cleaning needed. Obviously having two large extruders would be cost prohibitive, but the handheld ones aren't that expensive.
I've been thinking about luminaries for a few weeks now so of course that's where I started. I made a few different shapes to decide which ones I like best. I also had an idea for a little luminary gnome that I tried out, but I put it on too tight and it did not make it off the cone. I am definitely going to try again.

Update: I was trying out Google's work around for images on this post. It looks terrible, but I don't have a solid alternative yet. If you click on the individual images they should render and not look blurry. Apologies, and thank you for bearing with me while I figure this out.
Back in December I was searching for something on Amazon and they recommended this cute little silicone mold. I loved it, but I decided that it was too late to do anything for this year. I left it in my cart though and last week decided to buy it (and a few more texture items coming soon). I couldn't wait to try it out, but not working with a lot of silicone molds there was definitely a learning curve.

I started with a fairly wet piece of clay. I know enough about molds to know that dry clay would crack.

As I was removing the clay I quickly realized that with the arms being separate that they needed to come out first since they are recessed. I set them aside and worked on the main body.

I learned quickly to be gentle as I decapidated a couple of reindeers. Since this mold is a bit like a Y it definitely took figuring out how to loosen it without breaking off parts. I had to be very gentle.

I also learned that leaving extra clay on the back beyond the seems meant that I'd have to do more shaping/cutting later.
62mrc6tg3pGWn_3qlHubglOyBzFgB1GO7aoQ1ajiuQzpoRYPm0EAAvOXukLKR1KLTRuSesptuIva_dAAcHE9wreIOiNG3/s320/IMG_7733.jpeg"/>

It looks a little demented without arms.

I tried two different arm attachments. I like them both. I might end up with a favorite once we get through the whole process, but I don't have one yet - do you?
At one of my December shows I was a klutz and knocked over my ornament trees. Surprisingly I only had 4 ornaments break. One was beyond repair, but the other three were just broken in one place. I've been wanting to try kintsugi for a long time and even had a few other pieces set aside for when I finally got around to it. I decided to take the plunge and try it. I already have e6000 that I use for making magnets and decided for this first foray that would be good enough as an adhesive. So all I needed was the leaf adhesive and the metal leaf paper.
I had done a good bit of research and decided that I could use imitation leaf vs spending on the real thing for my first try. I did have 3 colors to choose from (gold, silver, brass), but for these I went with all gold.

Step 1 was to do a little sanding. Two of the larger plates weren't actually broken they just had a deep crack. I sanded the edges so they weren't as rough. Step 2 was to glue the pieces together. As I said before I used e-6000 as the glue. For the pieces with the cracks I just wanted to fill them in. It took me a couple of tries to figure out how to get glue into the cracks without having it spill over. It was some careful wiping down. I let the glue dry overnight so it had time to solidify.

Step 3 is to add the leaf adhesive. The directions said to let it dry for 30 minutes or until it isn't cloudy any more. I made my fingers sticky touching it. Step 4 is to add the gold leaf. It's hard because if you get the adhesive on your fingers then the paper sticks to your hands and not the pottery. Took me only one try to learn that lesson. It helped at some points to break the leaf into smaller pieces before I tried to apply it. I found that for different pieces I liked different widths of the leaf. For the first piece I did the front first and then switched to doing the back first so that I could learn more. The first side you do needs to be completely done so that you don't have other things sticking to the adhesive.

The last step is to spray with a sealer. I only had a matte sealer and I thought it wouldn't make a difference. It absolutely did. I still like these pieces, but I will definitely be buying a gloss sealer for the future.

This was really fun to try, but I definitely won't be doing it frequently. I did put the ornaments on my tree immediately and love them. However, the plates aren't functional. They will make nice wall art, but these aren't things that I think most people would want. I don't have a lot of pieces break in the firing process, but those that do will likely continue to end up in the trash. I will reserve this for speical pieces that break that I don't want to lose.

One of the advantages of keeping track of things is metrics!!
2023 Top 5 Sellers by Count:
- Mugs
- Small Plates
- Trinket Diskes
- Spoon Rests
- Ornaments
2023 Top 5 Sellers by Percent of Sales:
- Mugs - 27%
- Small Plates - 12%
- Long Platters - 6%
- Spoon Rests - 6%
- Platters - 6%
Something which shouldn't surprise anyone the top seller in categories - Crabs!! 25% of Mugs, 38% of Trinket Diskes, 35% of Small Plates, 35 % of the Long Platters...pretty much every category its Crabs.

I also did 18 shows which was a lot. This year I'm going to be pickier in my shows. I've also been tracking the fee ratio of my shows - 12% being the average. There were a couple of shows that were much higher than this. They were all multi-day shows that I thought were going to be better than they were. I likely won't be doing any of those again.
I do want to figure out how to drive more sales online. While I don't really like having to ship things, I think that this is an untapped resource.
Having all this data also helps me determine what things I've been making that aren't things I should continue selling. For example, I made a whole tea set this year plus an extra teapot. While I did really enjoy the experience - I still have all of it. I think eventually I will find the right buyer, but I haven't yet.
There are things that sold really well in 2022, but did not sell well in 2023 like my large decortative pumpkins. My theory is that people bought smaller this year due to the economy. Next year I have all of those in inventory so we will see, but I won't make any more.
I feel like at some point the market for crabs will be saturated, but I don't think it is just yet :).
There aren't really any shows in the first 3 months of the year so I will be spending the next couple of months building up inventory. I also have some new ideas for things that I'm going to be working on during this downtime. Stay tuned
I love this yarn. I used it for my Open Wave Block Shirt last year. I bought more yarn from Greenwood Hill Farm at the Maryland Sheep and Wool and was just waiting for the yarn to tell me what it wanted to be. I'm really happy with the results. I used 2 skeins of silver and 3 of slate
I know from the shirt I made that this yarn is exceptionally warm so once again I chose an open pattern so I could wear it indoors without sweating. I picked this stitch from the Crochet Every Way Stitch Dictionary. This is the spider filet stitch. I don't think it looks like a spider, especially considering spiders have 8 legs not 6.

Stitches:
ch: chain
sk st: skip stitch
hdc: half double crochet
dc: double crochet
dc3tog: yarn over twice, insert hook and pull through a loop, yarn over, pull through 2 loops (you should have 2 loops on your hook). Yarn over twice, insert hook and pull through a loop, yarn over, pull through 2 loops (you should have 3 loops on your hook). Yarn over twice, insert hook and pull through a loop, yarn over, pull through 2 loops (you should have 4 loops on your hook). Yarn over and pull through all 4 loops to complete the stitch.
picot: sc, ch 3, sl st in the sc stitch you started with, sc in the next stitch to close
Back Panel:
This pattern works in multiples of 16 + 8. For the width I wanted I cast on 72 (16*4 + 8)
Row 1: dc in the 6th chain from the hook, * ch 1, sk st, dc. Rep from * across.
Row 2: ch 4, sk st, dc, ch 1, dc, *ch 4, sk 2 st, dc3tog, ch 4, sk 2 st, dc, ch 1, sk st, dc, ch 1, sk st, dc. Repeat from * across
Row 3: ch 4, sk st, dc, sk st, ch 1, dc, *ch 4, sc in the next ch 4 space, sc in the dc3tog, sc in the next ch 4 space, ch 4, sk 2 st, dc, ch 1, sk st, dc, ch 1, sk st, dc. Repeat from * across
Row 4: ch 4, sk st, dc, sk st, ch 1, dc, *ch 4, dc3tog in the middle sc, ch 4, dc in the dc, ch 1, sk st, dc, ch 1, sk st, dc. Repeat from * across
Row 5: ch 4, sk st, dc, *ch 1, sk st, dc. Repeat from * across
Row 6: ch 4, sk st, dc, *ch 1, sk st, dc. Repeat from * across
Repeat rows 2-6 5 times or until you reach your desired length.
Front panel - Make 2
Cast on 28. This isn't a full version of the pattern,but I wanted the front panels to end slightly short
Row 1: dc in the 6th chain from the hook, * ch 1, sk st, dc. Rep from * across.
Row 2: ch 4, sk st, dc, ch 1, dc, ch 4, sk 2 st, dc3tog, ch 4, sk 2 st, dc, ch 1, sk st, dc, ch 1, sk st, dc, ch 4, sk 2 st, dc3tog, ch 4, sk 2 st, dc
Row 3: ch 4, sk st, dc, sk st, ch 1, dc, ch 4, sc in the next ch 4 space, sc in the dc3tog, sc in the next ch 4 space, ch 4, sk 2 st, dc, ch 1, sk st, dc, ch 1, sk st, dc, ch 4, sc in the next ch 4 space, sc in the dc3tog, sc in the next ch 4 space, ch 4, sk 2 st, dc
Row 4: ch 4, sk st, dc, sk st, ch 1, dc, ch 4, dc3tog in the middle sc, ch 4, dc in the dc, ch 1, sk st, dc, ch 1, sk st, dc, ch 4, dc3tog in the middle sc, ch 4, dc in the dc
Row 5: ch 4, sk st, dc, *ch 1, sk st, dc. Repeat from * across
Row 6: ch 4, sk st, dc, *ch 1, sk st, dc. Repeat from * across
Repeat rows 2-6 5 times or until you reach your desired length.
Sew together the front panels to the back panel leaving 7 inches for the sleeves.

For the sleeves witch to the silver yarn.
Row 1: ch 4, * ch 1, sk st, dc. Rep from * across ending with ch 1, slip stitch to join. Pick up 36 stitches
Row 2: ch 4, sk st, dc, ch 1, dc, *ch 4, sk 2 st, dc3tog, ch 4, sk 2 st, dc, ch 1, sk st, dc, ch 1, sk st, dc. Repeat from * across. For the last stich slip stitch to join instead of the dc
Row 3: ch 4, sk st, dc, sk st, ch 1, dc, *ch 4, sc in the next ch 4 space, sc in the dc3tog, sc in the next ch 4 space, ch 4, sk 2 st, dc, ch 1, sk st, dc, ch 1, sk st, dc. Repeat from * across. For the last stich slip stitch to join instead of the dc
Row 4: ch 4, sk st, dc, sk st, ch 1, dc, *ch 4, dc3tog in the middle sc, ch 4, dc in the dc, ch 1, sk st, dc, ch 1, sk st, dc. Repeat from * across. For the last stich slip stitch to join instead of the dc
Row 5: ch 4, sk st, dc, *ch 1, sk st, dc. Repeat from * across. For the last stich slip stitch to join instead of the dc
Row 6: ch 4, sk st, dc, *ch 1, sk st, dc. Repeat from * across. For the last stich slip stitch to join instead of the dc
Row 7: ch 4, * ch 1, sk st, dc. Rep from * across ending with ch 1, slip stitch to join. Note on this round there is intentionally a reduction of the 3 dc in the sleeves to 2 between the spiders
Row 8: ch 4, sk st, dc, *ch 4, sk 2 st, dc3tog, ch 4, sk 2 st, dc, ch 1, sk st, dc. Repeat from * across. For the last stich slip stitch to join instead of the dc
Row 9: ch 4, sk st, dc, *ch 4, sc in the next ch 4 space, sc in the dc3tog, sc in the next ch 4 space, ch 4, sk 2 st, dc, ch 1, sk st, dc. Repeat from * across. For the last stich slip stitch to join instead of the dc
Row 10: ch 4, sk st, dc, sk st, *ch 4, dc3tog in the middle sc, ch 4, dc in the dc, ch 1, sk st, dc. Repeat from * across. For the last stich slip stitch to join instead of the dc
Row 11: ch 4, sk st, dc, *ch 1, sk st, dc. Repeat from * across. For the last stich slip stitch to join instead of the dc
Row 12: ch 4, sk st, dc, *ch 1, sk st, dc. Repeat from * across. For the last stich slip stitch to join instead of the dc
Row 13: ch 5, *sk 2 st, dc, ch 2. Repeat from * across sl st to join.
Row 14: ch 5, *sk 2 st, dc, ch 2. Repeat from * across sl st to join.
Row 15: ch 3, dc in the chain space, *2 dc in the next ch space. Repeat from * sl st to join.
Row 16: ch 3, dc in each stitch, sl st to join.
Row 17: ch 1, sc, picot in each stitch around, sl st to join.

Turn the sweater right side out
Pockets - make 2
Cast on 16 in the slate
Row 1: dc in the 6th chain from the hook, * ch 1, sk st, dc. Rep from * across.
Row 2: ch 4, sk st, dc, *ch 1, sk st, dc. Repeat from * across
Row 3: ch 4, sk st, dc, ch 1, dc, ch 4, sk 2 st, dc3tog, ch 4, sk 2 st, dc, ch 1, sk st, dc, ch 1, sk st, dc
Row 3: ch 4, sk st, dc, sk st, ch 1, dc, ch 4, sc in the next ch 4 space, sc in the dc3tog, sc in the next ch 4 space, ch 4, sk 2 st, dc, ch 1, sk st, dc, ch 1, sk st, dc
Row 4: ch 4, sk st, dc, sk st, ch 1, dc, ch 4, dc3tog in the middle sc, ch 4, dc in the dc, ch 1, sk st, dc, ch 1, sk st, dc
Row 5: ch 4, sk st, dc, *ch 1, sk st, dc. Repeat from * across
Row 6: ch 4, sk st, dc, *ch 1, sk st, dc. Repeat from * across
Switch to silver
Row 7: ch 3, hdc in the chain space, *2 hdc in the next chain space. Repeat from * ending with the last hdc in the last stitch
Row 8: ch 1, picot in each stitch to the end.
Sew on to make the spider stitches line up on the front panel. I decided to map it to the second one up.

Collar
Start at the bottom right corner with the silver yarn
Row 1: ch 3, 2 hdc in the space, * 3 hdc in the next space. Repeat from star all the way around to the bottom left corner.
Row 2: ch 4, * sk st, dc, ch. Repeat from * across end with a dc in the last stitch.
Row 3: repeat row 3
Row 4: ch 3, dc in the ch space, * 2 dc in the next chain space. Repeat from * across, end with a dc in the last stitch
Row 5: ch 1, picot across.
Weave in all ends
Well I should have scraped off the bear glaze. Aside from that everything else looks great, but that bear is saggy. I do love how all the dill items came out.


