
Another pattern I got from Heart Hook Home. This one got a little long as I was using different yarn from the pattern. It's especially long when you consider the height of her parents - lol.
I added the dark brown in the ears which I think gives it an added touch of whimsy.
I'm hoping to post action shots of all of these once she's born.


This star baby sleep sack is so cute! I can't wait to see a real baby in it! The pattern can be found here on Heart Hook Home.

This sweater worked up pretty quickly. I used just over 3 skeins of Venice Twilight Fingering Tweed from American Ewe Yarn. Each skein is 440 yards. I love this yarn, its light, but really warm.

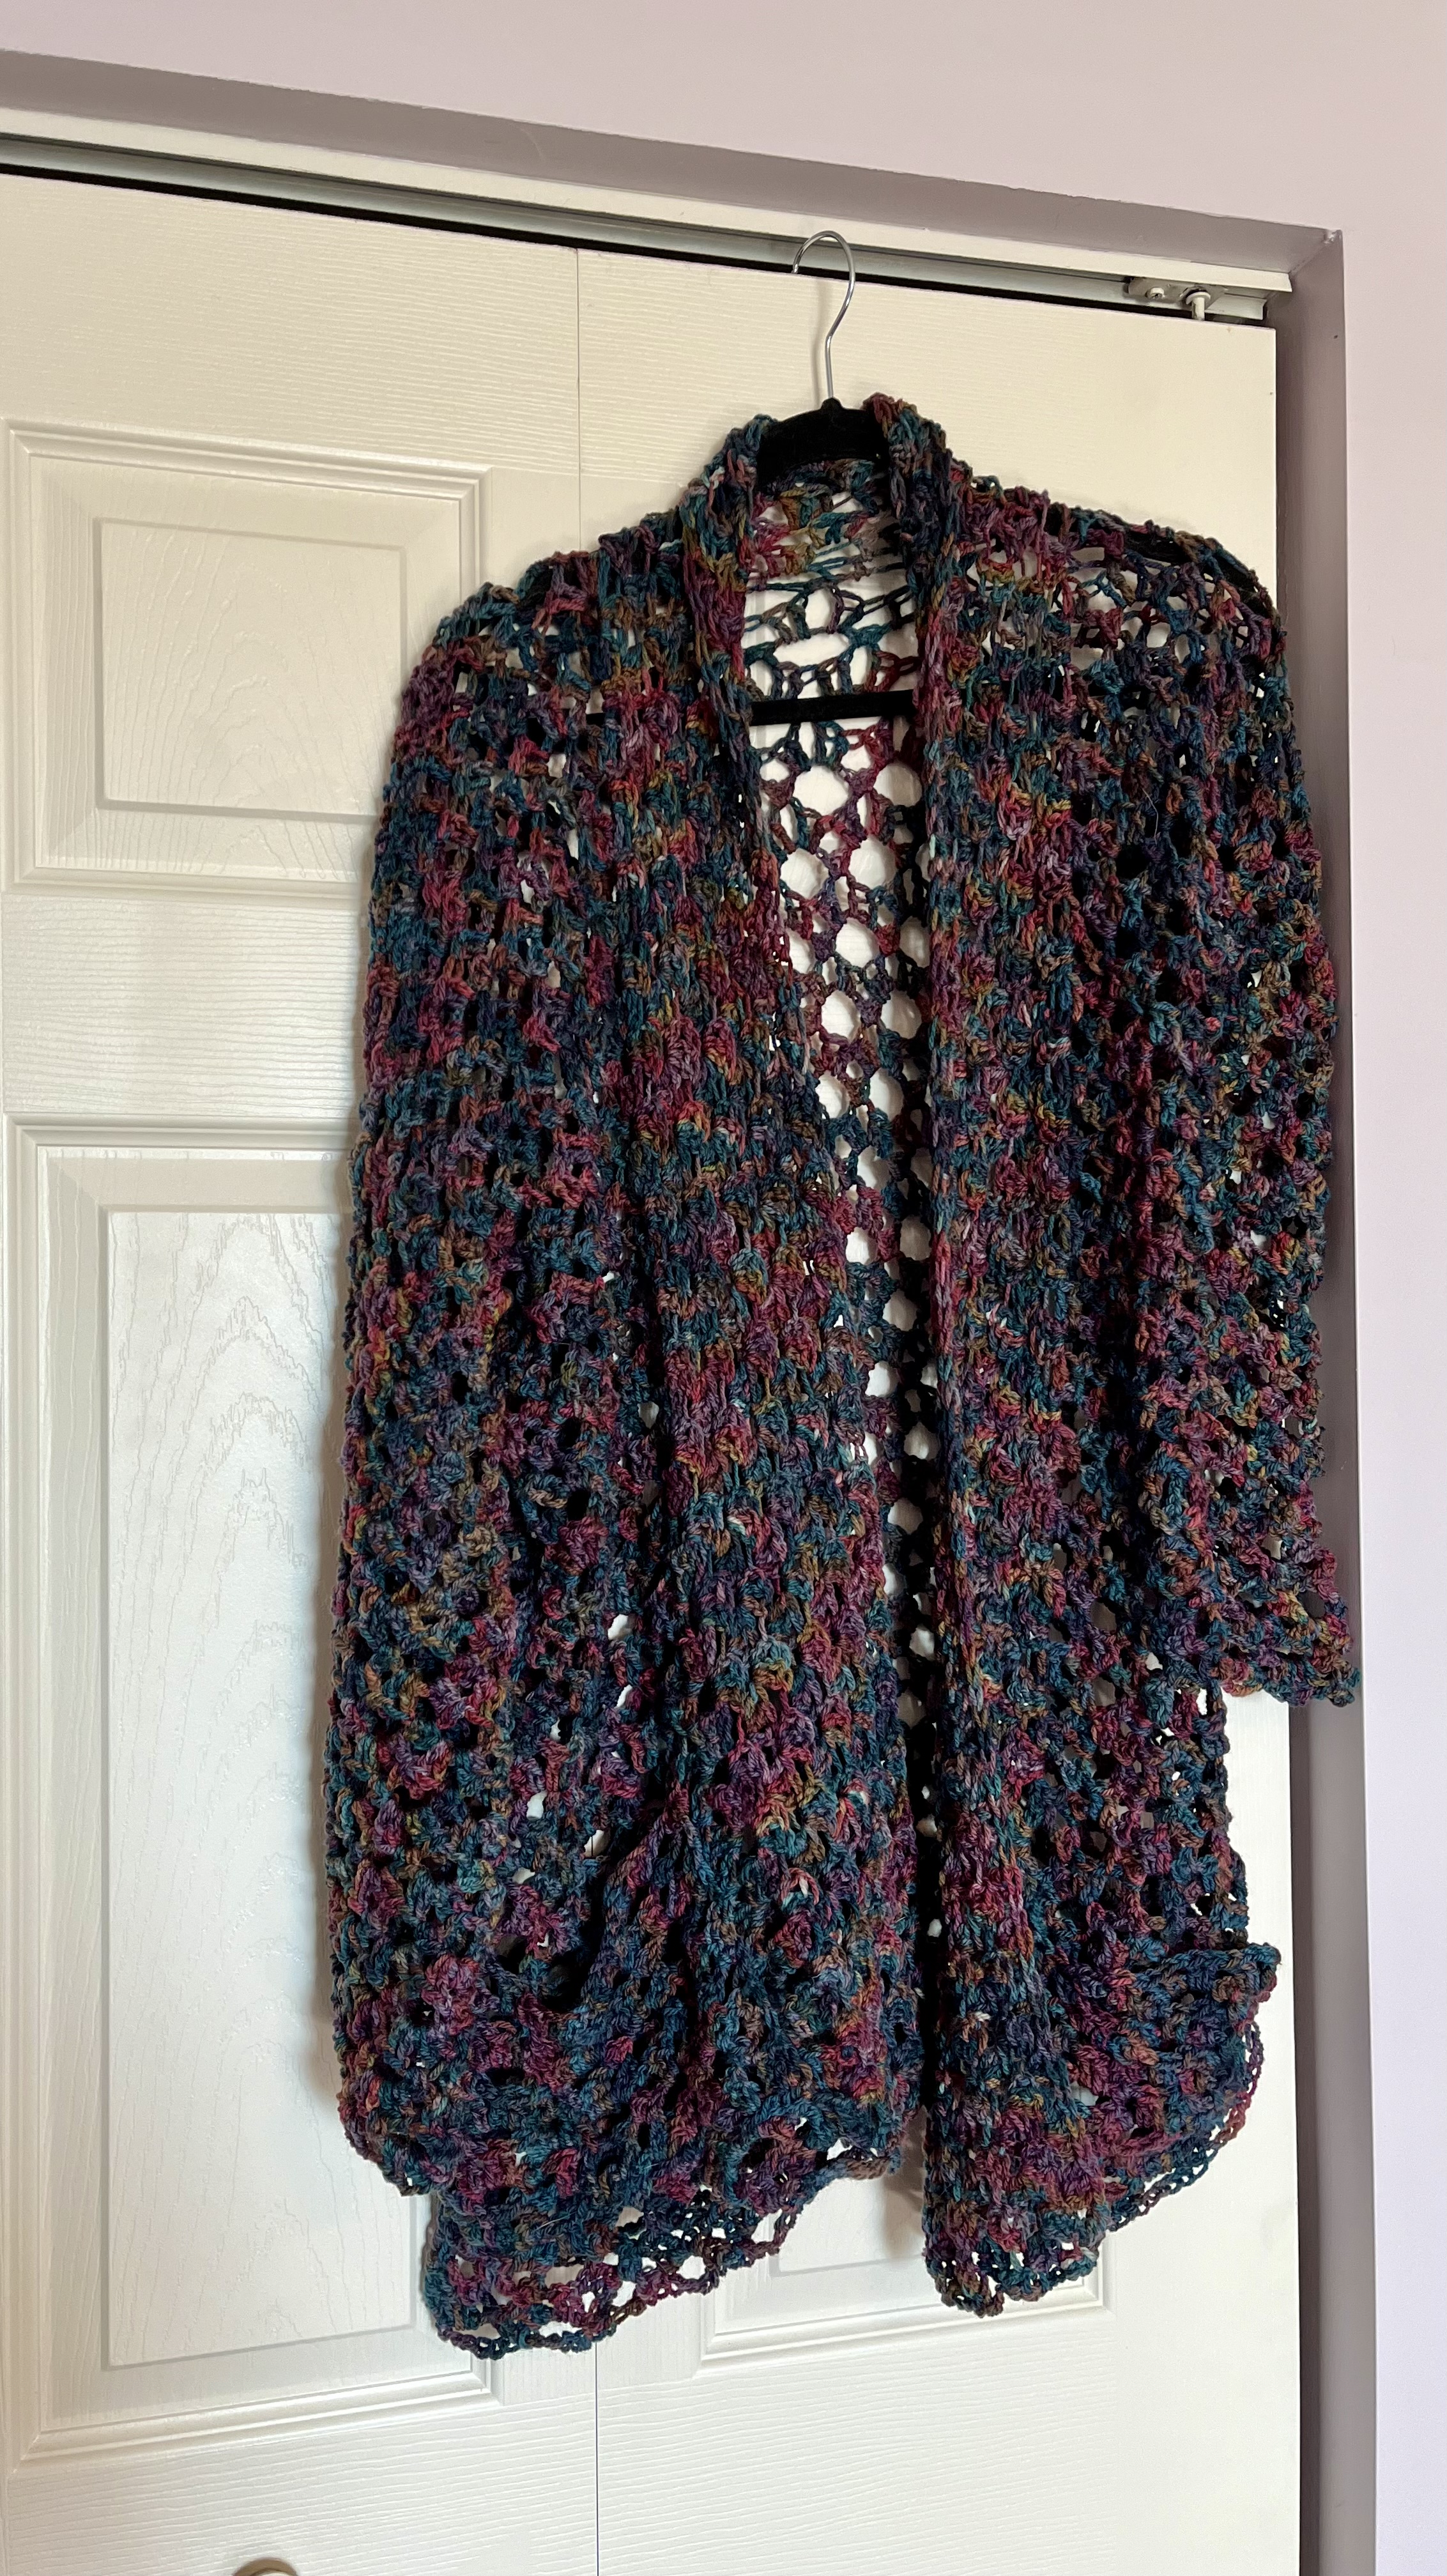
This stitch is called Crow's foot lattice.
Stitches:
ch - chain
sk st - skip stitch
sc - single crochet
dc - double crochet
tr - triple crochet
Cast on in multiples of 4 + 4. You're going to make one back panel and 2 side panels. The two side panels should be however many multiples of 4s you have divided by 2.
Row 1: dc in the 4th chain from the stitch, *ch 1, sk 2 st, sc, ch 1, sk 2 st, in the same stitch (dc, ch 1, tr, ch 1, dc). Repeat from *, end on the tr.
Row 2: ch 1, sc in the tr, *ch 1, in the sc (tr, ch 1, dc), ch 1, sc. Repeat from *,
Row 3: ch 1, sc in the sc, *ch 1, in the ch 1 between the tr and the dc (dc, ch 1, tr, ch 1, dc), ch 1, sc in the sc. Repeat from *.
Row 4: ch 4 (tr + ch), dc in the same stitch, *ch 1, sc in the tr, ch 1, in the sc (tr, ch 1, dc). Repeat from *.
Row 5: ch 5 (tr + ch), dc in the same stitch, * ch 1, sc in the tr, ch 1, in the ch 1 between the tr and the dc (dc, ch 1, tr, ch 1, dc). Repeat from *, end with the tr.
Repeat rows 2-5 until you get your desired length.
Use the same pattern for the sleeves, collar, and pockets.


I started this cardigan shortly after the Sheep and Wool, but only had 2 skeins of yarn. I needed 3 to complete it and it was out of stock. Luckily Kim Dyes Yarn has a notify me button and it came back in stock after only a month or so. This is on her Cronut Sport yarn which is a Superwash Marino in the Forget Me Not colorway. I love how soft and silky it is.

This cardigan uses the Hydrangea stitch pattern.
Stitches:
ch - chain
sk st - skip stitch
sc - single crochet
dc - double crochet
Special stich - 4 dc into the same stitch, on the 4th dc don't finish and leave 2 loops on the hook
chain in multuples of 16 + 9
Row 1: ch 3, dc into the 4th chain from the hook, dc into the same stitch, dc into the same stitch but don't finish and leave 2 loops on the hook, sk 7 stitches, 4 dc into the same stitch,* ch 4, sk 3 st, sc, ch 4, sk 3 st, special stitch (4 dc into the same stitch, on the 4th dc don't finish and leave 2 loops on the hook), sk 7 stitches, 4 dc into the same stitch. Repeat from * until the end, ending with a dc.
Row 2: ch 3, Special stitch (the ch 3 counts as the first dc), 4 dc into the 4th dc from the previous row, * ch 5, sc in the sc, ch 5, special stitch into the first dc from the previous row, 4 dc into the last dc from the previous row. Repeat from * across ending on a dc.
Row 3: ch 3, Special stitch (the ch 3 counts as the first dc), 4 dc into the 4th dc from the previous row, * ch 6, sc in the sc, ch 6, special stitch into the first dc from the previous row, 4 dc into the last dc from the previous row. Repeat from * across ending on a dc.
Row 4: ch 7, sc into the connecting dc, ch 4, Special stitch (the ch 3 counts as the first dc), 4 dc into the 4th dc from the previous row, * ch 4, sc in the sc, ch 4, special stitch into the last (opposite of what you did before) dc from the previous row, 4 dc into the first (opposite of what you did before) dc from the previous row. Repeat from * across ending with a dc.
Row 5: ch 8, sc into the sc, ch 5, Special stitch, 4 dc into the 4th dc from the previous row, * ch 5, sc in the sc, ch 5, special stitch into the first dc from the previous row, 4 dc into the last dc from the previous row. Repeat from * across ending with a dc.
Row 6: ch 9, sc into the sc, ch 6, Special stitch, 4 dc into the 4th dc from the previous row, * ch 6, sc in the sc, ch 6, special stitch into the first dc from the previous row, 4 dc into the last dc from the previous row. Repeat from * across ending with a dc.
The hardest thing about this is the transition from row 3 to row 4. You're basically reversing the order of the clusters of dc and the chains. I hope this makes some sense, it looks really cool once its done.

crochet
Bel Air Festival for the Arts this Sunday Sept 14th and Double Diamond Mesh Crew Neck Sweater
September 12, 2025This Sunday is the Bel Air Festival for the Arts 9-5. I hope to see you there if you're local!.
This stitch pattern with the very thin yarn that I used took a long time, but it was actually a pretty easy pattern over all. I love this linen merino high twist yarn from Apothefaery.

Double Diamond Mesh Stitch
Stitches:
ch - chain
sk st - skip stitch
sc - single crochet
dc - double crochet
Cast on in a multiple of 6 + 2
Row 1: ch 4, sc in the 6th ch from the hook, * sc, sc, ch 5, sk 3 st, sc. Repeat from * across the row, when you reach the end of the row ch 2, sk st, dc.
Row 2: ch, sc in the dc, ch 2, * sc in the middle of the 3 sc, ch 3, sc in the 3rd of the 5 ch. Repeat from * across, the last sc should be in the 3rd chain from your first row.
Row 3: ch sc in the sc, sc in the first chain, *ch 5, sc in the chain before the sc, sc in the sc, sc in the chain after the sc. Repeat from * across, you'll end with just 2 sc.
Row 4: ch, sc in the sc, ch 3, * sc in the 3rd of the 5 ch, ch 3, sc in the middle of the 3 sc, ch 3. Repeat from * across, ending with a sc.
Row 5: ch 4, *sc in the chain before the sc, sc in the sc, sc in the chain after the sc, ch 5. Repeat from * across, end with ch 2 and dc.
Repeat rows 2-5 until you get to your desired length.
This sweater is two panels sewn together and then the same pattern for the arms.

This might be the coolest sweater that I've ever made. I found the stich for this in The New Crochet Stitch Dictionary by Nele Braas and Eveline Hetty-Burkart. I found this book recently and there are a ton of new stitch patterns in here that I hadn't seen before.
I used Miss Babs Yowsa for the yarn which is a DK weight yarn, but has a massive 560 yards per skein. The main color of the sweater is Plum and the ropes alternate Orchid and Chances are. I used 3 full skeins of the Plum. It's hard to say exactly how much I used of the other two, it wasn't a full skein, but it feels like a bit more than a half. I used a 4.5 mm hook.

Stitches:
ch - chain
sk st - skip stitch
sc - single crochet
hdc - half double crochet
dc - double crochet
fhdc - foundation half double crochet
sp sc - sc inserting the hook in the diagonally located hdc underneath the front loop of the hdc with the hook from the bottom to the top. More succinctly - you're doing a sc but in the middle strand of the hdc. This will create a bit of a ridge.
The stitch pattern is cast on in multiples of 7 + 3. I cast on 105 + 3 (108) for my panels.
Back Panel + 2 front panels:
Row 1: hdc in the 3rd loop from the hook and all the way across
Row 2: ch 1, sc, sc, *ch 5, sk 4 st, sc, sc, sc. Repeat from * across ending with the 3 sc.
Row 3: ch 2, hdc in each stitch or chain all the way across
Row 4: ch 5, sk 2 st, sp sc, sp sc, sp sc, *ch 4, sp sc, sp sc, sp sc. Repeat from * across until you get to the end. Finish by sk 3 st, ch 2, dc in the last stitch.
Row 5: ch 2, hdc in each stitch or chain all the way across
Repeat rows 2-5 until you get to your desired width. Note: in my first attempt I didn't notice that row 3 is chaining 5 and row 4 is chaining 4. Instead I did chain 5 for both - this will do an increase and not keep the rectangle.
I did a total of 41 rows for all of my panels. Sew together the 3 panels leaving 7-8 inches for the arm holes. When you sew together the panels make note of which side has the ridges. It's personal preference which you want for your outside, but make sure all 3 are the same orientation. Across the top I decided to sew 4 sets of holes in or about 6 inches

Next you're going to add on the arms. Make sure that as you're doing this the ridges are the same orientation as the panels. For the sleeves you already have a row of hdc since that was the last row on your panel. I picked up 8 holes for mine and then made it work with the stitches. I know, not exact but that's me.
For the sleeves you need to work back and forth.
Row 1: ch 1, sc, sc, *ch 5, sk 4 st, sc, sc, sc. Repeat from * across ending with a slip stitch from a chain.
Row 2: Turn your work and go the opposite way. ch 2, hdc in each stitch or chain all the way across. End with a slip stitch
Row 3: Turn your work and go the opposite way. ch 5, sk 2 st, sp sc, sp sc, sp sc, *ch 4, sp sc, sp sc, sp sc. Repeat from * end with a slip stitch
Row 4: Turn your work and go the opposite way. ch 2, hdc in each stitch or chain all the way across. End with a slip stitch
Make the sleeves your desired length. My sleeves are 24 rows long.

Next you're going to make the weaving ropes. The pattern says to do 10 fhdc for each pattern repeat plus 11. What I actually did was do the first one pretty long, weave it through, ripped out stitches until I got to the desired length and then used that as my measurement. Not at all exact, but it was easier than trying to count all those stitches. When you're weaving them in make sure to keep them as flat as you can. I think its impossible not to have some kinks, but you want as few kinks as possible. Sew both ends in once you have it looking the way you want.
I really like the alternating colors, but you could do the ropes all one color as well. You'll need a rope for every set of holes. I had an idea that I was going to use one long rope for the sleeves and it just didn't work well, the holes don't line up to neatly go from one row to the next.

I decided that it needed a collar. I did alternating rows of back loop only hdc. I made my collar 18 stitches high and it worked out to be 65 rows long. Sew it to the top of the 3 panels.
Last I decided I wanted buttons for when I wanted to wrap up tight. I had these amazing large hazelnut buttons from Favour Valley Woodworking. It took me a bit to place them because if they were too far down they looked a lot like headlights. I decided to put them both on the right front panel. One is just below the collar on the open side and the other is just below the collar on the sleeve side.
Having the 2 buttons means you can wear it completely open (first picture above), you can button just the inside panel (second picture above), or button both (picture just above)

This sweater was definitely a lot more work than most of my other sweaters, but I absolutely love how it turned out!
I've said it in the past, but many of my patterns now start with me looking through a book of various stitches, picking one, and then designing a sweater around that. This sweater uses the maple fans stitch found in The New Crochet Stitch Dictionary by Nele Braas and Eveline Hetty-Brown. I found a used copy that I've been perusing a lot recently. If you can find a copy and like to look at stitches, I'd highly recommend it. I did modify the stitch a bit to be double crochets instead of trebles to make the holes a little smaller.
I made this sweater mostly during Colorfest a few weeks ago. It was definitely an emergent design as I was in between people being in my booth that day. The yarn is Worsted Tweed by American Ewe Yarn in Glass of Port. I had 3 skeins of yarn and I used almost all of it. Each skein is 237 yards and it is a worsted weight tweed. Obviously this sweater has some larger holes in it so it definitely needs a shirt under it, but despite that it is really warm.

This pattern uses a 5.5 mm yarn
Stitches:
ch - chain
sk st
sc - single crochet
dc - double crochet
dc2tog - 2 double crochet into the same stitch and crocheted together
Front and back panels (make 2). Cast on in multiples of 4 + 2
I cast on 58
Row 1: sc all the way across
Row 2: ch 5 (counts as dc + 2 ch), dc2tog in the starting stitch, sk 2 st, dc2tog, ch 3, dc2tog in the same stitch, * sk 2 st, dc2tog, ch 3, dc2tog in the same stitch. Repeat from * across end with a dc
Row 3: ch 3, * dc2tog in the midle of the 3 chains, ch 3, dc2tog in the same stitch. Repeat from * across ending with a dc.
Repeat rows 2 and 3 until you reach your desired length. I had 18 rows.

Stitch the two panels together leaving approximately 8 inches for the arms and neck. I decided that I wanted the V's facing up, but you could do either up or down. Make sure your panels are facing the same direction though.
For the neck add a row of sc around the collar.
For the sleeves pick up 10 V's.
Row 1: ch 3, dc in the starting stitch, sk 2 st, dc2tog, ch 3, dc2tog in the same stitch, * sk 2 st, dc2tog, ch 3, dc2tog in the same stitch. Repeat from * across slip stitch to join
Row 2: ch 3, * dc2tog in the midle of the 3 chains, ch 3, dc2tog in the same stitch. Repeat from * across slip stitch to join
I made the sleeves 10 rows long.

This is my second poncho made with a Fusion 1000 kit from Cat Mountain Fiber Arts. These come as a kit with 10 different yarns of a similar color but different textures. This one is blacks and greys and I used almost all of it.
I wanted something that would match a lot of things, but that I could also wear at work.
This pattern uses a 5 mm hook.
Stitches:
ch - chain
sl st - slip stitch
sc - single crochet
hdc - half double crochet
dc - double crochet
bobble - yarn over, pull up, yarn over, pull up, yarn over, pull up, pull through all the chains
inc stitch - whatever stitch you're doing two in the first inc, ch 2, two in the second inc

I started with the softest yarn because that's what I would want on my neck.
Chain 30 and sl st to join making sure you haven't twisted the chain.
Mark 15 stitches apart.
Row 1: ch 3, dc until your first stitch marker, in the same stitch (2 dc, ch 2, 2 dc), hdc to the second stich marker, in the same stitch (2 dc, ch 2, 2 dc), hdc until the end and sl st to join
Row 2: ch 3, sk st, *bobble, ch 2, sk st. In the increase stitch do hdc not bobbles. Repeat from * all the way around, sl st to join.
Row 3: ch 3, 2 dc in the chain space. In the inc stitch do your dc. Sl st to join.
Row 4: ch 2, hdc all the way around except your inc stitchs. Sl st to join
Row 5: ch 2, hdc, ch all the way around except your inc stitchs. Sl st to join
Row 6: ch 2, , hdc all the way around except your inc stitchs. Sl st to join
Repeat rows 1-6. For the first yarn I made sure to save some because I wanted to go back and do the collar so I only did 5 rounds before I switched. For all the other skeins, I used them until they were gone and then just wove in the next yarn. I didn't worry about only doing it on a new row.
For the arm openings I went with row 18. You might want do to it earlier or later depending on how where it feels comfortable for you. I decided which side I wanted to be the front and then experimented with where the arm holes should go. They ended up much wider than I thought, but that was where it was most comfortable. I had the arm holes start 19 inches from the inc, including the inc stitches but not the chains - mark it. Then I counted 12 stitches inward and mark that.
When you get to the first marker chain 14 stitches loosely then join at the second marker with whatever stitch you are on. Do the same for the second arm hole. In the next row treat the chain stitches as if they are normal stitches for the row.
Boarder:
Save the last skein for the boarder. I ended on a hdc ch row and I think that made for a nice alignment with the boarder.
Boarder row 1: ch 6 (counts as a dc and 3 ch), sk a chain space, *3 dc in the same chain space, ch 3, dc in the chain space, ch 3. Repeat from *. Sl st to join. It worked out perfectly for me to do 3 dc in the inc stitch so I went with that.
Boarder row 2: ch 4 (counts as sc and 3 ch), *in the second dc stitch (2 dc in the same stitch then ch 6 then sc in the 4th chain, ch 3 then 2 dc in the same stitch), ch 3, sc in the next dc stitch, ch 3. Repeat from * around sl st to join.

I had just enough of the boarder yarn left to add a row of hdc around the sleeves. No particular reason other than asthetics. I also added a button on each one to be able to close it.
The last thing to do is add your collar. I had enough yarn for 4 rows. For the first 3 I did hdc skipping a stitch every 10 stitches to decrease it a bit. The last row I did hdc then chain.

Still looking at making some dark solid sweaters I can wear for work that will match a lot of things. This cardigan is very soft, and will work with a lot of different outfits.
The pattern is based on a stitch I found in a book - shells and arcs that was really easy to do.

Cast on in multiples of 8 + 5
Row 1: sc, * ch 5, sk 3, sc. Repeat from * to end with the sc
Row 2: ch 3, 3 dc in the ch space, * ch 3, sc in the next chain space, ch 3, 3 dc in the ch space. Repeat from * ending with a dc
Row 3: ch 6, sc in the 4th dc from the previous row, *ch 5, sc in the 1st dc from the previous row, ch 5, sc in the 4th dc of the previous row. Repeat from * ending with a sc
Row 4: ch 6, * sc in the ch space of the previous row, ch 3, 3 dc in the chain space of the previous row, ch 3. Repeat from * ending with a dc.
Repeat rows 2-4 until you get your desired length.

This pattern is like most of my cardigans - make a back panel then male two side panels that are slightly smaller than 1/2 the width of the back panel. Sew together leaving arm holes. Then pick up stitches for the arms to your desired length. Then add a collar and pockets.


What a great name for yarn - Crumble Slubby. It's such a great name I had to name the pattern after it. This shawl worked up really quickly. I did most of it at my show last weekend and just had to figure out the edging. I used 2 full skeins of the Crumble Slumby by Kim Dyes Yarn. It is a fingering weight yarn that is 438 yards.
This pattern uses a 4mm hook. I've been using the 4mm hook a lot lately. I think because I've been making a lot of lightweight summery things.

Stitches:
ch - chain
sl st - skip stitch
hdc - half double crochet
dc - double crochet
tr - treble crochet
Start with a magic circle.
Row 1: ch 4, dc, dc, ch 2, dc, dc, ch, dc
Row 2: ch 4, dc in the first dc, 2 dc in the second dc, ch 2, 2 dc in the first dc, ch, dc, ch, dc
Row 3 - 9: ch 4, dc in each of the chain spaces leading to the center space then dc ch in the first dc of the chain space of the last row. In the center space 2 dc, ch 2, 2 dc then ch, dc in the second dc of the chain space from the last row. Ch, dc in each of the chain spaces to the end.
Row 10: ch 3, 2 dc in each chain space leading to the center space then dc ch in the first dc of the chain space of the last row. In the center space 2 dc, ch 2, 2 dc then 2 dc in the second dc of the chain space from the last row. 2 dc in each of the chain spaces to the end, dc in the last stitch.
Row 11: ch 3, dc in each stitch leading to the center space. In the center space 2 dc, ch 2, 2 dc. dc in each stitch to the end of the row.
Row 12: ch 4, then sk st, dc to the center space. In the center space 2 dc, ch 2, 2 dc then ch dc in each stitch to the end of the row.
Row 13: Repeat row 10
Row 14: ch 2, hdc in each stitch leading to the center space. In the center space 2 hdc, ch 2, 2 hdc. hdc in each stitch to the end of the row.
Row 15: Repeat row 11
Row 16: Repeat row 12
Row 17 - 24: Repeat row 3
Row 25: Repeat row 10
Row 26: Repeat row 11
Row 27: Repeat row 12
Row 28: Repeat row 10
Row 29: Repeat row 14
Row 30: Repeat row 11
Row 31: Repeat row 12
Row 32-39: Repeat row 3
Row 40: Repeat row 10
Row 41: Repeat row 11

Now we're going to do the edging. You're going to do one row of hdc along the top of the triangle. For all of the rows that have dc do 3 dc, for the rows that have a hdc do 2 dc. This will help make the top look a little more even.
Edging row along the other two sides of the triangle: ch 4, Repeat tr ch 2 tr in the next stitch to the center. In the second stitch of the dc from the last round 2 tr ch 5 2 tr. Repeat tr ch 2 tr ending with a tr.
That's it. Super simple and you'll be surprised how quickly this shawl works up.

This pattern uses the Lace Star Flower Stitch that I found in this pattern. I had two skeins of this yarn from when I used to belong to a yarn of the month club. This is Audine Wools Shine Sport in Sky. The yarn is a sport weight and was 350 yarns. I used almost the entire 2 skeins of yarn.

I'm not going to recreate the stitch pattern, since it is linked on the Joy of Motion Crochet site. The back Was 75 stitches wide, the two side panels were 35 stitches wide, and the pockets were 25 stitches wide. I used the same stitch on the sleeves, made them 3/4 length, and at the end of the sleeves I did 5 rows of chain 3 single crochet. For the collar I added a few more rows of the star flower and then did the same 5 rows of the chain 3 single crochet.

I'm happy with how this turned out. Simple little cardigan.

This cute little cardigan came together quickly. It uses 3 skeins of Malabrigo Rios Worsted weight yarn. Each skein is 210 yards and I used almost all of it. Unfortunately it does not have a dye lot or a colorway and I can't remember where I picked it up.
I've been into the 3/4 length sleeves lately. In this particular case it was necessary because I definitely didn't have enough yarn for full sleeves.

For this pattern I used a 6 mm hook.
Stitches:
ch - chain
sk st
sc - single crochet
dc - double crochet
Back Panel
ch 70
Row 1: dc in the 4th chain from the hook, *ch2, sk 2 st, dc, dc. Repeat from * across, ch 2 and dc in the last stitch
Row 2: ch 3, dc in the ch space, * ch2, 2 dc in the chain space. Repeat from * across, ch 2 and dc in the last stitch
Repeat row 2 until its 32 rows long (or your desired length).
Side Panels - Make 2
ch 30
Row 1: dc in the 4th chain from the hook, *ch2, sk 2 st, dc, dc. Repeat from * across, ch 2 and dc in the last stitch
Row 2: ch 3, dc in the ch space, * ch2, 2 dc in the chain space. Repeat from * across, ch 2 and dc in the last stitch
Repeat row 2 until its 32 rows long (or your desired length).

Sew together the top of the sweater and down the sides leaving 7-8 inches for the sleeve opening.
For the sleeves you're going to repeat the same pattern, but alternate directions.
Row 1: ch 3, dc in the ch space, * ch2, 2 dc in the chain space. Repeat from * across, ch 2 and sl st to join
I picked up 11 of the dc around. Repeat row 2 until you have 15 rows. For each row change directions so that you have a chain space.
Turn the cardigan inside out.
On the edge of the sleeve:
Row 1: *ch 4, sc in the chain space. Repeat from * around, sc at the start.
Row 2-3: Repeat row 1.

Collar
Row 1: * ch 4, sc in the chain space. Repeat from * around, sc to end.
Row 2-5: Repeat row 1
Pockets - make 2
ch 18
Row 1: dc in the 4th chain from the hook, *ch2, sk 2 st, dc, dc. Repeat from * across, ch 2 and dc in the last stitch
Row 2: ch 3, dc in the ch space, * ch2, 2 dc in the chain space. Repeat from * across, ch 2 and dc in the last stitch
Rows 3-8: repeat row 2
Sew on pockets
I loved this yarn when I bought it, but it wasn't until I was actually starting to use it that I realized that it was rainbow colored, although definitely darker than your usual rainbows. I bought this yarn at the Maryland Sheep and Wool from Briar Rose Fibers. The actual colorway wasn't labelled, but it is their promises yarn. Their shop is currently closed so I can't link to it, but its a worsted weight yarn that is 500 yards a skein and I used nearly all of 2 skeins.
This worked up really quick while I was travelling last week. I definitely was getting looks as I was trying to sew it together in the Delta lounge late Thursday night. I have been travelling so much for work that I have barely touched clay. I have been watching a ton of videos though so I have all these ideas for when I have time this weekend. I also have 3 kilns worth of bisque to glaze, but I'm itching to make more vs glaze
Also ClayShareCon is this week so I know I'm going to have more ideas soon.
This pattern uses a 5mm hook.
Stitches:
ch - chain
sk - skip
hdc - half double crochet
sl st - slip stitch
Back panel
Cast on 81
Row 1: sc in the second stitch from the hook, sc, *Ch 4, sk next 4 chs, sc in each of the next 2 ch. Repeat from * across.
Row 2: ch 3, sk 1 sc, (2 hdc, ch 2, 2 hdc) in the next ch sp. *Sk 2 sc, (2 hdc, ch 2, 2 hdc) in the next ch4sp. Repeat from * across to the last 2 sc. Sk 1 sc, 1 hdc in the last sc.
Row 3: ch 5, sk 2 hdc, 2 sc in the next ch 2 space. *Ch 4, sk 4 hdc, 2 sc in the next ch2sp. Repeat from * across to the last 3 hdc. Ch 2, sk 2 hdc, 1 hdc in the last hdc.
Row 4: ch 4, 2 hdc in ch2sp. *Sk 2 sc, (2 hdc, ch 2, 2 hdc) in the next ch 4 sp. Repeat from * across to the last 2 sc. Sk 2 sc, 2 hdc in the last ch2sp, ch 1, 1 hdc in the last hdc.
Row 5: ch 1, 1 sc in the first hdc and 1 sc in the next ch 1 sp. *Ch 4, sk 4 hdc, 2 sc in the next ch 2 sp. Repeat from * across to the last 5 hdc. Ch 4, sk 2 hdc, 1 sc in the next ch 1 sp and 1 sc in the last hdc.
Repeat rows 2-5 until you reach your desired length. I liked the look better ending on a row 2/4 vs a 1/4. I have about 50 rows
Side panels - make 2
Cast on 41
Row 1: sc in the second stitch from the hook, sc, *Ch 4, sk next 4 chs, sc in each of the next 2 ch. Repeat from * across.
Row 2: ch 3, sk 1 sc, (2 hdc, ch 2, 2 hdc) in the next ch sp. *Sk 2 sc, (2 hdc, ch 2, 2 hdc) in the next ch4sp. Repeat from * across to the last 2 sc. Sk 1 sc, 1 hdc in the last sc.
Row 3: ch 5, sk 2 hdc, 2 sc in the next ch 2 space. *Ch 4, sk 4 hdc, 2 sc in the next ch2sp. Repeat from * across to the last 3 hdc. Ch 2, sk 2 hdc, 1 hdc in the last hdc.
Row 4: ch 4, 2 hdc in ch2sp. *Sk 2 sc, (2 hdc, ch 2, 2 hdc) in the next ch 4 sp. Repeat from * across to the last 2 sc. Sk 2 sc, 2 hdc in the last ch2sp, ch 1, 1 hdc in the last hdc.
Row 5: ch 1, 1 sc in the first hdc and 1 sc in the next ch 1 sp. *Ch 4, sk 4 hdc, 2 sc in the next ch 2 sp. Repeat from * across to the last 5 hdc. Ch 4, sk 2 hdc, 1 sc in the next ch 1 sp and 1 sc in the last hdc.
Repeat rows 2-5 until you reach your desired length. These need to be the same length as the back panel
Sew the front panels to the back panel leaving about 7 inches for the arms.
Sleeves
Row 1: ch 3, sk 1 sc, (2 hdc, ch 2, 2 hdc) in the next ch sp. *Sk 2 sc, (2 hdc, ch 2, 2 hdc) in the next ch4sp. Repeat from * across to the last 2 sc. Sk 1 sc, sl st to join. I picked up 10 of the 2 hdc, ch 2, 2 hdc
Row 2: ch 5, sk 2 hdc, 2 sc in the next ch 2 space. *Ch 4, sk 4 hdc, 2 sc in the next ch2sp. Repeat from * across to the last 3 hdc. Ch 2, sk 2 hdc, sl st to join.
Row 3: repeat row 1
Row 4: repeat row 2
Row 5: repeat row 1
Row 6: repeat row 2
Row 7: repeat row 1
Row 8: repeat row 2
Row 9: repeat row 1, but don't do the last 2 hdc, ch 2, 2 hdc - so you should have 9 instead of 10.
Row 10: repeat row 2
Row 11: repeat row 1
Row 12: repeat row 2
Row 13: repeat row 9 - you should end up with 8 now
Row 14: repeat row 2
Row 15: repeat row 1
Row 16: repeat row 2
Row 17: repeat row 1
You can adjust this to your desired length for your sleeves, I have kind of short arms and I made this on the short side. I like the look better ending on a row 1.

Colar
Turn the sweater right side out. Lay it flat in front of you and start at the bottom right corner.
Row 1: ch 3, (hdc, hdc) into the same space, *sk to the next chain space, 3 hdc. Repeat from * up the right side across the back, and down the left side, hdc in the last stitch.
Repeat row 1 for 9 rows or until you have your desired colar. I really like the thick colar on this one.
Pockets - make 2
Cast on 11
Row 1: sc in the second stitch from the hook, sc, *Ch 4, sk next 4 chs, sc in each of the next 2 ch. Repeat from * across.
Row 2: ch 3, sk 1 sc, (2 hdc, ch 2, 2 hdc) in the next ch sp. *Sk 2 sc, (2 hdc, ch 2, 2 hdc) in the next ch4sp. Repeat from * across to the last 2 sc. Sk 1 sc, 1 hdc in the last sc.
Row 3: ch 5, sk 2 hdc, 2 sc in the next ch 2 space. *Ch 4, sk 4 hdc, 2 sc in the next ch2sp. Repeat from * across to the last 3 hdc. Ch 2, sk 2 hdc, 1 hdc in the last hdc.
Row 4: ch 4, 2 hdc in ch2sp. *Sk 2 sc, (2 hdc, ch 2, 2 hdc) in the next ch 4 sp. Repeat from * across to the last 2 sc. Sk 2 sc, 2 hdc in the last ch2sp, ch 1, 1 hdc in the last hdc.
Row 5: ch 1, 1 sc in the first hdc and 1 sc in the next ch 1 sp. *Ch 4, sk 4 hdc, 2 sc in the next ch 2 sp. Repeat from * across to the last 5 hdc. Ch 4, sk 2 hdc, 1 sc in the next ch 1 sp and 1 sc in the last hdc.
Row 6: repeat row 2
Row 7: repeat row 3
Row 8: repeat row 4
Row 9: repeat row 5
Row 10: repeat row 2
Sew on the pockets onto the front panels. I did these 2 inches from the bottom and an inch back from where the colar starts.

I made most of this top at one of my recent holiday shows, but needed to finish it. At most shows I don't have enough space to sew the pieces together so it has to wait until I'm home. This yarn from Morehouse Farm is really soft and very warm. I find sometimes that I want a warm sweater for inside where I'm not going to be too warm. That's why I made this sweater with an open stitch. I actually was going to make the sleeves longer, but I didn't have enough yarn. You could easily extend them if you wanted to (and had enough yarn).
I used 3 skeins of the Blueberry and 2 of the Wisteria from their 3 strand worsted. This is a nice size worsted weight yarn and their skeins have approximtely 145 yards of yarn. You could make this with any worsted weight yarn.

This pattern uses a 6 mm hook.
Stitches:
ch - chain
sk - skip stitches
dc - double crochet
Front and Back panels - make 2
Cast on 28 with the Blueberry
Row 1: dc in the 6th stitch from the hook, dc in the same stitch, ch 2, 2 more dc in the same stitch, sk 4 stitches, *2 dc ch 2 2 dc in the next stitch, sk 4 stitches. Repeat from * until the end of the row, dc in the last stitch
Row 2: ch 3, *2 dc ch 2 2 dc in the chain space. Repeat from * until the end of the row, dc in the last stitch
Rows 3-16: repeat row 2
Switch yarns to the Wisteria
Rows 17-24: repeat row 2

Sew the 2 panels together. Leave a 9 inch opening at the top for the neck and 7-8 inches for the sleeves. I also like to leave 1-2 inches at the bottom, but this is just stylistic.
Make the sleeves:
Row 1: ch 3, *2 dc ch 2 2 dc in the chain space. Repeat from * until the end of the row, dc in the last stitch. Pick up 9 stitches.
Rows 2-5: repeat row 1
Weave in all ends and flip the shirt right side out.

I didn't buy these two yarns thinking that they went together. They just happened to end up next to each other in my yarn storage (under bed shoe containers) and I went - oooooh. The main blue green is from Briar Rose and is 3 skeins of their whisper #117. The olive green is a skein and a half in Hunt Valley Cashmere that I had leftover from my Spring Flower Top made earlier this year.
I feel like this sweater is gorgeous, but the colors remind me of algae in a pond which is where I came up with the name.

Both of these yarns are DK weight and you could use any two complimentary DK weight yarns. I used a 5.5 mm hook for this pattern. The rectangles for the sweater in this pattern are made vertical - which means the same cast on for the back panel and both front panels. If you want it longer or shorter then add or remove the number you cast on.
Stitches:
ch - chain
sl st - slip stitch
sk st - skip stitch
hdc - half double crochet
bobble - yarn over, pull through, yarn over, pull through, yarn over, pull through, yarn over, pull through, pull through all 9 stitches on the hook, chain
Back Panel:
cast on 90
Row 1: hdc in the 2nd loop from the chain and to the end
Row 2: ch 3 (counts as hdc and a ch), sk st, hdc, ch all the way across ending with a hdc in the last stitch
Row 3: ch 3, hdc in the chain space, ch all the way across ending with a hdc in the last stitch
Row 4-6: repeate row 3
Row 7: ch 2 (counts as first hdc), hdc in the first chain space, 2 hdc in each of the chain spaces until the end. In the last ch space 1 hdc and one hdc in the last stitch
Row 8: ch 2, hdc in each stitch across
Row 9: repeat row 2
Row 10-13: repeat row 3
Row 14: repeat row 8
change yarn colors here
Row 15: ch 2, *sk st, bobble, repeat from * until the last stitch ending with a hdc
Row 16-18: ch 2, bobble in the chain space all the way across ending with a hdc
change back to original yarn color
Row 19: ch 2, hdc in the same space, 2 hdc in each of the chain spaces until the end. In the last ch space 1 hdc and one hdc in the last stitch
Row 20: repeat row 2
Row 21-24: repeat row 3
Row 25: repeat row 7
Row 26: repeat row 8
Row 27: repeat row 2
Row 29-31: repeat row 3
Row 32: repeat row 7
Front Panels - Make 2
Row 1: hdc in the 2nd loop from the chain and to the end
Row 2: ch 3 (counts as hdc and a ch), sk st, hdc, ch all the way across ending with a hdc in the last stitch
Row 3: ch 3, hdc in the chain space, ch all the way across ending with a hdc in the last stitch
Row 4-6: repeate row 3
Row 7: ch 2 (counts as first hdc), hdc in the first chain space, 2 hdc in each of the chain spaces until the end. In the last ch space 1 hdc and one hdc in the last stitch
Row 8: ch 2, hdc in each stitch across
Row 9: repeat row 2
Row 10-13: repeat row 3
Row 14: repeat row 8

Line up the front panels with the back panel - they should go right to the edge of the second color of yarn. Leave about 8 inches for the arm hole. I also like to leave around 2 inches on the bottom, but this is stylistic. Sew the panels together.
Sleeves (done on each arm):
Row 1: ch 2, hdc all the way around and then sl st to join. I picked up 48 stitches - the exact number doesn't matter as long as it's close
Row 2: ch 3 (counts as hdc and a ch), sk st, hdc, ch all the way across ending with a sl st to join
Row 3: ch 3, hdc in the chain space, ch all the way across ending with a sl st to join
Row 4-6: repeate row 3
Row 7: ch 2 (counts as first hdc), hdc in the first chain space, 2 hdc in each of the chain spaces until the end. End with a sl st to join
Row 8: ch 2, hdc in each stitch across, sl st to join
Row 9: repeat row 2
Row 10-13: repeat row 3
Row 14: repeat row 8
change yarn colors here
Row 15: ch 2, *sk st, bobble, repeat from * until the last stitch ending with a sl st to join
Row 16: ch 2, bobble in the chain space all the way across ending with a sl st to join
change back to original yarn color
Row 17: ch 2, hdc in the same space, 2 hdc in each of the chain spaces until the end. End with a sl st to join
Row 18: repeat row 2
Row 19-22: repeat row 3
Row 23: repeat row 7
change yarn colors here
Row 24: ch 2, *sk st, bobble, repeat from * until the last stitch ending with a sl st to join
Row 25: ch 2, bobble in the chain space all the way across ending with a sl st to join

Collar
Turn the sweater right side out. When you lay it flat in front of you start at the bottom right corner
Row 1: ch 2, hdc all the way around
Row 2: ch 3 (counts as hdc and a ch), sk st, hdc, ch all the way across ending with a hdc in the last stitch
Row 3: ch 3, hdc in the chain space, ch all the way across ending with a hdc in the last stitch
Row 4: repeate row 3
Row 7: ch 2 (counts as first hdc), hdc in the first chain space, 2 hdc in each of the chain spaces until the end. In the last ch space 1 hdc and one hdc in the last stitch
change yarn colors here
Row 8: ch 2, *sk st, bobble, repeat from * until the last stitch ending with a hdc
Row 9: ch 2, bobble in the chain space all the way across ending with a hdc

Pockets (make 2):
cast on 16
Row 1: hdc in the 2nd loop from the chain and to the end
Row 2: ch 2, hdc in each stitch across
Row 3: ch 3 (counts as hdc and a ch), sk st, hdc, ch all the way across ending with a hdc in the last stitch
Row 4: ch 3, hdc in the chain space, ch all the way across ending with a hdc in the last stitch
Row 5-7: repeate row 3
Row 7: ch 2 (counts as first hdc), hdc in the first chain space, 2 hdc in each of the chain spaces until the end. In the last ch space 1 hdc and one hdc in the last stitch
change yarn colors here
Row 8: ch 2, *sk st, bobble, repeat from * until the last stitch ending with a hdc
Row 9: ch 2, bobble in the chain space all the way across ending with a hdc
Sew on the pockets where comfortable for your arm length. My pockets are 5 rows from the bottom and 7 rows back from the end of the collar.
Weave in all ends and voila a great fall sweater.
This is based on the Let it Bee Wrap from Heart, Hook, Home. However, instead of making a wrap I made a cute little cover up.

I wish I remembered what this yarn was. I've had it for years just staring at me. All I remember is that it was made with real silver in it. I had a couple of balls in my stash just laying there for a while and I decided to just figure something out. This is probably closest to a sport weight yarn and I used a 4.5 mm hook. You could easily make this with any yarn and just adjust the width and length to what you want it.
I still cast on 68 like the pattern said. I had 5 balls of the green and 4 of the silver. I did as many rows as I could with what I had off 2 balls of the green then switched to the silver. At the end with the last ball I was able to add 2 rows to each size and that still left me enough to sew it together. I ended up being able to 5 rows of green then 5 of silver ending with 2 rows of green. Make 2 identical panels. Again the exact length can vary based on your taste.

Once you have the two panels - sew it up. I wanted the neck to be fairly loose so I left a 13 inch neck and I left 7 inches for each of the sleeves. Unlike my usual patterns I didn't leave any slack on the side. This is because I wanted to finish it with a row of sc all the way around the bottom. I really like the way this turned out considering I started with no real plan :)

This summer sweater came together really quick. I really like summer sweaters to have fairly big holes and use a lightweight yarn. I like wearing them when there is a light breeze. I used Miss Babs yarn Katahdin in Mystery Land. This is a fingering weight yarn and the skein was 1750 yards. I used most of it, but not all of it. If I had to guess there are a couple of hundred yards left.

This pattern uses a 4 mm hook.
Stitches:
ch - chain
sk - skip
sc - single crochet
hdc - half double crochet
Back panel - cast on 100
Row 1 - hc in the 3rd stitch from the hook, *ch 3, sk 3, hdc, hdc. Repeat from * until the end
Row 2 - ch 2, hdc, *ch3, hdc in the hdc, hdc in the hdc. Repeat from * until the end
Repeat row 2 until you get to your desired length. Mine is 53 rows.
Side panel - make 2
Cast on 45
Row 1 - hc in the 3rd stitch from the hook, *ch 3, sk 3, hdc, hdc. Repeat from * until the end
Row 2 - ch 2, hdc, *ch3, hdc in the hdc, hdc in the hdc. Repeat from * until the end
Repeat row 2 until you get to your desired length. Mine is 53 rows.
Sew on the side panels leaving about 7-8 inches for the arms. I also like to start about 2 inches from the bottom.

For the arms pick up 60 stitches doing the same pattern as you did for the panels.
Row 1 - ch2, hdc, *ch 3, sk 3, hdc, hdc. Repeat from * until the end
Row 2 - ch 2, hdc, *ch3, hdc in the hdc, hdc in the hdc. Repeat from * until the end
Repeat row 2 until you get to the desired arm length minus about 2 inches. Mine is 17 rows.
Sleeve Border
Row 1 - ch 3, *hdc in the chain space, ch 1, hdc in the hdc below. ch 1. Repeat from *, slip stitch to join.
Row 2 - ch 3, * hdc in the chain space, ch 1. Repeat from *, slip stitch to join.
Row 3 - Repeat row 2
Row 4 - ch 3, * sc in the chain space, ch 3. Repeat from *, slip stitch to join.
Row 5 and 6 - repeat row 4

Sweater Border
Make sure the sweater is right side out. Start at the bottom left corner on the inside.
Row 1 - ch 3, *sk st, hdc. Repeat from * up the one side, across the back and down the other side. It doesn't matter how many stitches you pick up as long as it looks ok.
Row 2 - ch 3, * hdc in the chain space, ch 1. Repeat from *, slip stitch to join.
Row 3 through 5 - Repeat row 2
Row 6 - ch 3, * sc in the chain space, ch 3. Repeat from *, slip stitch to join.
Row 7 through 10 - repeat row 4

Pockets - make 2
Cast on 20
Row 1 - ch 3, hdc, * ch, sk st, hdc. Repeat from * across.
Row 2 - - ch 3, * hdc in the chain space, ch 1. Repeat from *, slip stitch to join.
Row 3 through 11 - Repeat row 2
Row 12 - ch 3, * sc in the chain space, ch 3. Repeat from *, slip stitch to join.
Row 13 and 14 - repeat row 4
Sew on the pockets where it feels good for the arms. Mine are rows up from the bottom and one row back from the end of the original panel.


