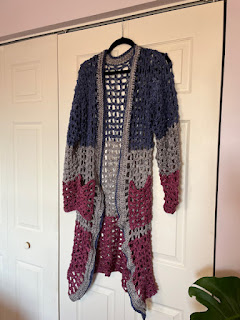
I love this yarn. I know I say that a lot, but I do. This yarn comes from Greenwood Hill Farm and is 100% Merino Wool. These gorgeous colors are the natural colors of the sheep. The colors here are Slate and Silver.

This pattern uses a 4 mm hook and took 3 skeins of the slate and 2 skeins of the silver. Each skein is 180 yards.
Stitches:
ch - chain
sk st - skip stitch
sl st - slip stitch
sc - single crochet
hdc - half double crochet
dc - double crochet
tc - triple crochet
The cast on for this is in multiples of 16 + 2. On the back side I did 66 stitches. I wasn't sure if the shirt was going to be big enough so on the front side I did 80 stitches. Some of you might be thinking - how does that work the front and the back being different number of stitches? When you sew it together you just leave the extra stitches in the neck. It does mean that the shirt has an obvious front side. You can decide to do what I did or have two exactly the same size.
It's also worth noting that all of the even rows are sc all the way across.

Row 1: sc in the 2nd chain from the hook, * ch 1, sk st, hdc, ch, sk st, dc, ch, sk st, tc, ch, sk st, tc, ch, sk st, dc, ch, sk st, hdc, ch, sk st, sc, ch, sk st, sc. Repeat from * ending on a sc
Row 2: sc in each chain across
Row 3: ch 4, tc, *ch 1, sk st, dc, ch 1, sk st, hdc, ch 1, sk st, sc, ch 1, sk st, sc, ch 1, sk st, hdc, ch 1, sk st, dc, ch 1, sk st, tr, ch 1, sk st, tr. Repeat from * ending on a tc
Row 4: Repeat row 2
Row 5: ch 2, sk 2, sc, * ch 1, sk st, hdc, ch, sk st, dc, ch, sk st, tc, ch, sk st, tc, ch, sk st, dc, ch, sk st, hdc, ch, sk st, sc, ch, sk st, sc. Repeat from * ending on a sc
Repeat Rows 2-5 for pattern always ending on an even row.
Row 43: change colors and continue rows 43-52 in the second color.
Make your second panel deciding whether you're going to make it the same width or 16 stitches wider.
Line up the two panels on the outside and pin. If you've made the front panel larger then pay attention to the back panel. You want a neck opening that is about 10 inches wide. Measure the middle and then go 5 inches in either direction. Line up the front panel starting with the shoulder - you will have extra material in the neck in the front panel.
Sew up the sides. I almost always start my sides 1.5 to 2 inches from the bottom. Leave an arm hole that is 8 inches wide at the top.
For the sleeves use the same color as the top. I always start my sleeves in the armpit so I wasn't too concerned at getting exactly 66 stitches. Start your yarn and sc around. I picked up 62 stitches ending on a hdc. Sl st to join.
Row 1: sc in the 2nd chain from the hook, * ch 1, sk st, hdc, ch, sk st, dc, ch, sk st, tc, ch, sk st, tc, ch, sk st, dc, ch, sk st, hdc, ch, sk st, sc, ch, sk st, sc. Repeat from *. Depending on how many stitches you picked up your ending might be different. With 62 I ended on a hdc. Sl st to join
Row 2: sc in each chain across
Row 3: ch 4, tc, *ch 1, sk st, dc, ch 1, sk st, hdc, ch 1, sk st, sc, ch 1, sk st, sc, ch 1, sk st, hdc, ch 1, sk st, dc, ch 1, sk st, tr, ch 1, sk st, tr. Repeat from *. Sl st to join
Row 4: Repeat row 2
Row 5: repeat row 1
Row 6: repeat row 2
Row 7: repeat row 3
Row 8: repeat row 2
Row 9: repeat row 1. You're going to start tapering in so end on a dc instead of the hdc
Row 10: repeat row 2
Row 11: repeat row 3. Taper again end on a sc
Row 12: repeat row 2
Row 13 repeat row 1. Taper again end on a tc
Row 14: repeat row 2
Row 15: repeat row 3. Last taper end on a hdc
Row 16: repeat row 2.
Weave in all of your ends and you're done!
This yarn is so soft. It's made from silk, merino, and sea cell. What is sea cell you ask? Sea cell is a fiber that's made from seaweed! I got this yarn at the Maryland Sheep and Wool having never heard of sea cell. All I knew is that it was just so soft and silky. This particular yarn came from Yarn Hygge. Something about these colors cried out color block to me. I used 2 skeins each of Blues, Silver, and Burgandy. Each skein is approzimately 240 yards.

This pattern uses a 5mm hook.
Stitches:
sk - skip
ch - chain
sc - single crochet
scblo - single crochet back loop only
hdc - half double crochet
hdcblo - half double crochet back loop only
bobble - yarn over, pull loop up, yarn over, pull loop up, yarn over (7 loops on hook), pull all the way through
This sweater is made using the mesh stitch with a bobble which is addapted from a popcorn mesh stitch. Cast on in multiples of 6 + 2. For the back panel I cast on 56 (54 + 2).

Row 1: Sc in the 2nd ch from the hook. * ch 3, sk 2 chains, bobble in next chain, ch 3, sk 2 chains, sc in the next ch. Repeat from * across.
Row 2: Ch 1, sc in the first sc, * 3 sc in the chain space, skip the bobble, 3 sc in the chain space, sc in the sc. Repeat from * across.
Row 3: Ch 2, dc in the same sc, * ch 3, sk next 3 sc, sc, ch 3, sk next 3**, bobble. Repeat from * across ending with the **, dc in last stitch.
Row 4: Ch 1, sc, *3 sc in the chain space, sc in the sc, 3 sc in the chain space, skip the bobble. Repeat from * across, sc in the last stitch.
Row 5: Ch 1, sc in first sc, * ch 3, sk 3 sc, bobble in next sc, ch 3, sk 3 sc, sc. Repeat from * across, sc in the last stitch.
You're going to repeat rows 2-5 until you reach your desired length. The big decision was how big to make the color blocks. I ended up deciding that each block should be 26 rows. Based on that....rows 1-26 are burgandy, rows 27-52 are silver, and rows 57-78 are blues. You could absolutely change this up to make the blocks, bigger smaller, or even stripes. What's important for this pattern to look right is that you change out on an odd row. The even rows make the row below it look finished.

For the side panels do the exact same pattern as you did for the back, but make them narrower. For my sweater I cast on 24. Make 2 side panels.
Next step is to sew the side panels to the back panel. I found that this was easier than on a lot of sweaters because all I had to do was line up the holes. The top of the side panel and the back panel are sewed together across. There will end up being 3 holes between the two side panels. For the arms I measured to get about 8 inches and found that each hole was about an inch so I left 8 holes open on either side. Finally, I left 2 holes open at the bottom - this is purely asthetic. Since this sweater is rather holey I decided when sewing up the sides that I wanted to use the color of the color block as I sewed and have a little overlap rather than pick 1 color to sew with. This made my seems much less noticeable.
Next step is to do the arms. We're going to repeat the same pattern as above except the last stitch for each will turn into a slip stitch. If you've been reading my patterns you know that I'm not super dilligent on you must pick up x number of stitches on the arm hole. Most of the time my sleeve patterns stitches are in 1s or 2s. For this pattern it matters more because we want to be able to have the nice bobble mesh. What's nice though is that you can line up with the holes. However, by this time you should be comfortable with the overall pattern so if you pick up in a multiple of 3 vs 6 - it's not a big deal. I picked up 9 "holes" for a total of 59 stitches.
For the sleeves I made the determination to make the color blocks smaller. I ended up deciding each block should be 14 rows so based on that...rows 1-14 are blues, rows 15-28 are silver, and rows 29-43 are burgandy (yes I know there's an extra row, I'll explain later).
I always start arms on tops in the arm pit so it hides the seams a bit.
Row 1: Sc in the 2nd ch from the hook. * ch 3, sk 2 chains, bobble in next chain, ch 3, sk 2 chains, sc in the next ch. Repeat from * across, slip stitch to join. Note: if you're in a multiple of 3 vs 6 then you'll join after the sc instead of the bobble.
Row 2: Ch 1, sc in the first sc, * 3 sc in the chain space, skip the bobble, 3 sc in the chain space, sc in the sc. Repeat from * across, slip stitch to join.
Row 3: Ch 2, dc in the same sc, * ch 3, sk next 3 sc, sc, ch 3, sk next 3**, bobble. Repeat from * across ending with the **, slip stitch to join. Note: if you're in a multiple of 3 vs 6 then you'll join after the bobble instead of the sc.
Row 4: Ch 1, sc, *3 sc in the chain space, sc in the sc, 3 sc in the chain space, skip the bobble. Repeat from * across, slip stitch to join.
Row 5: Ch 1, sc in first sc, * ch 3, sk 3 sc, bobble in next sc, ch 3, sk 3 sc, sc. Repeat from * across, slip stitch to join. Note: if you're in a multiple of 3 vs 6 then you'll join after the bobble instead of the sc.
Row 6: Repeat row 2.
Row 7: Repeat row 3.
Row 8: Repeat row 4.
Row 9: Repeat row 5.
Row 10: Repeat row 2.
Row 11: This is our first decrease. Repeat row 3 except don't do the last 2 chains. You'll join from your last bobble or sc (depending on if you started from 3 or 6) and slip stitch to the sc.
Row 12: Repeat row 4.
Row 13: Repeat row 5 except don't do the last 2 chains. You'll join from your last bobble or sc (depending on if you started from 3 or 6) and slip stitch to the sc.
Row 14: Repeat row 2.
Row 15: Change colors. Repeat row 3 except don't do the last 2 chains. You'll join from your last bobble or sc (depending on if you started from 3 or 6) and slip stitch to the sc.
Row 16: Repeat row 4.
Row 17: Repeat row 5 except don't do the last 2 chains. You'll join from your last bobble or sc (depending on if you started from 3 or 6) and slip stitch to the sc.
Row 18: Repeat row 2.
Row 19: Repeat row 3 except don't do the last 2 chains. You'll join from your last bobble or sc (depending on if you started from 3 or 6) and slip stitch to the sc.
Row 20: Repeat row 4.
Row 21: Repeat row 5.
Row 22: Repeat row 2.
Row 23: Repeat row 3.
Row 24: Repeat row 4.
Row 25: Repeat row 5.
Row 26: Repeat row 2.
Row 27: Repeat row 3 except don't do the last 2 chains. You'll join from your last bobble or sc (depending on if you started from 3 or 6) and slip stitch to the sc.
Row 28: Repeat row 4.
Row 29: Change colors. Repeat row 5 except don't do the last 2 chains. You'll join from your last bobble or sc (depending on if you started from 3 or 6) and slip stitch to the sc.
Row 30: Repeat row 2.
Row 31: Repeat row 3.
Row 32: Repeat row 4.
Row 33: Repeat row 5.
Row 34: Repeat row 2.
Row 35: Repeat row 3.
Row 36: Repeat row 4.
Row 37: Repeat row 5.
Row 38: Repeat row 2.
Row 39: Repeat row 3.
Row 40: Repeat row 4.
Row 41: Repeat row 5.
Row 42: Repeat row 2.
Row 43: Repeat row 3.
Row 44: ch 2, hdc in each stitch around, slip stitch to join.

Now let's work on the edging. Turn the sweater right side out, with it flat in front of you pick up the bottom right edge. Using the silver yarn chain 2. For each hole that you have in the lace you need 4 stitches. I did 1 in the "post" of the hole and then 3 in the in betweens. For this you're going to want to do the stitches into the stitches and not the chain space to make it look good as the edging. You're going to hdc up the right side, across the back and then down the left side.
Edging:
Row 1: ch 2, hdc all the way around ending on the bottom left corner
Row 2: ch 2, hdc blo all the way around
Row 3: ch 1, sc all the way around
Row 4: ch 1, sc blo all the way around
Row 5: Change colors to blues. ch 1, sc all the way around
Row 6: ch 1, sc blo all the way around

Last step now is the pockets. My original plan was to make them out of the silver since that's the panel they'll be on, but I ran out of silver. I actually really like the way it looks with the burgandy pickets, really makes them pop.
Cast on 17.
Row 1: Sc in the 2nd ch from the hook. * ch 3, sk 2 chains, bobble in next chain, ch 3, sk 2 chains, sc in the next ch. Repeat from * across.
Row 2: Ch 1, sc in the first sc, * 3 sc in the chain space, skip the bobble, 3 sc in the chain space, sc in the sc. Repeat from * across.
Row 3: Ch 2, dc in the same sc, * ch 3, sk next 3 sc, sc, ch 3, sk next 3**, bobble. Repeat from * across ending with the **, dc in last stitch.
Row 4: Ch 1, sc, *3 sc in the chain space, sc in the sc, 3 sc in the chain space, skip the bobble. Repeat from * across, sc in the last stitch.
Row 5: Ch 1, sc in first sc, * ch 3, sk 3 sc, bobble in next sc, ch 3, sk 3 sc, sc. Repeat from * across, sc in the last stitch.
Repeat row 2-5. End on row 16 (8 holes). Make 2 pockets.
I knew I didn't want the pockets to cross the color block. I ended up placing them 1 back from the edge and 2 up from the silver/burgandy color change. Sew them around.
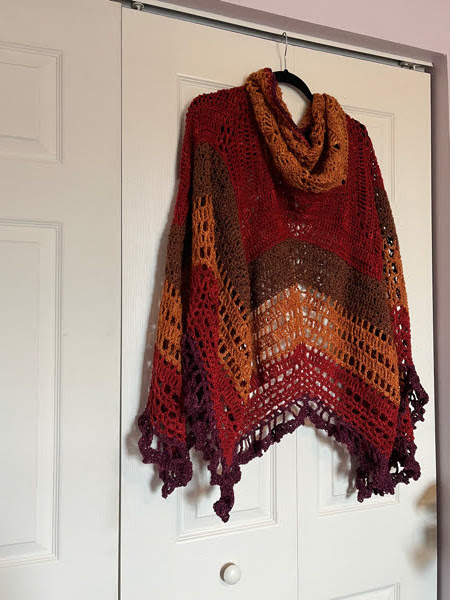
I started off wanting to make a butterfly shawl, but with these colors I think leaf is much more appropriate. This yarn is from Feederbrook Farm and is their silk DK weight yarn. I bought this at the Maryland Sheep and Wool and the colors aren't listed, but its 2 skeins of a burnt orange color, 2 of a cranberry red color, a skein of dark brown, and a skein of a nice deep purple for a total of about 1500 yards.

This didn't come out exactly perfect as the top isn't entirely flat, but once its on you'll never notice it. I think it's because of the different types of stitches that I used trying to create some different texture. The single crochets definitely aren't as wide as the other stitches. I used the same color until it ran out and always switched on rows.

This uses a 4 mm hook.
Stitches used:
ch - chain
ch sp - chain space
sc - single crochet
hdc - half double crochet
dc - double crochet
tc - treble crochet
bphdc - back post half double crochet
bpdc - back post double crochet
shell - 2 dc, 2 ch, 2 dc
v-stitch - 1 dc, 2 ch, 1 dc
sk st - skipt stitch
bobble - yarn over, pull up, yarn over, pull up, yarn over, pull up (7 loops), pull all the way through
picot - chain 3, insert the hook into the same stitch and pull it through
Start with a magic ring with the orange
Row 1: ch3, 7 dc, 1 trb
Row 2: ch3, 1dc in same st, *2dc in next st*. Repeat from *. In the last stich 1 dc and 1 trb
Row 3: ch5, sk st, *1 dc in next 4 sts, ch 2, sk st. Repeat from * 1 tc in last st
Row 4: ch3, in the chain space (1dc, 2ch, 2dc), *sk st, 1 dc, ch2, 1 dc, sk st, shell in the next ch space *,
Repeat from * once. Sk st, 1 dc, ch 2, 1 dc, sk st, in next ch sp 2dc, 2ch, 1dc, 1trb in last st
Row 5: ch3, sk st, * in next ch sp shell, 1 dc, sk st in the next 2 sts, in next ch sp v-stitch, sk next 2 sts, 1 dc. Repeat from *. In the last ch sp shell, sk st, 1 tc in the last stitch
Row 6: ch3, sk st, 1 dc, *In next ch sp shell, dc, dc, sk 2 sts, v-stitch, sk 2 sts, dc, dc. Repeat until end with a tr in the last stitch.
Ok so here is the pattern to follow for the rest of the shawl - in row 5 there was 1 dc between the shell and the v, in row 6 there were 2, in row 7 there will be 3....are you seeing the pattern here? The number of stitches between the shell and the v increases by 1 every row from now on. That's the big secret for this. Like I said before I decided to make it texturally interesting so I experimented with different stitches. You can follow my path or create your own.

Row 7-9: dc
Row 10: alternate dc with 3 dc in the same stitch
Row 11: dc
ROw 12: alternate dc with 3 dc in the same stitch
Row 13: dc
ROw 14: alternate dc with 3 dc in the same stitch
Row 15: dc
Row 16: hdc
Change colors - red
Row 17: sc
Row 18-20: sc, ch
Row 21: hdc
Row 22: dc
Row 23: hdc
Row 24: sc
Row 25: bp hdc
Row 26: bp dc
Row 27: bp hdc
Row 28: sc
Change colors - brown
Row 29-30: 2 hdc in the same stitch, sk st
Row 31: dc
Row 32-33: 2 hdc in the same stitch, sk st
Row 34: sc
Change colors - orange
Row 35: dc, ch
Row 36: 2 dc in the same stitch, sk st
Row 37: dc, ch
Row 38: 2 dc in the same stitch, sk st
Row 39: dc, ch
Row 40: sc
Change colors - red
Row 41: hdc, ch
Row 42: dc
Row 43: hdc, ch
Row 44: 2 hdc in the same stitch, sk st
Row 45: hdc, ch
Row 46: 2 hdc in the same stitch, sk st
Row 47: hdc, ch

Continue to use the red at this point to do a sc across the flat top. This helps to even it out if it hasn't been even.
Change colors - purple
Row 48: bobble, ch
Row 49: tc, ch 3. In the shell spaces ch 5 instead of ch 3
Row 50: * sc, hdc, dc, hdc. Repeat from *. In the shell space - sc, hdc, dc, tc, dc, hdc. For the v-stitch make sure you still sk a stitch then just sc in the 2 chains
Row 51: sc in the sc and hdc stitches. Picot in all the dc stitches (and in the tr for the shells)
When you get to the end sc across the top again.
This yarn is so gorgeous it almost didn't need a pattern at all. It is "Textured" Handpsun Yarn from Windsong Farm. It's only about 18 yards. I hesitate to even call this a pattern since it's so simple, but it did take me a bit to figure out what I wanted to do with this yarn so maybe it helps someone else.
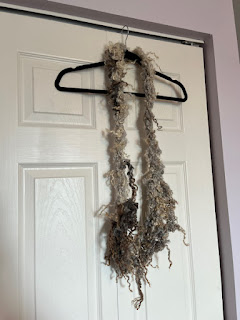
I used a 12 mm hook and chained 40. That felt like the right length that if I needed to loop it twice I could, but I could also just wear it as a necklace.
Row 1: join the loop using a slip stitch making sure that there are no twists. *Chain 3, skip 2 stitches, sc. Repeat from * slip stitch to join.
Row 2: *ch 3, sc in the chain space. Repeat from *. This will not make it all the way around. Weave in when you run out of yarn.
You'll see in the picture above that there is clearly a place where there is an extra row. When you double loop it (below) then I think it really pops. When you're done pull out the extra hangy bits that got caught up as you were crocheting. I feel like this will lay really nicely over a long sleeve shirt, once again looking forward to colder weather for this.

Also, don't forget about the Bel Air Festival for the Arts tomorrow Sunday September 18th. I'm in booth 220.
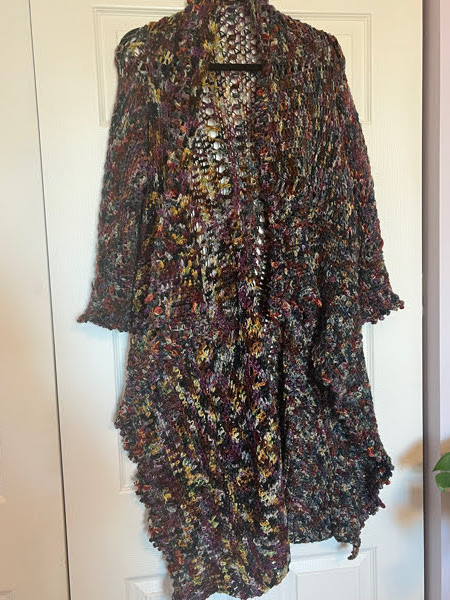
The sides and back of this sweater are made all in one piece. It makes for really nice panels in the front that you can wrap around yourself. We went up to Chaumont for the holiday weekend and the weather was chilly so I got to wear this sweater earlier than I thought I would. I think I might add some buttons so that when it gets real cold it will stay in place.
I did a good amount of frogging working out this sweater. When I make a shirt or sweater to sew I usually aim for the back to be about 23-24 inches. I did that with this sweater and found that I was swimming in it. Since it's made all in once piece it was closer to 14 inches when it felt right. I'm not entirely sure why that is, but the sweater fits great so I'm going with it. I'll ponder that more and see if I can come up with a reason why it's true.
This pattern uses 4 skeins of Yowsa from Miss Babs in Bewitching for about 2200 yards of yarn.

This pattern uses a 5.5 mm hook.
Stitches used:
ch - chain
sl - slip stitch
sk - skip stitch
sc - single crochet
hdc - half double crochet
dc - double crochet
bobble - yarn over, pull a stitch through, yarn over, pull a stitch through, yarn over, pull all the stitches through (7 loops at once)
X - skip a stitch, dc, go back to the stitch you skipped and behind your new stitch dc
picot - sc, ch 3, sc into the right side of your sc
ch 119
Row 1: sc in the second stitch from the hook, ch, sk - all the way across. End on a sc
Row 2-5: ch 2, sc in the chain space, ch - all the way across. End on a sc
Row 6: ch 3, bobble in the chain space, ch - all the way across. hdc in the last stitch
Row 7-16: ch 2, sc in the chain space, ch - all the way across. End on a sc
Row 17: ch 2, bobble in the chain space, ch - all the way across. hdc in the last stitch
Row 18: - 27: ch 1, 2 sc in the space, sk - all the way across.
Row 28: ch 3, X stitch - all the way across. dc in the last stitch
Row 29-37: ch 2 hdc all the way across
Row 38: ch 2, hdc in the first 22 stitches, ch 22 (we are making the first arm opening here), sk stitches 23-30, hdc in the 40th stitch and all the way to the end. Option: if you want to create a flap between the front panel and the back panel then instead of going to the end ch 10 at the end and skip the last 10 stitches
Row 39: ch 3, X stitch - all the way across. dc in the last stitch
Row 40-44: ch 2, hdc all the way across
Row 45: ch 3, X stitch - all the way across. dc in the last stitch
Row 46: ch 2, sk, sc, ch, sk - all the way across. End on a sc
Row 47-50: ch 2, sc in the chain space, ch - all the way across. End on a sc
Row 51: ch 3, bobble in the chain space, ch - all the way across. hdc in the last stitch
Row 52-56: ch 2, sc in the chain space, ch - all the way across. End on a sc
Row 57: ch 3, X stitch - all the way across. dc in the last stitch
Row 58-62: ch 2, hdc all the way across
Row 63: ch 3, X stitch - all the way across. dc in the last stitch
Row 64: ch 2, hdc in the first 22 stitches, ch 22 (we are making the first arm opening here), sk stitches 23-30, hdc in the 40th stitch and all the way to the end. Option: if you want to create a flap between the front panel and the back panel then instead of going to the end ch 10 at the end and skip the last 10 stitches
Row 65-73: ch 2, hdc all the way across
Row 74: ch 3, X stitch - all the way across. dc in the last stitch
Row 75-84: ch 1, 2 sc, sk - all the way across.
Row 85: ch 2, bobble in the chain space, ch - all the way across. hdc in the last stitch
Row 86-95: ch 2, sc in the chain space, ch - all the way across. End on a sc
Row 96: ch 2, bobble in the chain space, ch - all the way across. hdc in the last stitch
Row 97-101: ch 2, sc in the chain space, ch - all the way across. End on a sc

This will give you your back and front panels. The front panels will drape nicely down. I decided that this needed a border all the way around.
Row 1: start at the bottom right edge. ch 2 bobble, ch. When you get to the corners - 2 hdc in the corner stitch, ch 2, 2 hdc in the corner stitch. You'll end on a corner, but only need to do 1 hdc since your ch 2 will cound as the second hdc. Join via a slip stitch to the ch 2.
Row 2: ch 1, sc, picot in the ch between the bobbles, sc into the bobble. When you get to the corners - sc into the first hdc, 2 sc into the second hdc, ch 2, 2 sc into the 1st hdc on the other side of the corner, sc into the second hdc. Then keep going with your picots. Slip stitch to join and then tie off
I decided I wanted to make my sleeves end about 3 inches back from my wrist. If you want your sleeves longer or shorter just add in a few rows.
Row 1: starting at the bottom of the armhole (the underarm section) ch 2, hdc around, sl stitch to join. I picked up 45 stitches. The exact number doesn't matter to me as long as it doesn't look like I have any holes and I pick up the same number on the second sleeve.
Row 2-3: ch 2, hdc around, sl stitch to join.
Row 4-10: ch 2, hdc around, in the last 2 stitches hdc together, sl stitch to join
Row 11: ch 3, X stitch - all the way across , sl stitch to join
Row 12-16: ch, sc into the chain stitch, sk stitch, 2 sc. Repeat until the end, sl stitch to join
Row 17: ch 2, bobble in the chain space, ch - all the way across, sl stitch to join
Row 18-22: ch 2, sc in the chain space, ch - all the way across, sl stitch to join
Row 23: ch 2, bobble in the chain space, ch - all the way across, sl stitch to join
Row 24: ch 1, picot in the ch between the bobbles, sc into the bobble - all the way across, sl stich to join and tie off
I'm not super careful about counting my stiches in the arms. I know I want it rather wide on the top and then the same width for the forearms. If you want looser or tighter arms play with the number of stitches.

Pockets (make 2):
ch 20
Row 1: sc in the second stitch from the hook, ch, sk - all the way across. End on a sc
Row 2-10: ch 2, sc in the chain space, ch - all the way across. End on a sc
Row 11: ch 3, bobble in the chain space, ch - all the way across. hdc in the last stitch
Row 12-21: ch 2, sc in the chain space, ch - all the way across. End on a sc
Turn so now your side becomes the top.
Top Row 1: ch 2, bobble in the chain space, ch - all the way across, sl stitch to join (I had 13 bobbles)
Top Row 2: ch 1, picot in the ch between the bobbles, sc into the bobble - all the way across, sc in the last stitch and tie off
Sew on the pockets on the front panel just above where the arms end. Remember the sweater will stretch.
This project took multiple turns. It all started because I decided that I wanted to learn the basket weave stitch. I had seen pictures of crocheted items with it for a while and it always looked amazing. I don't know why, but I assumed that it would be hard to do. In reality it's easy - as long as you keep track of your stitches. This ruana involved a lot of frogging.
This yarn is Fourth of July by Briar Rose. I started off thinking that this would make a great sweater, but midway through the first skein I knew it wanted to be something different. At first I thought that it wanted to be a poncho, but then it hit me - ruana. It drapes perfectly and it will be super warm once the cool weather comes.

This pattern uses 4 skeins of Fourth of July for a total of about 2200 yards. It uses a 5 mm hook.
Stitches:
ch - chain
hdc - half double crochet
dc - double crochet
fpdc - front post double crochet
bpdc - back post double crochet
The basket weave stitch cast on is in mulitples of 4 + 2. I cast on 70 stitches because this was originally going to be a sweater and I wanted it to be about 24 inches wide.

Row 1: ch 2, dc all the way across, hdc in the last stitch
Row 2: ch 2, *fbpdc in each of the next 4 dc, bpdc in each of the next 4 dc. Repeat from * hdc in the last stitch.
Ok here's the trick to this pattern. When you cast on you did it in multiples of 4. If you do it in an even multiple then row 3 (and all the odd rows) will be the same as row 2. If you do it in an odd multiple then row 3 (and all the odd rows) will be the opposite of row 2. The important thing is to pay attention - for a series of 4 rows you want the posts to be on the same side. I have 17 which is an odd number so it goes back and forth.
Row 3: ch 2, *bpdc in each of the next 4 dc, fpdc in each of the next 4 dc. Repeat from * hdc in the last stitch.
Row 4: ch 2, *fbpdc in each of the next 4 dc, bpdc in each of the next 4 dc. Repeat from * hdc in the last stitch.
Now here comes the switch. Anywhere that you were fp will now be a bp and anywhere that was a bp will be a front post.
Row 5: ch 2, *fbpdc in each of the next 4 dc, bpdc in each of the next 4 dc. Repeat from * hdc in the last stitch.
Row 6: ch 2, *bpdc in each of the next 4 dc, fpdc in each of the next 4 dc. Repeat from * hdc in the last stitch.
Row 7: ch 2, *fbpdc in each of the next 4 dc, bpdc in each of the next 4 dc. Repeat from * hdc in the last stitch.
Row 8: ch 2, *bpdc in each of the next 4 dc, fpdc in each of the next 4 dc. Repeat from * hdc in the last stitch.
Ok now repeat until you reached your desired lenth. I used almost all of the 2 skeins. Mine ended up being 68 rows long.
Make 2 of these

Line the two panels up. You want to make sure that where the panels line up the basket weave switches from the fp to the bp.
Sew halfway up. I sewed about 36 rows up. Weave in your ends and you're done.

I got this yarn at the Maryland Sheep and Wool. It is was a show colorway from Kim Dyes Yarn. I bought 3 skeins - or at least I thought I did. I accidentally bought 2 skeins in a fingering weight and only 1 in the Brioche DK. When I got home and was looking at what I bought I realized my mistake. I contacted Kim and she sent me 2 skeins of the DK so that I would have 3. I haven't figured out yet what I'm going to make with the 2 skeins of fingering, but I know it's going to be gorgeous - because this yarn is gorgeous! It's inspired by Monet's water lilies.
This pattern uses a lot of yarn for the shells. Normally a shirt like this only takes 2 skeins, but this one used almost all of the 3.

Use a 5.5 mm hook
Stitches:
ch - chain
sk st - skip stitch
sc - single crochet
dc - double crochet
shell - 5 dc in the next ch 3 space

The pattern works with a cast on in multiples of 5 + 2. I cast on 72. I wanted this top to be a bit wider so that I could make the sleeves capped.
Row 1: Sc in the 2nd chain from the hook, sc in the next ch, * ch 3, sk 2 ch, sc, sc, sc. Repeat from * across. The last stitch will be a single sc
Row 2: Ch 1, sc in the first sc, * sk next sc, shell (5 dc in the chain space), sk next sc, sc in the next sc. Repeat from * across ending with a sc.
Row 3: Ch 3, sk next dc, * sc in the next 3 dc, ch 3, sk the first dc, sc in the next 3 dc, ch 3 and sk the last dc. Repeat from * across. At the end of the last shell ch 1, hdc in the last stitch.
Row 4: Ch 3, 2 dc in the first ch 1 space, * sk next sc, shell. Repeat from * across, for the last shell only do 3 dc in the turning chain.
Row 5: Ch 1, sc in the frist dc, sc in the next dc, * ch 3, sk next (dc, sc, dc), sc in the next 3 dc. Repeat from * across ending with the ch 3 and then dc in th e last 2 stitches.
Repeat rows 2-5 until you get to your desired length. I made mine 19 rows. Make 2 panels

Sew from the shoulder to the neck hole. I made my neck hole 11 inches wide.
Now for the sides. I wanted there to be some capped sleeves, but I didn't exactly know how to do it so I played with it until I figured out a way that I liked.
First make sure that the top is turned right side out. You're going to pin from the shoulder down how big you want your arm hole (mine is 8 inches) and then an inch in from the edge. Start sewing from that inch in and move to the edge. When you get to the edge flip the top inside out and then sew the seam normally. I left about 2 inches at the bottom unsewed because I like that look.
I toyed with the idea of calling this the Frankensweater because the pattern I was working towards morphed so many times, but no one would get it but me. I started this over the winter and I think that what I was making then was a poncho, but I ran out of yarn. I tried to stretch it as best as I could, but the lemon peel stitch uses a lot of yarn. I went to buy more yarn, but they were out of stock. When I went back to it, I had no idea what I was doing. I started by ripping back to just the big rectangle portion, but then it felt like it wasn't wide enough for a poncho. It did feel like the start of a sweater....so that's what it became. The pattern for this is very notional because I took terrible notes as I kept changing things.
This pattern uses Into the Whirled DK Yarn in Captain Tightpants. Yes the yarn is gorgeous, but also Firefly! One of the best shows of all time. If you haven't watched it and like SciFi, I highly recommend. This used about 4 skeins of yarn.

I used a 5.5 mm hook for this pattern.
This pattern uses the lemon peel stitch which is alternating double crochet and single crochet stitches. As you increase rows - you're always double crocheting in the previous rows single crochet and single crocheting in the previous rows double crochet. If you ever find yourself doing the same stitch into the previous row - you've gone wrong somewhere. This stitch makes for a very warm sweater, but uses a lot of yarn.
Stitches:
ch - chain
dc - double crochet
sc - single crochet
hdc - half double crochet
hdc blo - half double crochet back loop only
Back Panel
Cast on to your desired width. For a large
Row 1: sc in the 3rd loop from the hook, dc, *sc, dc. Repeat from * - end with a dc
Row 2: ch 1 (this counts as a sc), *dc, sc. Repeat from * - end with a sc
Row 3: ch 3 (this counts as a dc), *sc, dc. Repeat from * - end with a dc
Repeat rows 2 and 3 until you reach your desired length. For a large/extra large I make my sweater backs about 23 inches wide. The front panels then need to be half that.

Side Panel (make 2)
Same pattern as the back panel, but slightly less than half the size. For example, if I cast on 70 stiches for my back panel then I would do 30 or 32 for my side panels.
Sew the sides onto the back. At the top it will sew to the middle and have 2-4 stiches between the panels (depending on how many stitches you used for your side panels vs back). Leave about 8 inches from the top down the side for the arms. I also left 2 inches at the bottom open, but this was purely asthetic.

For the sleeves I always start at the arm pit to hide the join. Repeat the lemon stitch pattern around until you get to about elbow length. Then for the last 4 stitches only do 2. So if you were ending with a dc for a row. You're second to last stitch would be sc 2 together and then the last stitch would be dc 2 together. Do this 2 rounds in a row.
For the bottom of the sleeve I did the same pattern I was planning on for the collar.
Cast on 16.
Row 1: hdc in the second stitch from the hook. Hdc across - you should end with 15 stitches
Row 2: hdc blo across
Row 3: hdc
Repeat rows 2 and 3 until you have roughly the desired length to go around your wrist area. I did 18 rows.
Sew end to end and then onto the bottom of your sleeve. Do this again for the other sleeve.

Next we're going to make the collar. First turn the sweater right side out. I used the same pattern as the end of the sleeves alternating rows of hdc and hdc blo. Make sure the sweater is right side out. Then lay it down on a surface in front of you with the opening on the top. You're going to start at the bottom right corner. The first row will be hdc. The second will be hdc blo. If you start at the wrong corner or if you don't turn the sweater right side out then you won't see the ribbing when it's worn. You can make the collar whatever width feels and looks good. My sweater has 7 rows. I always end with a hdc row because it seems to look more finished that way.

Pockets (make 2):
Cast on 7. Do the same as with the sleeve ends. I did 8 rows alternating the hdc and hdc blo.
This will be ribbing on the top of the sleeve. Now you're going to pick up the stiches across to make the rest of the sleeve using the lemon peel stitch. Make it to your desired length. The most common thing I put in my sweater pockets is my phone so I usually make it about the height of an iPhone. Sew on the pockets where they feel comfortable for the arms. Mine are about an inch back from where the ribbing starts and 2 inches from the bottom.
I know that this pattern isn't all that specific, but I hope that it's still helpful anyway.
I hesitate to call this a pattern because it was so quick and simple to do, but it's exactly what I wanted and intended so I'll share. I have a lot of sleeveless dresses that I like to wear in the summer. Maybe it's just in my head, but it feels like they aren't dressy enough. I usually wear something over them to make them more work appropriate. I wanted something that dressed it up just enough, but didn't actually add any warmth. This is a cover up for when its really hot out and you just don't want to be wearing anything.
I chose a yarn that would work work my black, navy, and grey dresses the Fire in the Evening color way from Dragonfly Fibers on their Pixie fingering weight yarn. The skein is 430 yards and I used probably about 2/3 of it.

There was a pattern that I made a cardigan with a few years ago that I can't find that was the inspiration for this. I really wish I could find it because I'd love to give the woman credit. I modified it a bit and changed it into more of a poncho, but I loved the stitch. The diamonds are basically chains with single crochets. You can do any odd number of chains and then you single crochet into the middle stitch on the next row.
For this I used a 4mm hook.
Stitches:
ch - chain
sc - single crochet

I decided to use 11 for my odd number, but you could do more or less depending on how big you want your diamonds to be. For the first row you want the number of skiped stitches to be half of your odd number, but round down. So since my odd number was 11. 11 / 2 is 5.5 so I cast on in multiples of 5. When I got to 80 that felt like the right amount for it to drape nicely just above my elbows. I then added 11 stitches for the first stitch for a total of 91.
Cast on 91 stitches

Row 1: sc in the 6th stitch from the hook, * ch 11, skip 4 stitches, sc in the next stitch. *Repeat from star to the end
Row 2: chain 6, sc in the 6 stitch which is the middle of the 11, *chain 11, sc in the 6 stitch which is the middle of the 11. Repeat from * until end
Repeat row 2 until you reach your desired length. I did 20 rows. The great thing about this is that you can mostly eye what is the middle, I didn't go crazy making sure that I was always in the 6th stitch (vs the 5th or the 7th).
Make 2 panels. I sewed them together leaving 10 inches for the neck and about 8.5 inches for the arms.

It was so amazing being back in person for the Maryland Sheep and Wool Festival, but I did actually expand my yarn horizons during the pandemic. First, online yarn sales meant that I could peruse all the web sites (and yes I really did click on all of them). I discovered fiber artists and sellers I probably never would have otherwise.
The other thing that I learned about were special colorways specifically designed for an event. I'm positive I've seen signs, walked past yarn, maybe even been told by someone at checkout - but it never actually sunk in that this was a thing. Being back in person for the festival this year I was looking for it and bought several.
The yarn in this design is a special from the Sheep and Wool. It is by Dragonfly Fibers (who I did know about and love pre-pandemic) and is called Welcome Back. I love the name and love the yarn. This was worked up with their Pixie yarn which is a fingering weight superwash merino. This pattern is super simple with some nice edging. I did play yarn chicken and that's why there is only 1 pocket - if you have more yarn then certainly there could be 2. :)
Can you tell that we're up in Chaumont at the cabin? I was searching for the right place to take pictures and I'm really happy with how the dog pen fence looks. Just had to avoid the poison ivy - that's a different kind of project for another day.

I used a 4mm hook.
Stitches in this pattern:
ch - chain
sk st - skip stitch
sc - single crochet
dc - double crochet
v-stitch - dc, ch 3, dc
picot - ch 3, sc into the same stitch

Back Panel
Chain 80
Row 1: sc in the 4th ch from the loop, *sk st, dc, ch 3, sk st, sc, ch 3. Repeat from *. End the row on a dc
Row 2: ch 3, *dc in the sc, ch 3, sc in the dc, ch 3. Repeat from * to the end of the row. End the row on a dc
Repeat row 2 until you reach your desired length. This is 48 rows.
Side Panels (make 2)
Cast on 36. Follow the rest of the Back Panel instructions

Sew together the back and the sides. I left 15 rows for the arm holes and 3 rows at the bottom seem (just because I like the look).

For the arms I picked up the stitches around the edge and used the same pattern of sc, ch 3, dc, ch 3 for 6 rows.
Row 7 and 8: ch 1, sc all the way around in each stitch. Slip stitch to join
Row 9: ch 6, dc in the same stitch, sk stitch, v-stitch. Repeat the v-stitch all the way around. Slip stitch to join
Row 10: ch 1, sc, picot in the middle of the ch 3 of the v stitch, sc until the next middle, picot all the way around. Slip stitch to join
For the trim of the main body I started on the bottom left side with it still inside out. This is the same edging as the arms.
Row 1 and 2: ch 1, sc all the way around in each stitch.
Row 3: ch 6, dc in the same stitch, sk stitch, v-stitch. Repeat the v-stitch all the way around.
Row 4: ch 1, sc, picot in the middle of the ch 3 of the v stitch, sc until the next middle, picot all the way around.
Weave in and trim all ends and flip right side out.

I really wanted pockets, but wasn't sure if I had enough yarn. I had enough for one so that's what I made.
Chain 16
Row 1: sc in the 4th ch from the loop, *sk st, dc, ch 3, sk st, sc, ch 3. Repeat from *. End the row on a dc
Row 2: ch 3, *dc in the sc, ch 3, sc in the dc, ch 3. Repeat from * to the end of the row. End the row on a dc
Repeat row 2 until you reach your desired length. Mine is 48 rows.
Sew the pocket on the side for your dominant hand. I'm a left so the pocket went on the left. The right length for me was 3 rows from the bottom and 3 rows back from the sc of the edge.
Enjoy! Let me know if you make it, would love to see pictures!
One of the amazing yarns I found at the Sheep and Wool festival is from A Hundred Ravens. I purchased their Yaksha Mini Set in Phoenix which is 20% Yak (also 70% SW Merino and 10% Nylon). I've never had Yak yarn before and it's super soft. At the Sheep and Wool it was pouring when I was in their tent and the wind was blowing hard. There was another woman looking at the same yarn, in the same color set, and we ended up buying it all.
I wanted a good use of the yarn so I learned another new stitch. This is the Nexus stitch and it shows off the yarn really well. You know what else shows off the yarn well? The gorgeous Red Oak buttons from Favour Valley Woodworking. I started off making a shirt, but I wanted to use all of the colors and it just got too long for a shirt and thus it became a poncho.

This is a fingering weight yarn and I used a 4.5 mm hook. You will need 2 sets of Yaksha for this - approximately 950 yards total.
The Nexus stitch is cast on in multiples of 8 + 7 stitches. I cast on 103 (96+7) which worked out to be about 24 inches.
Stitches:
Sk: skip stitch
Ch: Chain
sc: Single crochet
dc: Double Crochet
Shell: Double Crochet, chain 3, double crochet, chain 3, double crochet
V-stitch: Double crochet, chain 3, double crochet
Spike stitch: insert hook into the double crochet 2 rows below and single crochet in the will be the middle stitch of the shell and around the chain 5 from one row below.

Row 1: dc in the 7th ch from the hook, * sk 3 ch, sc in the next ch, sk 3 ch, shell. Repeat from * across, in the last chain v-stitch
Row 2: Ch 1, sc in the first dc, ch 2, *v-stitch in the next sc, ch 5, sk shell. Repeat from * across sc in the 3rd ch of the turning chain
Row 3: Ch 1, sc in the first st, * Shell in the ch 3 space of the next v-stitch, spike stitch in dc 2 rows below. Repeat from * across sc in the last stitch
Row 4: Ch 4, dc in the turning stitch, *ch 5, sk next shell, v-stitch in the next sc. Repeat from * across dc, ch 1, dc in the last stitch
Row 5: Ch 6. dc in the same stitch, * spike st in the top of the shell dc 2 rows below, Shell in the Ch 3 space of the v-stitch. Repeat from * across v-stitch in the last stitch.

You will have 12 shells in the shell rows. Repeat rows 2-5 until you run out of yarn. As one color finished, I switched to the next yarn even if it was mid-row. The colorway makes it so that it flows fine. I decided I wanted it to end on a shell row (row 3 or 5) for the edging. Make 2 panels.
Line up the two panels. Mine ended up being 34 inches long - this becomes your top and bottom. I made the neck about 10 inches wide based on personal preference. So I went to 17 inches (the middle) and then pinned 5 inches in either direction. Sew from the end to each pin.

This poncho really called out for some buttons and these felt like the perfect ones. I went with 3 on each side. I wanted the arm hole to be 8 inches - so I put the first button there. The second button went about an inch from the bottom. Then the last button midway between the two. Put them about an inch in from the edge.

Seriously love these buttons. I'm really happy with the final product and I feel like it's light enough to wear when its not oppresively hot any more.
Just finished a new top that I'm calling Buds on Stems. I have this amazing book Crochet Every Way Stitch Dictionary by Dora Ohrenstein. I was looking to create my next design and was flipping through pages and found the Buds on Stem stitch. I had actually already previously put the book cover in because it was such a pretty stitch.
I had 2 skeins of Sojurn in Moss from Miss Babs which is a fingering weight yarn.

I used a 4.5 mm hook.
Stitches:
Ch = chain
sc = single crochet
dc = double crochet
sk 2 ch = skip two chains
Buds = double crochet 3 together, ch 3, double crochet 3 together

The cast on for this stitch is multiples of 6 + 3. I cast on 63 which gave me 10 buds going across.
Row 1: Buds in the 6th chain from the hook, sk 2 ch, *dc, sk 2 ch, Buds, sk 2 ch. Repeat from * across, dc in the last chain.
Row 2: Ch 5, *sc in the next ch 3 space, ch 2, dc in the next dc, ch 2. Repeat from * across ending with dc.
Row 3: Ch 5, dc 3 together in the first chain, * dc in the next sc, Buds in the next dc. Repeat from * across. In the last chain dc 3 together
Row 4: Ch 1, sc in the first dc, * ch 2, dc in the next dc, sc in the next ch 3 space. Repeat from * across, dc in the last ch.
Row 5: Ch 3, * Buds in the next dc, dc in the next dc. Repeat from * across.
Repeat rows 2-5 until you have your desired length. I ended up wiht 14 rows of buds.
Make 2 panels

The next step is to sew the panels together. I wanted a fairly open neck so I sewed in 3 buds on each side. For the arm holes I left 5 buds. I also didn't sew all the way to the bottom because I like how it looks when shirts have a little bit of an open bottom.
This pattern is for an adult medium. You could easily adjust to make it wider or longer to adjust the size. I used almost all of the yarn so if you're going to go larger you'd need another skein.
Memorial Day weekend was our first weekend at the cabin in Chaumont! It was so amazing to be back there again, I really miss it in the winter. It was also Willow's first trip up. She absolutely loved it, she loved it so much that when it came down to get in the car to go home - she laid down in protest.
While we were up there I had brought with me a 1000 yard set from Cat Mountain Fiber Arts. This was a yarn set of the same color varient, but in 10 different yarns. Each yarn is approximately 100 yards long for a total of 1000 yards. The yarns are all roughly the same weight. This particular color is called Wood Nymph.

I knew that I wanted to make a poncho out of this yarn, but having not made one before I was reading various patterns to get an idea of what to do. This pattern from Spoons and Hooks helped me with the aha! moment to get me going. What this made me see is - start with a circle and then you're going to grow on each corner by 2 each round - that's it!

I realized recently that half double crochet is my favorite stitch. I find that my hands can do patterns with it really fast and I just really get in a groove. Knowing that I had 100 yards of each and that this was a circular poncho, I made the decision that I would use all of one yarn and then just switch - and not worry about only switching on a new row. With the finished poncho you can't tell the difference and I was able to make it as large as possible by not worrying about it.

This pattern uses a 6mm hook.
Abbreviations:
hdc = half double crochet
hdcblo = half double crochet back loop only
sc = single crochet
ch = chain
sk st = skip stitch
bobble = yarn over, pull up, yarn over, pull up, yarn over, pull up, pull through all the stitches (7), chain
v stitch = two hdc in the same stich, skip a stitch
tr = treble crochet
granny corner = 2 stiches (whatever you did in that round - sc, hdc, or tr) in the first chain stitch, ch 2, 2 stitches (whatever you're doing in that round) in the second chain stitch.
I used a foundation hdc to start this poncho. Why? Because I just learned how to do it and I think it's really cool plus practice! I cast on 55 stitches because that's what felt good with this yarn around my neck. Cast on an odd number of stitches whatever makes sense for your head (it should be able to easily fit over without catching ears) with whatever yarn you use.
For each row that you do you're going to increase by 4 stitches - 2 on each side. It's like the corner of a granny square. You're going to do 2 of the stitch in the first chain, chain 2 then do 2 of the stich in the second chain stitch.
Once you have your chain - join it back to the beginning making sure that you have no kinks in the chain. Now mark the spot on the opposite side of where you joined. For me with 55 stitches this was the stitch that was 28 away.
Row 1: ch 2 and hdc in the starting stitch. ch 2 then 2 more hdc in the same stitch. hdc in each stitch to your marker. 2 hdc in the marker stitch ch 2 then 2 hdc in the same stitch. hdc back to the begining. sl stitch to join
Row 2-4: ch 2, hdc all the way around with a granny corner in the two sides
Row 5-you run out of the first yarn: ch 1, sc, sk stitch, 2 sc, repeat to end

This next section is a repeating pattern until you get to the last row.
Row 1-2:ch 2, v stitch around, granny stitch in open spaces, sl stitch to join
Row 3: ch 2, hdc around, granny stitch in open spaces, sl stitch to join
Row 4: ch 2, bobble around, granny stitch with hdc in open spaces, sl stitch to join
Row 5: ch 2, hdc around, granny stitch in open spaces, sl stitch to join
Row 6-8: ch 2, hdcblo around, granny stitch in open spaces, sl stitch to join
I did this pattern 4 times. In the 3rd an 4th rounds I switched up the bobble row to do bobble, ch, sk stitch to save yarn. The bobble stitch takes up a lot of yarn and I was looking to save yarn as my poncho got larger. I also ended on a bobble stitch because I thought it would compliment the eddging in my head well.

The edging was pretty simple.
Row 1: ch 7 (4 for the tr, 3 ch), tr crochet, *sk stitch, tr, ch 3, tr * repeat *. This is the only row without a granny corner. In the open chain space just tr, chain 2, tr on the other side
Row 2: The goal of this row is to have a picot in the middle of the v of the treble. Sl stitch in the first chain, sl stitch in the second chain, ch 4, sl stitch into the same stitch (to create the picot), sc in the next stitch, sl stitch where the 2 tr meet.

I had a little bit of yarn leftover so I decided to create a bit more of a neck and use up all the yarn.
Row 1: sc all the way around (no granny)
Row 2: v stitch all the way around (no granny)
Row 3: sc all the way around (no granny)
I had JUST enough yarn to do this and weave in my end. Really happy with the finished result, but will have to wait until it gets chilly again to wear.

There is no "right" way to choose which yarns to use where. I knew I wanted something really soft by my neck so I used what I'm pretty sure was the mohair to start with. I also knew that the two boucle type yarns would be wasted in the bobble and that I wanted them to be apart from each other so I switched to them when I knew I was going into the hdcblo and v stitch sections. Have fun with it!
My crochet supervisors asleep on the job.


