
Why is this a mother in law sweater? Because I made it for my mother in law :) We were talking on Mother's Day and she confessed that the sweater I made her for Christmas a few years ago accidentally found its way into the wash. It's now only fit for a small child - literally. She didn't want to tell me, but also she loved her sweater and wanted another one. So as soon as I finished the Popsicle Sweater, I started on a new sweater for her.
This sweater is made from 2 skeins of Fourth of July yarn from Briar Rose. As I was making the pockets I ran out of yarn. I went through my remnants stash and found a pink yarn that I thought complimented it well. I made the pockets and decided it needed trim around the neck. Then I thought it needed it for the ends of the sleeves as well. I finished and was cleaning up - and found a small ball of the green I had from the first skein. Doh! I've decided the pink looks better than if it was all green.

I was in such a rush to send this off that I forgot to write down the pattern before I did. Going to do most of this from memory.
This sweater uses a 5 mm hook.
Start with the back panel. Cast on so it's long enough for the length, I did 70 stitches
Row 1: hdc across
Row 2-4: v stitch across (hdc 2 in a stich, skip a stitch)
Row 5: hdc across
Row 6: bobble stitch across
Row 7: hdc across
Repeat rows 2-7 until you reach your desired width. I did 5 repeats

The two side panels are the same as the back panel, but half the width. Sew the top and up the sides leaving about 8 inches for the arms (for an adult large). For the sleeves follow the same pattern, but work in the round. When you get to about elbow length start to crochet the last 2 stitches in the round together to taper the arms.
For the collar make sure the sweater is now right side out. Start on the bottom left corner and hdc up over and down. Then do hdc in the back loop only. Repeat in alternating rows until your collar is your desired width. I did 6 rows.

The pockets are the last piece. I used the same pattern as I did for the back and made it 14 stitches wide. My last 3 rows were in the pink color vs the green. The last touch was a row of sc around the collar and at the end of the sleeves.
Hopefully this is helpful. My patterns aren't as detailed as others are, but also I don't follow patterns when they are that detailed. I'm always changing it as I go to fit my needs. I'm hoping that others do the same.
I finally finished this sweater in the Sky Lounge at the Minneapolis airport on Sunday. I had started it a few weeks ago and then prioritized other projects for a variety of reasons. Then I became obsessed with finishing because I saw just how awesome this was going to be. This yarn is from Miss Babs and is the Popsicle Fun colorway. The pattern is my own.

Stitches:
Hdc – half double crochet
V stitch – 2 hdc in the same stitch, skip the next stitch
The back and the sides in the popsicle stick color are just rectangles. This pattern uses a 5 mm hook. Cast on enough to make the length that you want. I cast on 100 stitches. The pattern for the back and the sides is a row of hdc then two rows of v-stitch. I repeated the back 12 times and the sides 4 times. This made my back about 21 inches wide and the sides about 9 inches wide. I left a about 3 inches at the bottom not sewed and 8 inches for the arms.

Next I worked on the arms. I had all the pretty colors to work from! I decided to go from light to dark. I did the same pattern (1 row hdc then 2 rows of v stitch) and did 5 rows of each color. I went back and forth on this, but I figured out that with the length of my arms this was the right number of stitches. I did this for all of the colors except the last one. I am possibly a little too organic when I make my sleeves, but I don't decrease until the sleeve is about the length of my elbow and then I just gauge how much I want to taper in each row.
For the last color I cast on 18 stitches and then alternated hdc and back loop hdc. I made it the same number of rows as I had stitches in the bottom of my sleeve - 20. Then sew the top and bottom together and then to the sleeve.
Next I made the pockets. I knew I wanted to use as much yarn as possible in the collar and I didn't want to run out. I measured my hand against the sweater and decided I wanted my pockets to be 18 stitches deep so I cast on 18. I also knew that I wanted them to be about 10 rows wide and that I only had 7 colors so I picked 3 colors to do 2 rows vs 1. Same pattern - 1 row hdc and then 2 rows v-stitch.

Last but not least the collar! I had more of some yarn than others based on how much I had used in the arms and the pockets. I started light to dark again and used the same pattern I used for the bottom of the sleeves - 1 row of hdc and 1 row of back loop hdc. You want the sweater to be right side out and then start at the bottom left corner. You go up the side, across the back, down the other side - and repeat. For the colors I had less of I didn't worry if it ended mid row, I just switched colors. You can't tell unless you're looking at it really hard. I ended up with 15 rows for my collar. I kept trying it on to decide how it felt and how much more I needed.
As always when I make a new sweater it becomes my new favorite. This one is light enough to wear when its a bit warm. I wore it to a work event and got tons of compliments.
So as I was sewing this together today wearing a purple shirt I made maybe a month ago I realized I made nearly the same shirt twice. The one from a month ago is a gradient that I made in two giant granny squares. This one was made in rows, but with the same stitch. Clearly I see purple yarn and think - 3 half double crochet!

Cast on any number of stitches in a multiple of 3 to desired width.
Row 1: 2 half double crochet (hdc) into the 3rd stitch from the end. *skip 2 stitches. 3 hdc. *repeat until the last stitch. 1 hdc in the last stitch
Row 2: ch 2. 2 hdc into the chain stich. *3 hdc into the last chain of the 3rd hdc below. * repeat until the last stich. 1 hdc in the last stich
Repeast row 2 until desired length
Make another identical rectangle then sew together leaving space for the neck and arms

During the holidays Miss Babs had a big sale. I love their yarn and bought a whole lot of it. I used yarn from Miss Babs for my birthday sweater as well. This ruana is crocheted using one of Miss Babs gradient sets in Lady of the Lake. I love the blues and greens that are anchored by the deep charcoal grey.
 The pattern is super simple. This was the right length for me (I'm 5'3), but you could cast on more or less depending on your height.
4 mm hook
Cast on 212 with one of the base colors
Row 1: sc in the 3rd chain from the hook, *chain, sk st, sc* repeat * till th e end
Row 2-8: ch 2, sc in the chain space, *chain, sc in the chain space* repeat * till th e end
Row 9-10: HDC in the first chain, sk st, 2 HDC in the next stich. Repeat till the end (V stitch)
Repeat with 8 rows of sc/ch and then 2 rows of the V stitch until you run out of yarn with a full row. For me this was 28 rows
Change to your first gradient color then repeat the pattern until you run out of yarn with a full row. Repeat with the next 2 gradient colors. What I found was that some of the colors had a row more or less than others, but I didn't worry about it because I knew it would blend in the end.
When you get to your 4 gradient color - count your rows. You'll want to make the same number of rows on the other side.
First row with 4th color: Use whatever pattern it should be - whether it is a sc/ch or V stitch. You want to do this for 106 stiches (or half the number of stitches you cast on). Then chain stitch for 104 stitches.
Second row with the 4th color: Use whatever pattern it should be - whether it is a sc/ch or V stitch for the whole row. The first half will be into the chain you just made and then the second half will be in the stitches. You're making the opening in the front right now!
Now just continue on your pattern with the rest of the 4th color then the 5th and the 6th.
Switch back to your base color. Count the number of rows that you've done with colors 4, 5, and 6. Subtract that from the number of rows you had in the first half - that's the number of rows you need to finish. Follow the same pattern to finish.

I decided that I wanted a boarder in the front so I added in 2 rows of the sc/ch in the middle to give it a little pop
I know my patterns aren't as disciplined as most patterns, but as I've been learning to modify other people's patterns and design my own I realized that I wish more patterns helped me how to think about the pattern. Once I started thinking about what the pattern was telling me, it really helped me determine how I can go off and make my own.

So last week we went up to Chaumont to visit the property in the snow. We ran into a few challenges. First, was a major snowstorm on the way up Thursday night. We ended up having to stop in Binghamton because of a winter storm. The rain was fine, but when we hit the ice it was getting a little dicey. It actually wasn't too far to the "snow line", but driving slow into the night so we stopped at a hotel.
Getting the dogs into the hotel was interesting. We took them for a walk, but they were both so excited about the new place and the snow neither would do their business. But on the walk we saw there was covered parking so Craig went to move the car while I went with the dogs up to the room. I get into the hotel and my glasses completely fog up so I can barely see. River and I get into the elevator and in a millisecond Willow backs out of her harness and starts running away. River and I barely get out of the elevator before it closes to go after Willow. They are both still so excited and start running around. Takes me a couple of minutes to catch Willow and get her back in her harness.
We go back to the elevator and Willow is petrified of it. I end up having to drag her in by the scruff of her neck. Later I realized that was literally her first encounter with an elevator. We get to the room and the two of them are in crazy mode just running around, and also looking for Craig. They calm down slightly when he comes but won't settle. River finally decides to go to bed under the covers and gets repeatedly attacked by Willow. Willow just won't settle and eventually she indicates she needs to go out. It's now nearly 1am. Craig gets out of bed gets dressed and takes her out. He has to bribe her in and out of the elevator with treats. Once he gets back River starts begging to go out.
Do the dogs sleep in? No. Of course not. They are up at 630 wanting to play. I had a call at 8 and right after I get on the dogs want to go out. I hear them leave and then 30 seconds later Willow is back. Craig was unable to bribe her into the elevator and manage River.

It was really cold and snowy up at the property. We weren't able to park and go down to check on the land because the shoulder hadn't been plowed yet so there was no place for us to park. We did take the dogs out on the Chaumont Bay and they had a blast.
Since it was so cold we spent a lot of time in the hotel room and I finished the sweater I was working on and started a new sweater. I got the back panel and one side panel done before I flew down to Atlanta for work on Sunday. This sweater really was a lot of emergent design. The yarn just told me what it wanted to be and I went with it.
The yarn is from Miss Babs - 2 skeins of Moss and 1 of Birthday Favors in Big Silk. I used a 6mm hook.
Here's the pattern....
Back panel:
Chain your alternate color to desired length. I'm 5'3 and I wanted it to be to about mid thigh so I chained 92.
Row 1: SC into the 3rd chain from the hook. *ch 1. skip a stich. SC. * Repeat * to the end of the row
Row 2: Ch 2. SC into the chain space. ch 1. Repeat to the end of the row
Row 3: SC into the chain space. *Skip a stich. single crochet twice* Repeat * until the end of the row
Row 2-18: Ch 1. 2 SC into the space between the two stitches till the end of the row
Row 19: Switch to your alternating color. Ch 2. SC into the space between the two stiches ch 1. Repeat to the end of the row
Row 20-22: Ch 2. SC into the chain space. ch 1. Repeat to the end of the row
Repeat the alternating pattern of 16 rows of the main color and 4 rows of the alternate color until you reach your desired width. I had 4 sections. To know the width you're looking for measure from shoulder to shoulder across the back. You want it to be 1-2 inches larger than shoulder to shoulder.
For the last section only do 2 rows of the alternate color.

Side Panel - Make 2
Start with how many times you repeated the back panel. I did 4 so I knew that my side panels should be 2 of the pattern across. Since the edge in the alternate color is only 2 that means there will be 2 stitches in the center when I sew the panels together for where the neck will be. Since this has vertical stripes its important that the stripes from the back meet the stripes in the front. For my size with this yarn it worked out that a pattern of 16 of the main color with 4 of the alternating color worked - you can play it with it to determine the right pattern for you.
For the side panels - end in the main color. We'll add the alternating color as a collar later.
Sew the side panels to the back panel. The side panel with the alternating color should align to the alternating color of the back panel. Since you have 2 rows on each of the ends, sewing them together you end up with 4 rows together. When sewing the top together pay particular attention that your stripe from front to back lines up.
Now we can start making the collar. I decided I wanted a really wide collar so I did the alternating color for 12 rows. Once I finished the yarn decided it needed a ruffle edge.
Collar Row 1: Ch 2. SC into the space between the two stiches ch 1. Repeat to the end of the row
Collar Row 2-12:Ch 2. SC into the chain space. ch 1. Repeat to the end of the row
Collar Row 13: Ch 2. 2 HDC into the first stitch. * 3 HDC into the ch stich. 3 HDC into the next stich. * Repeat * until the end of the row
Sleeves
I like to start my sleeves on the bottom because it hides the join nicely - no one is ever looking in my armpit :) For my sweater I started with my main color. In retrospect, I probably should have started with 2 rows of the alternate color, but by the time I realized that I was done with both sleeves and it looked fine. Make your decision what you want to do.
Sleeve length is going to depend on the length of your arms. Measure from the top of your shoulder to the wrist. I have very short arms so I did the pattern 3 times and it worked perfect.
Row 1-16: SC into the 2nd stich from the hook twice. *Skip a stich. single crochet twice* Join with a slip stich. Repeat * until the end of the row
Row 17-20: Switch to your alternating color. Ch 2. *SC into the space between the two stiches ch 1.* Join with a slip stitch. Repeat to the end of the row
Repeat rows 1-20 twice.
Sleeve end
Row 1: Ch 2. SC into the space between the two stiches ch 1. Repeat to the end of the row
Row 2-4:Ch 2. SC into the chain space. ch 1. Repeat to the end of the row
Row 5: Ch 2. 2 HDC into the first stitch. * 3 HDC into the ch stich. 3 HDC into the next stich. * Repeat * until the end of the row
Pockets make 2
Chain 14 in the main color
Row 1: 2 SC into 2nd chain from the hook . *Skip a stich. single crochet twice* Repeat * until the end of the row
Row 2-8: Ch 1. 2 SC into the space between the two stitches till the end of the row
Row 9: Switch to your alternating color. Ch 2. SC into the space between the two stiches ch 1. Repeat to the end of the row
Row 10-12: Ch 2. SC into the chain space. ch 1. Repeat to the end of the row
Row 13-20: Ch 1. 2 SC into the space between the two stitches till the end of the row
Re-orient the pocket so you're going across the top now
Row 1: Ch 2. SC into the space between the two stiches ch 1. Repeat to the end of the row
Row 2-4:Ch 2. SC into the chain space. ch 1. Repeat to the end of the row
Row 5: Ch 2. 2 HDC into the first stitch. * 3 HDC into the ch stich. 3 HDC into the next stich. * Repeat * until the end of the row
The stripe for the pockets lines up with the last stripe before the collar on the panel. How high up it goes depends on the length of your arms. Mine are 5 inches from the bottom. Sew on the pockets - leave the ruffle free

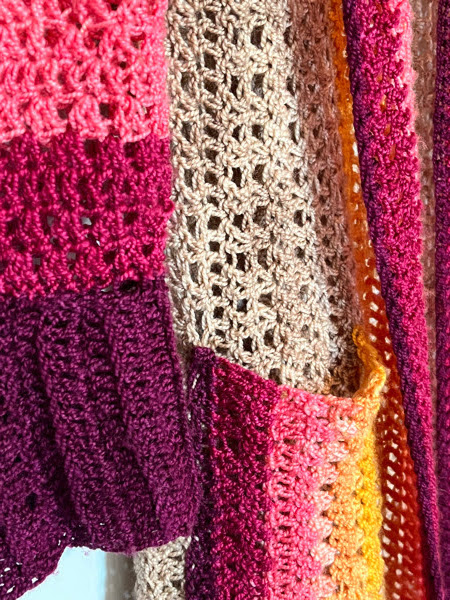
I've had 6 skeins of of Aran tweed from Briar Rose for a few months. I had a vision of this ruana in my head, really happy how it turned out.

It's made from two rectangular panels sewed together.

Cast on as many stitches as you need to reach the desired length. Mine is 116 stitches.
First row. Half double crochet (hdc) 3. *Bobble stitch hdc 10* until end of row hdc to finish.
Odd rows hdc to one stitch past the bobble, bobble - repeat
Even rows hdc to one stitch before the bobble, bobble - repeat
The bobble should cascade

Make it as wide as you want for one side. Make second panel. Sew together half way.
You could make this all one color. Alternate colors. Make stripes. Mine has two longer stripes then two shorter stripes. This would work with any weight yarn.


