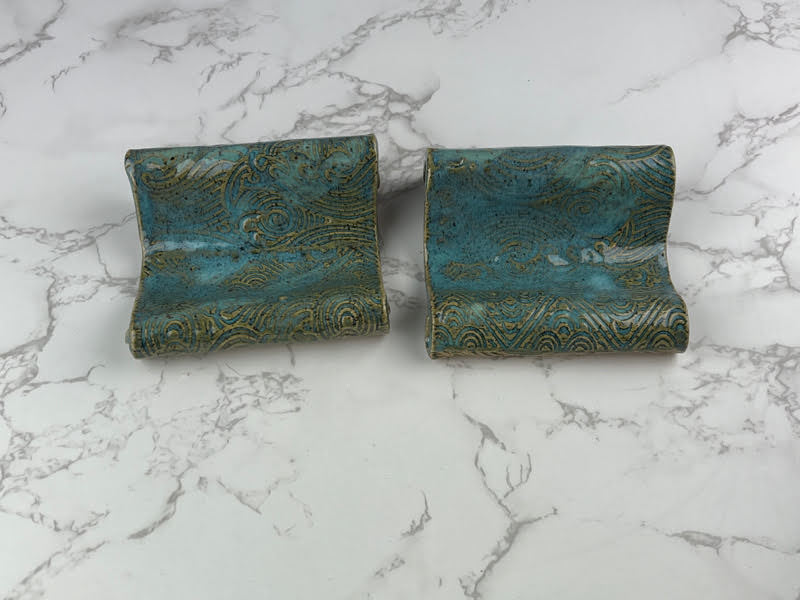
I was flipping through something last week and saw a double chip and dip. I thought it was a neat idea, especially as someone who always makes way too much food for a party.
I knew when I started that I wanted the dip to be on the ends and then a divider up the middle. Initially, I thought I'd make the end round like a mug would be, but as I placed the rounds in there it didn't fit the shape so I ended up attaching the ends to the side instead.
The wave in the middle happened because the clay was a little too floppy, but I really liked it so I shaped it and left it that way. I still have some clean up to do, but I need the clay to setup some more before I can keep working with it.

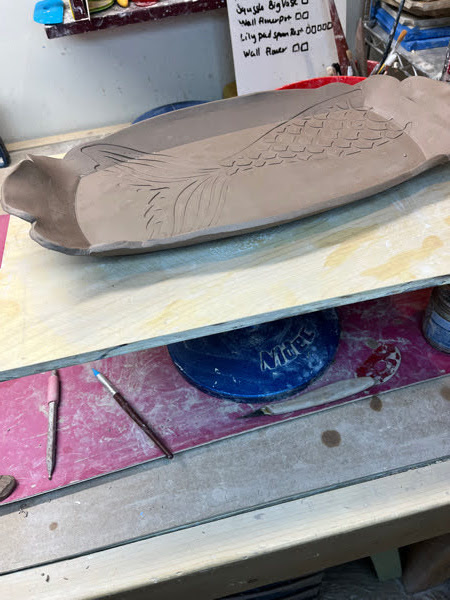
I was at a craft store not too long ago wondering around in the aisles and stumbled on a metal mermaid tail. I'm fairly certain the intent was that you mount it on your wall as decoration, but what I saw was texture! It fit on this tray perfectly. Now I have to figure out how I want to glaze it. Do I do all one color or try to separate the mermaid tail from the background?
This weekend I was looking at my teapot and decided it needed some tea cups. After I made the tea cups, I decided they needed saucers. I used a smaller template than I usually do for the cups - they're basically just small mugs. The saucers are just press plates with the 5 inc GR Pottery Form.

Now that I had the tea cups, I was missing the creamer and sugar bowl so I just had to make those. I went back to basically mug size, but made them a little wider. I made the sugar bowl lid the same way I did the teapot lid.

Then the sugar bowl needed a spoon so I shaped one. I'm pretty happy with my little tea set. Now I just have to get over wanting to keep it - I do not need a tea set, I do not need another tea set.

I was just invited to the Cloisters Sprint Tea and Bazaar April 29 and 30th. I have long wondered if one of the things that all potters have to do is make a teapot. There is a teapot in at least every 1 out of 2 issues of Pottery Making Illustrated. I decided that having been accepted into an event at a tea meant it was my time to make a teapot (or two).

For this one I used my new MKM roller of trees. I made the feet and the top with a leaf sprig I made a while ago. I'm really pleased with how it came out and I do think that making a teapot is a right of passage. It involves a lot of skills. Some of the skills are the same as making a large bowl, but then making the lid requires some new skills.

The second teapot is also made with a new MKM roller. The spout of a teapot is also a new skill. You have to make the tip high enough so that the water doesn't spill out when you don't want it to. Both of these have a rather simple spout that I could definitely refine over time, but they work!

The handle on a teapot is slightly different than a mug or a pitcher. First the body is shorter and wider, but then also I think the handle has to balance out the spout. I'm really happy with my first two tries, but I can only get better.

I had another slab of clay and I've been meaning to make a pitcher for a while so instead of a third teapot I made a large pitcher. On this I used my new stamps from DeLa Designs.

Flowers, dragonflies, and flowers for spring.

I didn't really know what to expect from NCECA having never been there before. It was an amazing experience and I'm glad I went, but I'm still on the fence as to whether I would go back.
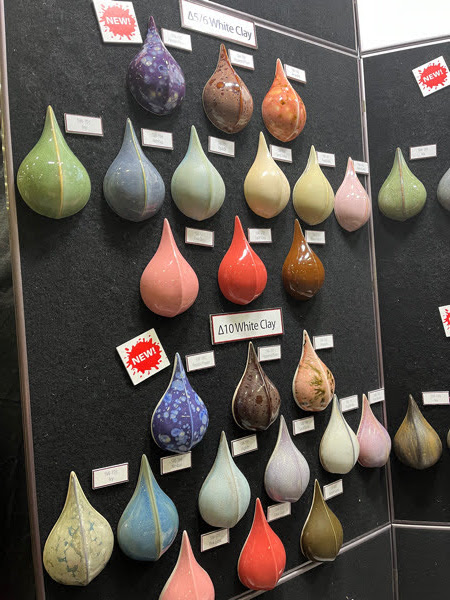
The swag from the resource hall was awesome. I have a whole lot of glazes and clays to try. I actually really hope I don't fall in love with some of the clay becase it would be very expensive to ship.
As someone who has a professional life outside of clay it was interesting walking around the resource hall with all the schools offering masters programs and residencies. I may have some fantasies about working in clay full time, but I don't see it in my near term future. This I think is actually why I'm on the fence on whether I would go again - the conference is definitely geared towards students and educators. It shouldn't be surprising - it's literally in the name. National Council on Education for the Ceramic Arts.
This particular conference definitely had stuff for the hobby potter, but it wasn't geared towards the hobby potter. There were a lot of sessions about how to better be inclusive in the classroom - things which just don't apply to me. I was specifically interested in sessions about making. I wanted to learn a lot of new techniques and see how to apply them. There were a few sessions catering to that, but not nearly as many as I would like.
Shayla Marsh gave an excellent presentation on Digital Tools and the Ceramic Surface: Craft Cutters in the studio. I didn't learn a whole lot in this one, but hearing it gave me the confidence that I do actually know what I'm doing with my Cricut and just need to keep exploring more.
YoonJee Kwak demonstrated a hand built perforated vessel that gave me a ton of ideas.
Naomi Clement did an excellent handle pulling demo. I'm definitely going to be looking into her work more.
Sam Chumley did a cool demo on Underglaze Prints and Variations. There was also an excellent awkward moment with half a hot dog print that I will never forget. This actually reminds me of my one big beef with the conference. The people who were in charge of the cameras were not pottery people. They kept trying to focus on the speakers face when all we ever wanted to see was what they were doing with their hands. If I could provide one piece of advice it would be to have someone who actually understands what people want to see in charge of the cameras.
The last session we saw was with Christina Orthwein who demonstrated her Carved Slab Vessels. They were absolutely gorgeous and one of the few sessions I actually took a picture in.

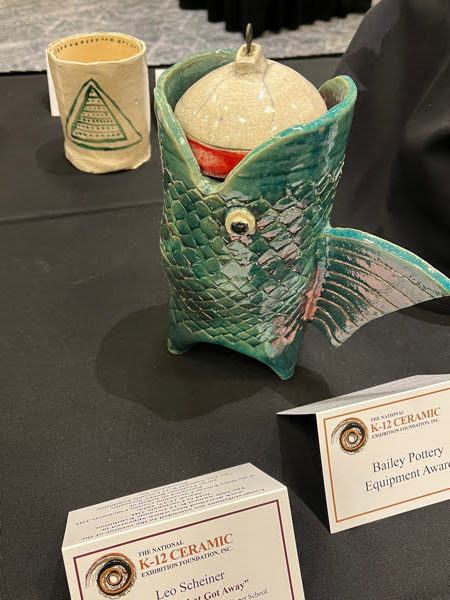
One of my favorite parts of NCECA was all the little galleries that they had. This was the most impressive of the galleries because it was all work by kids up through 12th grade. I didn't do the best job of getting the tags with their names in all the pictures, but the work was just so impressive.


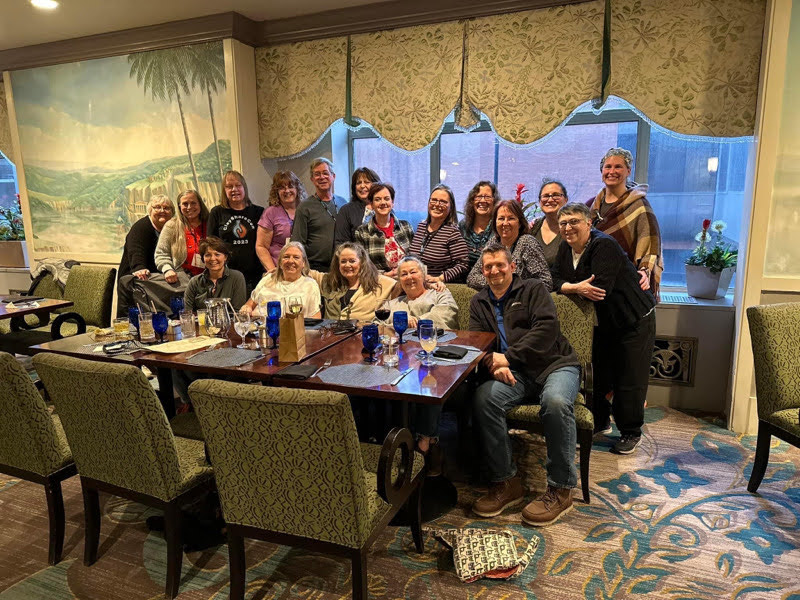
I had the best of intentions last week that I was going to blog while I was at NCECA, but it was such a whirlwind that I barely managed to take enough pictures. We did have a Clayshare dinner and took a group picture. It was a lot of fun getting to meet everyone.
The resource hall was overwhelming on the first day. The crowd was insane because there weren't any workshops going on yet. We wondered on the second floor and managed to capture this birdseye view. This doesn't even capture it all, there was a whole section of universities and other schools off to the left that you couldn't see from above.

Amaco has 6 new fluxes coming out that are all similar to Honey Flux, but are different colors.

Mayco has a dozen new glazes that are about to come out. I was able to get the sample pack from the Dick Blick booth in addition to the sample of Nimbus that Mayco was giving away.
Mayco also has a few new underglazes coming out.

And also a few new Stroke and Coats.

This is the shirt that I mostly made the first weekend of the Maryland Home and Garden show which is why I'm calling this my Garden Party Shirt. I'm always making something when I have shows. I always try to do a pattern that's not too complicated because I'm aways starting and stopping. Inevitably I find an issue and have to frog a few rows. Since I had just done this stitch for the Ombre Coat it was in by brain and easy to do, but I still ended up frogging a few times.
This shirt came out really cute. I intentionally made it a little shorter because the last time I used this yarn it stretched a lot. This is just a little less than one skein of Quitness by Briar Rose Fibers. This yarn is a heavy lace weight and is approximately 650 yards and I used a 4.5mm hook.
Stitches:
ch - chain
sc - single crochet
dc - double crochet
sl st - slip stitch

Panels - make 2
Cast on 60
Row 1: Double crochet in the 4th chain, 2 dc in the same stitch, *sk the next 3 stitches, sc, ch 2, 4 dc in the same stitch as the sc. Repeat from * across. Finish by skipping 3 (or more/less if you're adjusting) and sc in the last stitch.
Row 2: ch 3, 2 dc in the same stitch, * sc in the chain space (skip the dcs), ch 2, 4 dc in the chain space. Repeat from * across. Sc in the last stitch.
Row 3-30: repeat row 2
Row 31: Ch 3, 1 dc in the sc, *hdc in the next dc, 1 sc in the next 3 dc, sk the chain space. Repeat from * across ending with a dc.

Sew the panels together leaving 9 inches for the neck and 7 for the arms. I also left the bottom 2 inches open. You can choose to have the shells facing up or down, but make sure both panels are facing the same direction.
Now for the sleeves
Row 1: ch 3, *sk the next 3 stitches, sc, ch 2, 4 dc in the same stitch as the sc. Repeat from * across. sl st in the ch 3 from the start of the row.
Row 2: Reverse direction. ch 3, * sc in the chain space (skip the dcs), ch 2, 4 dc in the chain space. Repeat from * across. sl st in the ch 3 from the start of the row.
Row 3-10: repeat row 2
Row 11: Reverse direction. Ch 3, 1 dc in the sc, *hdc in the next dc, 1 sc in the next 3 dc, sk the chain space. Repeat from * across ending with a sl st.

Second weekend of the Maryland Home and Garden show is this Friday (10-6), Saturday (10-8), and Sunday (10-6). The craft show is actually in a different building than the main home and garden. The craft show is at the top of the hill in the Exhibition Hall. My booth is c306 and I'm in the aisle right in the middle. Would love to see you all.

This yarn really threw me for a loop. I tried a pattern on the web a couple of times and ended up frogging the whole thing twice. Eventually I found this pattern from Maya Luna Corazon that I used for inspiration. A lot of this pattern can be found on her blog, these are my modifications. I would not call this pattern my own.
I used 6 skeins of yarns from Dragonfly Fibers. I thought it was 4 colors, but looking at the labels I'm seeing that it's only 3. The darkest is Mr. Carson, the middle grey is Tarnished, and the two lighter gres are Silver Fox. There is definitely a notable difference in the dye lots of the last two. I'm good with it though as it adds to the ombre effect. The skeins are BUGGA! and each skein is about 400 yards in sportweight. If I had to guess I have about 150 - 200 yards left over. This stitch (I don't know what it's called) definitely eats up a lot of yarn.
This sweater is intentionally made to be really oversized and roomy. When making this keep in mind that I'm only 5'3 if you're taller or making it for someone who is - you're going to want to make it longer. The back lands just about at my knees with the front panels draping down to about mid-calf.

This pattern uses a 5.5 mm hook.
Stitches:
ch - chain
sl st - slip stitch
sk st - skip stitch
sc - single crochet
dc - double crochet
First front panel.
Cast on 84
Row 1: Double crochet in the 4th chain from the hook and all the way across
Row 2: ch 4, *sk st, dc, ch. Repeat from * across. DC in the last stitch
Row 3: ch 3, * dc in the chain space, dc in the dc. Repeat from * across ending with a dc in the last stitch
Row 4: ch 3, sk st, dc in the next 2 dc, *ch1, skip nexxt dc, dc in the next 3 dc. Repeat from * across ending with a dc in the last stitch
Row 5: ch 3, sk st, dc in each of the next 2 stitches, *dc in the chain space, dc in each of the next 3 dc. Repeat from * across ending with a dc in the last stitch
Row 6: Repeat row 2
Row 7: Repeat row 3
Row 8: Repeat row 4
Row 9: Repeat row 5
At this point you need to have stitches in a multiple of 4. If you don't then fudge the next row to get to 4.
Row 10: ch 3, 2 dc in the same stitch, *sk the next 3 stitches, sc, ch 2, 4 dc in the same stitch as the sc. Repeat from * across. Finish by skipping 3 (or more/less if you're adjusting) and sc in the last stitch.
Row 11: ch 3, 2 dc in the same stitch, * sc in the chain space (skip the dcs), ch 2, 4 dc in the chain space. Repeat from * across. Sc in the last stitch.
Row 12-30: Repeat row 11.
Row 31: Ch 3, 1 dc in the sc, *hdc in the next dc, 1 sc in the next 3 dc, sk the chain space. Repeat from * across ending with a dc.
I wanted this to go shoulder to shoulder so my front panel measures 21 inches. You can make it wider or shorter based on the measurements you're going for. I started with the darkest color intending to go dark to light. This first panel took about 1/4 skeins of the dark color. I started with the same dark color intenting to make the sleeve the same color at the end. While in a lot of patterns you can make both panels at the same time, since this is an ombre sweater I waited to make the other panel until I had a better idea of how the colors would play in.
Back Panel
Cast on 84
Row 1: Double crochet in the 4th chain from the hook and all the way across
Row 2-4: ch 3, 2 dc in the same stitch, * sc in the chain space (skip the dcs), ch 2, 4 dc in the chain space. Repeat from * across. Sc in the last stitch.
This is where I changed colors.
Row 3-32: Repeat row 2 in new color.
This is where I changed colors again.
Row 33-38: Repeat row 2 in new color.
Row 39: Ch 3, 1 dc in the sc, *hdc in the next dc, 1 sc in the next 3 dc, sk the chain space. Repeat from * across ending with a dc.
Row 40: ch 3, dc in each stitch across
Second front panel
I wanted to have it look exactly the same as the other panel so I started with the 4th color
Cast on 84
Row 1: Double crochet in the 4th chain from the hook and all the way across
Row 2: ch 4, *sk st, dc, ch. Repeat from * across. DC in the last stitch
Row 3: ch 3, * dc in the chain space, dc in the dc. Repeat from * across ending with a dc in the last stitch
Row 4: ch 3, sk st, dc in the next 2 dc, *ch1, skip nexxt dc, dc in the next 3 dc. Repeat from * across ending with a dc in the last stitch
Row 5: ch 3, sk st, dc in each of the next 2 stitches, *dc in the chain space, dc in each of the next 3 dc. Repeat from * across ending with a dc in the last stitch
Row 6: Repeat row 2
Row 7: Repeat row 3
Row 8: Repeat row 4
Row 9: Repeat row 5
At this point you need to have stitches in a multiple of 4. If you don't then fudge the next row to get to 4.
Row 10: ch 3, 2 dc in the same stitch, *sk the next 3 stitches, sc, ch 2, 4 dc in the same stitch as the sc. Repeat from * across. Finish by skipping 3 (or more/less if you're adjusting) and sc in the last stitch.
Row 11: ch 3, 2 dc in the same stitch, * sc in the chain space (skip the dcs), ch 2, 4 dc in the chain space. Repeat from * across. Sc in the last stitch.
Row 12-26: Repeat row 11.
This is where I changed back to the 3rd color.
Row 27-30: Repeat row 11.
Row 31: Ch 3, 1 dc in the sc, *hdc in the next dc, 1 sc in the next 3 dc, sk the chain space. Repeat from * across ending with a dc.

Sew together the panels. I left 2 inches on the bottom of the sweater purely for asthetic. Leave about 7 inches for the arm hole. Across the top sew from the shoulder to the last stitch of the main pattern - leaving the section with the dc and ch stitches to hang down.
Making the sleeves you want to match the sleeve color to the stitch color where the sleeve is. If you've followed what I've done that's color 1 and 3.
Row 1: ch 3, dc in the same stitch, *sk the next 3 stitches, sc, ch 2, 4 dc in the same stitch as the sc. Repeat from * across. Finish by skipping 3 (or more/less if you're adjusting). Sl st to join.
I picked up 8 of the modified shell stitches with this.
Row 2: Reverse direction. ch 3, dc in the same stitch, *sk the next 3 stitches, sc, ch 2, 4 dc in the same stitch as the sc. Repeat from * across. Finish by skipping 3 (or more/less if you're adjusting). Sl st to join.
Row 3-13: Repeat row 2.
Row 14: Ch 3, 1 dc in the sc, *hdc in the next dc, 1 sc in the next 3 dc, sk the chain space. Repeat from * across ending with a dc.
Adjust the sleves to whatever length you want. I assumed this would stretch a bit so my sleeves end right at the wrist for now.

I made the pockets to blend in with the same color on the front panel.
Cast on 14
Row 1: Double crochet in the 4th chain from the hook and all the way across
Row 2-9: ch 3, 2 dc in the same stitch, * sc in the chain space (skip the dcs), ch 2, 4 dc in the chain space. Repeat from * across. Sc in the last stitch.
Row 10: Ch 3, 1 dc in the sc, *hdc in the next dc, 1 sc in the next 3 dc, sk the chain space. Repeat from * across ending with a dc.
I like to sew on the pockets where the bottom is the bottom of my fingers when I hold my arms straight. Before you sew on the pockets make sure your sweater is right side out.
Mine are 15 modified shells from the bottom and 2 back from the dc area.
This kiln isn't packed as tightly as I normally get it, but there were some things I wanted to get for the Maryland Home and Garden show and the bowls take up a lot of space. I'm particularly happy with the nested bowl set. All 3 came out perfect.
The two refires also came out much better, which doesn't always happen.