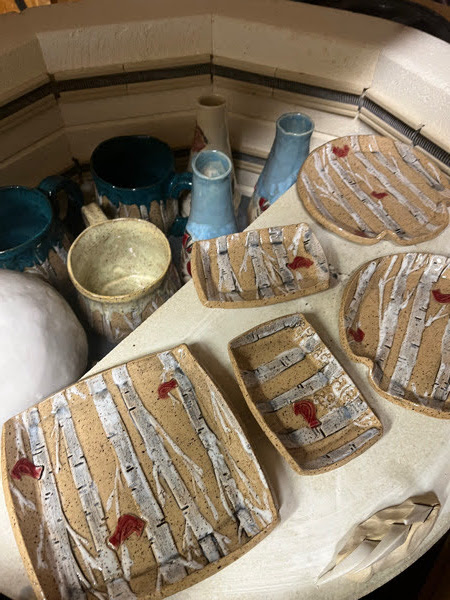
In my last glazing I had a ton of crabs, this one has a ton of birch trees and cardinals. I think the birch trees and cardinals were slightly easier than the crabs, less small parts. I'm really starting to feel like I'm building up inventory for the first few shows of the year.
Of course, I have no where to put this inventory. I need more shelving in the basement, but before we can put that up I have to create space. It's going to be a process. I have a ton of glassware that I just don't use and there are more efficient ways to store it than in the 1970s monstrocity that was passed down from my grandparents.
This is least varied kiln that I've ever done. So many crabs! I feel like I spent an entire day just glazing crabs. I'm not sure if at this point in the process if that made the glazing process faster than normal. I'm really pleased with how all of them came out though.
My favorite pieces are the Calla Lily candle holders, but the vase made of leaves is a close second. I'm also really pleased with how the soap dispensers came out. I'll post a picture in a few days to see if the actual dispenser fits.
My favorite pieces are the Calla Lily candle holders, but the vase made of leaves is a close second. I'm also really pleased with how the soap dispensers came out. I'll post a picture in a few days to see if the actual dispenser fits.


First glaze firing of the year! This glaze firing is the first one that's based on me focusing on building inventory of specific things. There are so many crabs in this kiln. I did not count the number of crabs that I glazed, but it was a lot. I glazed crab mugs, spoon rests, appetizer plates, sponge holders, magnets, and more. There were so many crabs that not all made it into the kiln.
Also in this kiln are the first two soap dispensers that I'm trying out. I'm excited and nervous about these. Worst case scenario they are a new shape of vase. Also in this kiln are all of the Calla Lily candle holders that I've made recently.

I had making a couple more squiggle bowls on my to do list for 2023. I've made a couple of these and they're always really well liked. I love how they look. These are made using the puzzling molds from Learn Fired Arts.

Rather than make two of the same I decided to make a second one in my small bowl form. I feel like this one is slightly more functional than the one above. The one above is definitely art, this one you could put fruit in.

When I was making these I had just a tiny bit of coils left over so I grabbed a really small sphere. When I've made spheres in the past I've always made them with the hole side down, but as I was looking at this I wondered - could it be a candle holder? I'm worried the hole will be too small by the time it shrinks. Also not sure if will be sturdy enough. We shall see. Worst case it becomes a very small art object.

Made a whole bunch of my Calla Lily candle holders. I think I still need to make more. I never had more than 1-2 sets at a show, but I never brought them home with me. I'm thinking about making them in more colors this year to add some more variety.

This pattern was built around buttons. I got these medium Hazelnut buttons at the Maryland Sheep and Wool Festival from Favour Valley Wordworking. I found them when I was looking for the bear buttons for the Reclaim Poncho with Arm Holes and I wanted to put them to use. I stood in my yarn room (ok it's a guest room, but it has a lot of yarn in it) and saw 6 skeins of Aran Tweed from Briar Rose Fibers and it was a perfect match.
Since I only had 6 skeins I knew this had to be a shorter sweater than I often make.

The sun was not cooperating in my office so I decided to try out using my pottery light setup (above). I think it looks a lot better than this pic even if I can't show it completely hanging.

This pattern uses the rice stitch which is basically just alternating front post and back post double crochet. It's looks like it's open, but it's still a pretty warm stitch.

I used a 5.5 mm hook for this.
Stitches:
ch - chain
sc - single crochet
sc blo - single crochet back loop only
hdc - half double crochet
hdc blo - half double crochet back loop only
dc - double crochet
fpdc - front post double crochet
dbdc - back post double crochet
sl st - slip stitch

Cast on 60.
Row 1: Dc in the 3rd chain from the hook, dc in each chain across
Row 2: ch 1, hdc in the first stitch, *fpdc, bpdc. Repeat from *, hdc in the last stitch
Repeat row 2 26 times (total of 28 rows)
Front panels - make 2
Cast on 26
Row 1: Dc in the 3rd chain from the hook, dc in each chain across
Row 2: ch 1, hdc in the first stitch, *fpdc, bpdc. Repeat from *, hdc in the last stitch
Repeat row 2 26 times (total of 28 rows)
Sew the panels together. Make sure that your first row from all 3 panels (which just has the dc) is at the bottom. I like to leave about 2 inches at the bottom before I start sewing. Leave 8 inches for each of the arm holes.

I always start my arms in the arm pit. Make sure the sweater is inside out. The biggest struggle I have with the arms is picking up the same number of stitches. For this pattern I picked up 43 stitches. I decided to make the arms for this sweater extra long. In retrospect, if I had shortened them a couple of rows I could have had a bigger collar.
Row 1: Ch 2, dc in each stitch around picking up 43 stitches
Row 2: ch 1, hdc in the first stitch, *fpdc, bpdc. Repeat from *, Sl st to join
Row 3-11: repeat row 2
Row 12: ch 1, hdc in the first stitch, *fpdc, bpdc. Repeat from *, in the last stitch join 2 together to decrease. Sl st to join
Row 14-18: repeat row 12
For me the decreasing is never an exact science. I try the sleeve on constantly and see if the taper feels right.
For the wrist - cast on 10.
Row 1: hdc in the second stich from the chain, hdc to the end (10 stitches)
Row 2: ch 2, hdc blo to the end
Row 3: ch 2, hdc to the end
Repeat row 2 and 3 until you have 16 rows
Leave a long tail to sew the end together and then onto the end of the sleeve. Important - make sure that you have your sweater and your sleeve both inside out when you sew together.
Repeat for the other arm.

I knew I was running out of yarn so I made the pockets before the collar.
Pockets - make 2
Chain 18
Row 1: Dc in the 3rd chain from the hook, dc in each chain across
Row 2: ch 1, hdc in the first stitch, *fpdc, bpdc. Repeat from *, hdc in the last stitch
Repeat row 2 4 times (total of 6 rows)
Turn your sweater right side out. You're going to start the collar on the bottom right.
I modified this a bit after I played yarn chicken and lost.
Row 1: Ch 2, hdc up over and down
Row 2: Ch 1, sc blo up over and down
Row 3: ch 1, sc up over and down
Row 4: Ch 1, sc blo up over and down

Now you can position the pockets and sew them on. I put mine about 3 inches from the sides and 2 rows up from the bottom. You can adjust as needed.
Last, but not least - the buttons! I had 6 buttons so I positioned them and decided to start 2 inches up and space them out 2 inches up the left side.
It's a really cozy little sweater. This aran tween yarn is pricey, but it's one of my favorites.


