
A few months ago I saw a picture of a Rat Tail cactus in Better Homes and Gardens. The name is tragic, but the actual cactus is these long skinny things (ok they look like rat tails) and these gorgeous pink and purple flowers. I found a place on Etsy that had them, but there were all kinds of warning about shipping when it was cold. Since it warmed up the last week I took the plunge. Of course I didn't just buy the rat tail cactus, I also bought 5 other cacti as well. They came this weekend and they were packaged perfectly.
Seeing as how I was already in planter mode this weekend I decided that I should make planters for them. The Rat Tail cactus and the Sedum Morganianum Donkey's Tail (who names these?) both needed hanging pots. I had made a conical hanging planter before. It's fairly simple - cut a large circle, make a cone, dry upside down. It will fire upside down too, so the top edge (currently resting on the board) will be bare clay.

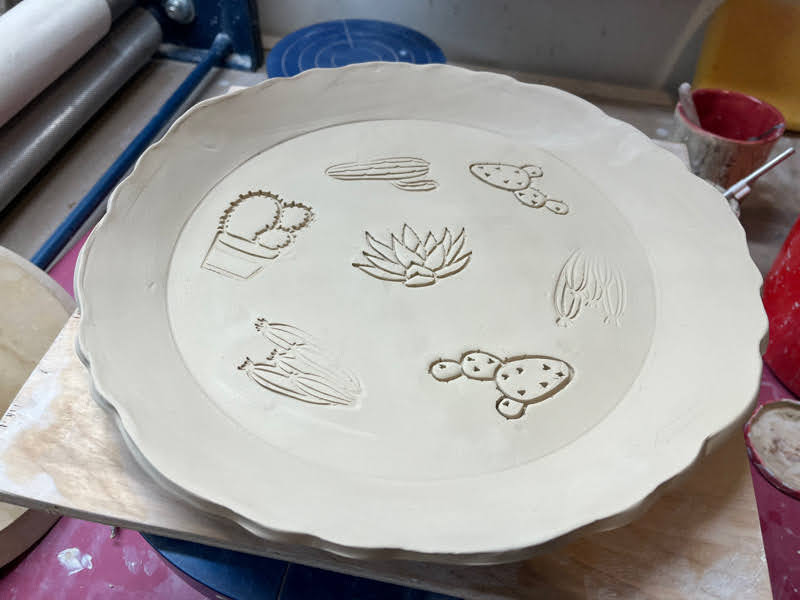
For the other hanging planter I wanted to try something different. I used the mold I made from my wok as the form. I draped the clay over it and created intentional folds. The stamp is one that I made. See the upside down flower? It's the first time I've used it and I really like how simple, but pretty it is. It too will get fired upside down and have a bare edge. I still have some cleaning up to do on this one, it is still pretty wet.

I feel like I'm getting a late start on this, but I decided to make some planters for myself for spring. I have a lot of plants. A lot of plants. There are 4 separate areas outside of my house where I grow things. The front is all perennials that start blooming while its still cold (with crocus) and there are things that bloom all the way through October. The side outside the fence is 6 boxes where I have herbs and veggies. The side inside the fence is 100 plus pots of herbs and veggies. Finally, there is the deck and the surrounding garden which has a lot of flowers and a few herbs.
I feel like every year I buy more plastic pots from various garden stores and every year I have more that disintegrate from the sun. I’ve been getting better at making pots so I decided this year to try to make some pots. I made this one a few weeks ago which is currently in the bisque kiln and then this weekend I decided to make some more medium sized ones.
I used one of my GR Pottery forms for the base. The walls are 5 inches high and the adorable stamps are from De La Designs.

I had to make a water catcher to match.
The other pot I made I used one of the stamps that I carved. I really like how it looks like trees.

These are drying under plastic now. Hopefully with the temps rising I can bisque them in a week or two.
Wine in the Woods is coming up! It will be the first time it's held since 2019. I'm so excited and I've invited some newbies to join. In preparation for that I made a few wine glass holders.

For those of you not familiar with Wine in the Woods, it's an outdoor wine festival held yearly in Maryland. You pay a fee to get in and they hand you a wine glass. All the wineries from Maryland have tents and you can try all (or some) of their wines. You're allowed to bring in food, water, chairs, etc. with you. Also you can buy bottles of wine to share among friends. The wine glass holder is a must so you don't have to hold your glass all day. They sell them there, but I thought - I can make this. I ended up making about 6 in a couple of hours. The first one took a bit to figure out (and size specifically to the smaller Wine in the Wooods glass), but the rest came together quite quickly.

I roughly followed this pattern from Heart Hook Home, but had to adjust for the smaller Wine in the Woods glass. Since the glass is pretty small I ended up chaining 12 instead of 18. I also played with the last rows sometimes chaning it up to just be single crochet and other following the pattern up. I also made the lengths varying sizes since people aren't all the same shape.
This is a great project if you just have a small amount of leftover yarn and you're just not sure what to do with it. It could be done with any weight yarn.
I know I make a lot of things in crochet, but this tank is the hippiest (is that a word?) I think I've ever made.

I started with this pattern for the Kanata Kerchief Tank, but I made some changes. The first change was that I had this 6 pack collection from Fiber Optic Yarns in Kashmir. I made the squares with one color inside and a different color outside. I also changed the pattern to repeating rows of puff stich, double crochet, and v stitch. I'm really happy with how it came out, but it might be too hippy for me.

Been making more mugs in 60 an Brown Bear. I still really like bmix, but also having a bit of a love affair with them as well. These are textured, but also made a bunch of blanks to play with Cricut stencils on.
These are laguna 60. The waves are made with a rolling pin from Jessica Putnam Phillips. This clay is rather groggy so I've been using my white sponge from mudtools more.

Brown Bear is really smooth like bmix. I love the way these stamps from De La Design Gifts.

So as I was sewing this together today wearing a purple shirt I made maybe a month ago I realized I made nearly the same shirt twice. The one from a month ago is a gradient that I made in two giant granny squares. This one was made in rows, but with the same stitch. Clearly I see purple yarn and think - 3 half double crochet!

Cast on any number of stitches in a multiple of 3 to desired width.
Row 1: 2 half double crochet (hdc) into the 3rd stitch from the end. *skip 2 stitches. 3 hdc. *repeat until the last stitch. 1 hdc in the last stitch
Row 2: ch 2. 2 hdc into the chain stich. *3 hdc into the last chain of the 3rd hdc below. * repeat until the last stich. 1 hdc in the last stich
Repeast row 2 until desired length
Make another identical rectangle then sew together leaving space for the neck and arms


