
A few years ago when I was first starting to branch out beyond scarves and hats I started making sweaters. There was this one sweater that I called the Frankensweater because it started off amazing. I had a perfect moss stitch for the back and front panels. Then I realized - I didn't have enough yarn for the arms and the collar. I was following a pattern and the sleeves were made wrist to shoulder. I didn't really know how to measure sleeves at that point so I made them really long. On the second sleeve I ran out of yarn - so I switched to a completely different yarn. Different weight, different color, different texture, and made the top of the sleeve. I started to use the same yarn for the collar - and ran out again. So I switched to yet another yarn with different weight, color, and texture. I used that to make the pockets too. The sweater was so ugly, but I had made it and I was sure that at some point I'd wear it.
It sat in my drawer for at least 4 years and I never took it out. It was so ugly. A few weeks ago I decided that it was shame to waste such pretty yarn and started unravelling it. It's so old that I didn't have notes on where the yarn is from. The yarn on the collar was really fuzzy and wouldn't frog so I just cut it out (it wasn't a very good quality). I've been thinking about a poncho with pockets for a while and decided try it out. I wish I had taken a picture of the Frankensweater before I frogged it, but I was sure I already had one. Apparently I was so ashamed of this sweater I never took a picture, or if I did, I deleted it.
This pattern is really forgiving. If you miss a stitch or add a stitch - no one will notice.

I'm fairly certain this was a worsted weight yarn. It was pretty heavy, but I don't know exactly how much yarn I used becuase it was too long ago. If I had to guess it's probably somewhere around 1000 yards because it's about the same size as my Down by the River Poncho. I used a 6 mm hook.
Stitches:
Ch – chain
Sc – single crochet
Hdc – half double crochet
Hdc blo – half double crochet back loop only
Tr – triple crochet
Ch Sp Stitch - 2 hdc in the first chain stitch, ch 2, 2 hdc in the second chain stitch
Puff - Yarn over, pull up (3), yarn over, pull up (5), yarn over, pull up (7), yarn over, pull up (9), yarn over and pull through all the loops, chaun to secure the puff
Sk st – skip stitch
Sl st – slip stitch

Cast on an even number of stitches. You want it to fit comfortably around your neck. You can always add a neck and make it smaller, you can't make it bigger later. I cast on 74.
You want your increases to be on opposite sides, but I didn’t want the start to be on the increases so I started, did about 10 stitches and then I did my increase. Each row increases by 2 stitches
Row 1: Hdc in the 2nd chain from the hook, hdc in each chain for 10 stitches, 2 hdc in the same stitch, ch 2, 2 hdc in the same stitch, hdc in each chain for 37, 2 hdc in the same stitch, ch 2, 2 hdc in the same stitch, hdc in each stitch until you get to the first stitch, sl st to join.
Since I cast on 74, half of 74 is 37 so after I did the increase I hdc in 37 stitches and then did the second increase. If you cast on a different stitch, just make sure they are on opposite sides.
Row 2-5: ch 2. Hdc blo in all stitches except the corners. There you’ll do the Ch Sp Stitch. Sl st to join
Row 6: ch 3, sk st, *Hdc, ch, sk st. Repeat from * all the way around except the corners where you will do the Ch Sp Stitch. Sl St to join
Row 7: ch 2, * 2 hdc in the same stitch, sk st. Repeat from * all the way around except the corners where you will do the Ch Sp Stitch. Sl St to join
Row 8: repeat row 6
Row 9: repeat row 7
Row 10: repeat row 6
Row 11: repeat row 7
Row 12: repeat row 6
Row 13: repeat row 7
Row 14: repeat row 6
Row 15: repeat row 7
Row 16-17: ch 5, sk st, * tr, ch 1, sk st. Repeat from * all the way around except the corners where you will do the Ch Sp Stitch but with a tr instead of hdc. Sl St to join
Row 18: ch 2, * hdc in each stitch. Repeat from * all the way around except the corners where you will do the Ch Sp Stitch but with a tr instead of hdc. Sl St to join
Row 19: Repeat row 2
Row 20: This row has the arm holes. I wanted the arm holes on the opposite side of the seam and about 2 inches from the corners. If you have a different number of stitches - that's ok, just make sure that they are the same number of stitches from the corner stitch.
Ch 2, hdc blo to the corner Ch Sp Stitch, hdc blo in 12 stitches, ch 18, skip 16 stitches, hdc blo 38, ch 18, skip 16 stitches, hdc blo to corner, Ch Sp Stitch, hdc blo to the seam. Sl St to join. increase stitch, hdc.
Row 21-22: Repeat row 2
Row 23: repeat row 6
Row 24: repeat row 7
Row 25: repeat row 6
Row 26: repeat row 7
Row 27: repeat row 6
Row 28: repeat row 7
Row 29: repeat row 6
Row 30: repeat row 7
Row 31: repeat row 6
Row 32: repeat row 7
Row 33-34: Repeat row 16
Row 35: repeat row 6
Row 36: repeat row 7
Row 37: repeat row 6
Row 38: repeat row 7
Row 39: repeat row 6
Row 40: repeat row 7
You now have the option to switch yarns or use the same yarn. This yarn also came off my Frankensweater, but it's probably more of a sport weight yarn. I thought it looked good as the trim. You could use the same weight yarn with the same pattern.
Row 41: ch 1, * sc in each stitch. Repeat from * all the way around except the corners where you will do the Ch Sp Stitch but with a sc instead of hdc. Sl St to join
Row 42: ch 7, tr into the same stitch, sk st, *tr, ch 3, tr, sk st. Repeat from * all the way around except the corners where you will do the Ch Sp Stitch but with a tr instead of hdc. Sl St to join
Row 43: *Sl st (no starting chain), puff, sl st, sl st. The puff goes into the middle stitch of each of the v's. In the corners I did extra sl st and an extra yarn over for the puff. Sl st to join

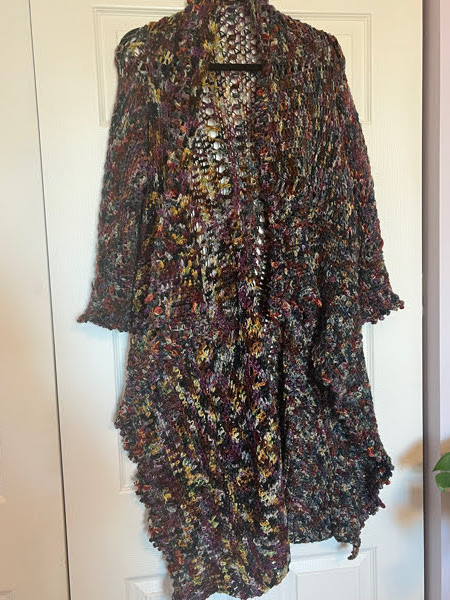
Once I had the contrast color at the bottom I decided I needed it around the pockets and neck too.
For the pockets I just did one how of sc all the way around. I thought the buttons would look cute and enable me to close the arm holes if it was really cold. I got these little bears on Etsy, they're just so cute!
Neck:
Row 1: ch 1, * sc in each stitch. Repeat from * all the way around. Sl St to join
Row 2: ch 2, * 2 hdc in the same stitch, sk st. Repeat from * all the way. Sl St to join

A while back I ended up with a Tunisian crochet hook. It's been in my bag of hooks for probably a year. A few weeks ago I decided - that's it I'm going to learn how to do this thing. I had some leftover light purple yarn that looked about the right weight for my 6mm Tunisian crochet hook. It's leftover first from a sweater I made myself and then from a matching sweater I made River.
I remembered that Heart Hook Home had done a bunch of Tunisian crochet and I started with the Simple Crochet tutorial. The key to Tunisian crochet is that on one row you pick up all the stitches onto you're hook and then in the reverse row you get them all off your hook until you're back to one. I did maybe 12 inches of the simple tunisian crochet and I found that it was curling like made. As I did some research I found that this is actually perfectly normal for this stitch. This is actually one of the things that I didn't like about some knitting stitches. I frogged everything.
I then then found the Heavenly Hyggee Hat Pattern and learned the knit and the purl stitches. A few things that I realized. First - OMG does the knit and purl look like it's actually knitting and not crochet. It makes sense given how you do it, but I was expecting it to be quite so similar. Second, when I was doing the simple stitch I kept dropping stitches, but by doing a pattern of 2 knit and 2 purl for the hat, I never dropped stitches. Third, as fast as I am at crochet from lots of practice, I am slow at this. A crochet hat would probably take me 1-2 hours. This took me way way more than that. Fourth, a big part of the problem was that I would be doing this while on zoom calls. Then I would loose track of whether I was in the forward row or the back row. Lots o' frogging!

I do not know exactly what yarn this is, but it is a worsted weight yarn. For the hat I cast on 62 stitches and made it about 80 rows. Then I stitched up the side and closed the top. Later once I had finished the scarf I added 6 rows around the bottom with the multi-colored yarn and then added the pom at the top.

For the scarf I cast on 26 stiches and I used all the light purple yarn I had left which gave me 158 rows. It was not long enough for a scarf so I searched out a yarn that ws the same weight and matched the color. I am not certain what this yarn is, but I'm fairly certain it's 4th of July from Briar Rose Fibers. It is possible the light purple is the same, but I can't be sure.
I changed colors on the side and went until I thought it would be the right length which was 94 rows. Then I flipped it over picked up my 24 stitches and continued on. The join is barely noticeable. If it isn't obvious I did 94 rows on this side too. I think it could do wiht a big of blocking, but overall I'm really please with how the set turned out.

This being a holiday week this will likely be my last post until next Monday. We'll see, maybe a kiln sneak peak over the weekend depending on how the timing works out. Happy Thanksgiving!
I'm a little obsessed with cables at the moment. They look amazing and they are actually really easy. You might remember from my Antique Rose Cabled Throw that I learned from this page on BeThinx.
I had 3 skeins of Worsted Tweed American Ewe Yarn from CeCe's Wool in Adella's Olive. I had the 8 oz skeins and used almost every bit of all 3 for this tunic. It's oversized both wide and long to be super comfy for fall and winter.

This pattern uses a 5 mm hook. You're going to cast on in multiples of 10 + 7. I actually cast on and did the first few rows a couple of times before I settled on 67 for my cast on. This gave me a panel that is approximately 22 inches wide. For cables every other row will be single crochet all the way across. The rest of this pattern repeats every 6 rows.
Stitches:
ch - chain
sc - single crochet
hdc - half double crochet
fpdc - front post double crochet
fptc - front post triple crochet

Front and Back Panels (make 2):
Row 1: sc in the second stitch from the hook, sc all the way across
Row 2: ch 1, * sc, sc, fpdc, fpdc, sc, sc, fpdc, fpdc, fpdc, fpdc. Repeat from * until you get to the last 6 stitches. sc, sc, fpdc, fpdc, sc, sc
Row 3: ch 1, sc all the way across
Row 4: ch 1, * sc, sc, fpdc, fpdc, sc, sc, fpdc, fpdc, fpdc, fpdc. Repeat from * until you get to the last 6 stitches. sc, sc, fpdc, fpdc, sc, sc
Row 3: ch 1, sc all the way across
Here comes the fancy cable part
Row 5: ch 1, sc, sc, * fpdc, fpdc, sc, sc, skip the first two fpdc, fptc, fptc. Now behind the two fptc you just did go back to the first stitch you skipped and fptc, fptc in the second stitch you skipped, sc in the stitch next to the first fptc you did, sc. Repeat from * until you get to the last 4 stitches. fpdc, fpdc, sc, sc
Row 6: ch 1, sc all the way across
That's it that's all you need to create these amazing looking cables.
Repeat rows 2-6 until you get your desired length. I repeated this 11 times ending on a non crossover row for a total of 77 rows. I decided that I wanted the seem to line up without the crossover, but you could absolutely end on that if that's your desired look.
Put the two panels together cable side in and pin. Leave yourself 8 inches for the arm holes and 9.5 for the neck. Sew up the sides and across the top. I decided to start about 2 inches from the bottom, but that's just a stylistic choice.
Next you're going to add the sleeves. I decided that having cables on every row in the sleeves would be far too busy. I also decided I wanted a slightly looser stitch than doing sc for the sleeves so I went with hdc.
I always start in the arm pit with my sleeves to hide the seems and the reductions in rows.
Row 1: ch 2, hdc around the arm picking up 38 stitches, slip stitch to join
Row 2: ch 2, hdc around, slip stitch to join.
Row 3-11: repeat row 2
I find that if I don't do a stitch in the ch stitch that my rows reduce by 1 stitch each round. As you work through rows 2-11 you want to reduce from 38 stitches to 32 stitches for row 12.
Row 12: ch 1, * sc, sc, fpdc, fpdc, sc, sc, fpdc, fpdc, fpdc, fpdc. Repeat from * until you get to the last 2 stitches. sc, sc, slip stitch to join
Row 13: sc all the way around, slip stitch to join
Row 14: ch 1, * sc, sc, fpdc, fpdc, sc, sc, fpdc, fpdc, fpdc, fpdc. Repeat from * until you get to the last 2 stitches. sc, sc, slip stitch to join
Row 15: sc all the way around, slip stitch to join
Row 16:ch 1, * sc, sc, fpdc, fpdc, sc, sc, skip the first two fpdc, fptc, fptc. Now behind the two fptc you just did go back to the first stitch you skipped and fptc, fptc in the second stitch you skipped. Repeat from * until you get to the last 2 stitches. sc, sc, slip stitch to join
Row 17: sc all the way around, slip stitch to join
Row 18-27: ch 2, hdc around, slip stitch to join.
Weave in all your ends.

I actually wanted to make this into a turtleneck, but alas I ran out of yarn so I just did one round around with sc and used the last of the ends that I had.
I'm really pleased with how this turned out and am looking forward for it to be chilly enough to get cozy in this.

I'm already working on my next cabled pattern. I had another skein of this yarn, but in Antique Rose. My original plan was to use it as an accent color, but it just didn't work out where the accent color worked so scarf it is! I'm trying out the Double Cabled Square and I'm loving it.
I am a bit of a fly by the seat of my pants crocheter. I never follow other people's patterns exactly. I never do guage. I make patterns up and then play yarn chicken to get to the end. Sometimes I lose at yarn chicken and have to alter my patterns as I'm making them.
All that said - I still think I make some pretty cool things. I have improved immensely over the last few years. A good part of that I think has been making my own designs vs following others. Having to at least have a lose plan for what I'm doing has made me more conscious of what I'm doing. I kind of relate that to what's happened with all the electronic maps. Before I could just plug stuff into Google Maps, I would think about my route. Now because I can just plug it in I do. Sometimes Google takes you a way that is not ideal.
This was true when we were on our way up to the Finger Lakes earlier this month. Did we get to our destination - yes? Could we have stayed on 81 longer and not made 50 turns at night on small back roads - yes!
What got me thinking about this is my new cable sweater I'm making. For some reason when I crochet with cables it comes out as a rhombus. I don't know if this always happens or it's just me. However, I do know that this is when I should block. So this is me blocking my cable sweater before I sew it together so it doesn't look all wonky. Maybe I should do this more often :)
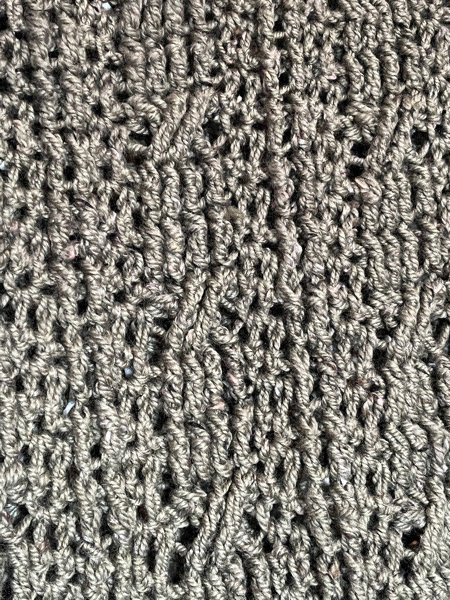
I love this yarn. I know I say that a lot, but I do. This yarn comes from Greenwood Hill Farm and is 100% Merino Wool. These gorgeous colors are the natural colors of the sheep. The colors here are Slate and Silver.

This pattern uses a 4 mm hook and took 3 skeins of the slate and 2 skeins of the silver. Each skein is 180 yards.
Stitches:
ch - chain
sk st - skip stitch
sl st - slip stitch
sc - single crochet
hdc - half double crochet
dc - double crochet
tc - triple crochet
The cast on for this is in multiples of 16 + 2. On the back side I did 66 stitches. I wasn't sure if the shirt was going to be big enough so on the front side I did 80 stitches. Some of you might be thinking - how does that work the front and the back being different number of stitches? When you sew it together you just leave the extra stitches in the neck. It does mean that the shirt has an obvious front side. You can decide to do what I did or have two exactly the same size.
It's also worth noting that all of the even rows are sc all the way across.

Row 1: sc in the 2nd chain from the hook, * ch 1, sk st, hdc, ch, sk st, dc, ch, sk st, tc, ch, sk st, tc, ch, sk st, dc, ch, sk st, hdc, ch, sk st, sc, ch, sk st, sc. Repeat from * ending on a sc
Row 2: sc in each chain across
Row 3: ch 4, tc, *ch 1, sk st, dc, ch 1, sk st, hdc, ch 1, sk st, sc, ch 1, sk st, sc, ch 1, sk st, hdc, ch 1, sk st, dc, ch 1, sk st, tr, ch 1, sk st, tr. Repeat from * ending on a tc
Row 4: Repeat row 2
Row 5: ch 2, sk 2, sc, * ch 1, sk st, hdc, ch, sk st, dc, ch, sk st, tc, ch, sk st, tc, ch, sk st, dc, ch, sk st, hdc, ch, sk st, sc, ch, sk st, sc. Repeat from * ending on a sc
Repeat Rows 2-5 for pattern always ending on an even row.
Row 43: change colors and continue rows 43-52 in the second color.
Make your second panel deciding whether you're going to make it the same width or 16 stitches wider.
Line up the two panels on the outside and pin. If you've made the front panel larger then pay attention to the back panel. You want a neck opening that is about 10 inches wide. Measure the middle and then go 5 inches in either direction. Line up the front panel starting with the shoulder - you will have extra material in the neck in the front panel.
Sew up the sides. I almost always start my sides 1.5 to 2 inches from the bottom. Leave an arm hole that is 8 inches wide at the top.
For the sleeves use the same color as the top. I always start my sleeves in the armpit so I wasn't too concerned at getting exactly 66 stitches. Start your yarn and sc around. I picked up 62 stitches ending on a hdc. Sl st to join.
Row 1: sc in the 2nd chain from the hook, * ch 1, sk st, hdc, ch, sk st, dc, ch, sk st, tc, ch, sk st, tc, ch, sk st, dc, ch, sk st, hdc, ch, sk st, sc, ch, sk st, sc. Repeat from *. Depending on how many stitches you picked up your ending might be different. With 62 I ended on a hdc. Sl st to join
Row 2: sc in each chain across
Row 3: ch 4, tc, *ch 1, sk st, dc, ch 1, sk st, hdc, ch 1, sk st, sc, ch 1, sk st, sc, ch 1, sk st, hdc, ch 1, sk st, dc, ch 1, sk st, tr, ch 1, sk st, tr. Repeat from *. Sl st to join
Row 4: Repeat row 2
Row 5: repeat row 1
Row 6: repeat row 2
Row 7: repeat row 3
Row 8: repeat row 2
Row 9: repeat row 1. You're going to start tapering in so end on a dc instead of the hdc
Row 10: repeat row 2
Row 11: repeat row 3. Taper again end on a sc
Row 12: repeat row 2
Row 13 repeat row 1. Taper again end on a tc
Row 14: repeat row 2
Row 15: repeat row 3. Last taper end on a hdc
Row 16: repeat row 2.
Weave in all of your ends and you're done!
This yarn is so soft. It's made from silk, merino, and sea cell. What is sea cell you ask? Sea cell is a fiber that's made from seaweed! I got this yarn at the Maryland Sheep and Wool having never heard of sea cell. All I knew is that it was just so soft and silky. This particular yarn came from Yarn Hygge. Something about these colors cried out color block to me. I used 2 skeins each of Blues, Silver, and Burgandy. Each skein is approzimately 240 yards.

This pattern uses a 5mm hook.
Stitches:
sk - skip
ch - chain
sc - single crochet
scblo - single crochet back loop only
hdc - half double crochet
hdcblo - half double crochet back loop only
bobble - yarn over, pull loop up, yarn over, pull loop up, yarn over (7 loops on hook), pull all the way through
This sweater is made using the mesh stitch with a bobble which is addapted from a popcorn mesh stitch. Cast on in multiples of 6 + 2. For the back panel I cast on 56 (54 + 2).

Row 1: Sc in the 2nd ch from the hook. * ch 3, sk 2 chains, bobble in next chain, ch 3, sk 2 chains, sc in the next ch. Repeat from * across.
Row 2: Ch 1, sc in the first sc, * 3 sc in the chain space, skip the bobble, 3 sc in the chain space, sc in the sc. Repeat from * across.
Row 3: Ch 2, dc in the same sc, * ch 3, sk next 3 sc, sc, ch 3, sk next 3**, bobble. Repeat from * across ending with the **, dc in last stitch.
Row 4: Ch 1, sc, *3 sc in the chain space, sc in the sc, 3 sc in the chain space, skip the bobble. Repeat from * across, sc in the last stitch.
Row 5: Ch 1, sc in first sc, * ch 3, sk 3 sc, bobble in next sc, ch 3, sk 3 sc, sc. Repeat from * across, sc in the last stitch.
You're going to repeat rows 2-5 until you reach your desired length. The big decision was how big to make the color blocks. I ended up deciding that each block should be 26 rows. Based on that....rows 1-26 are burgandy, rows 27-52 are silver, and rows 57-78 are blues. You could absolutely change this up to make the blocks, bigger smaller, or even stripes. What's important for this pattern to look right is that you change out on an odd row. The even rows make the row below it look finished.

For the side panels do the exact same pattern as you did for the back, but make them narrower. For my sweater I cast on 24. Make 2 side panels.
Next step is to sew the side panels to the back panel. I found that this was easier than on a lot of sweaters because all I had to do was line up the holes. The top of the side panel and the back panel are sewed together across. There will end up being 3 holes between the two side panels. For the arms I measured to get about 8 inches and found that each hole was about an inch so I left 8 holes open on either side. Finally, I left 2 holes open at the bottom - this is purely asthetic. Since this sweater is rather holey I decided when sewing up the sides that I wanted to use the color of the color block as I sewed and have a little overlap rather than pick 1 color to sew with. This made my seems much less noticeable.
Next step is to do the arms. We're going to repeat the same pattern as above except the last stitch for each will turn into a slip stitch. If you've been reading my patterns you know that I'm not super dilligent on you must pick up x number of stitches on the arm hole. Most of the time my sleeve patterns stitches are in 1s or 2s. For this pattern it matters more because we want to be able to have the nice bobble mesh. What's nice though is that you can line up with the holes. However, by this time you should be comfortable with the overall pattern so if you pick up in a multiple of 3 vs 6 - it's not a big deal. I picked up 9 "holes" for a total of 59 stitches.
For the sleeves I made the determination to make the color blocks smaller. I ended up deciding each block should be 14 rows so based on that...rows 1-14 are blues, rows 15-28 are silver, and rows 29-43 are burgandy (yes I know there's an extra row, I'll explain later).
I always start arms on tops in the arm pit so it hides the seams a bit.
Row 1: Sc in the 2nd ch from the hook. * ch 3, sk 2 chains, bobble in next chain, ch 3, sk 2 chains, sc in the next ch. Repeat from * across, slip stitch to join. Note: if you're in a multiple of 3 vs 6 then you'll join after the sc instead of the bobble.
Row 2: Ch 1, sc in the first sc, * 3 sc in the chain space, skip the bobble, 3 sc in the chain space, sc in the sc. Repeat from * across, slip stitch to join.
Row 3: Ch 2, dc in the same sc, * ch 3, sk next 3 sc, sc, ch 3, sk next 3**, bobble. Repeat from * across ending with the **, slip stitch to join. Note: if you're in a multiple of 3 vs 6 then you'll join after the bobble instead of the sc.
Row 4: Ch 1, sc, *3 sc in the chain space, sc in the sc, 3 sc in the chain space, skip the bobble. Repeat from * across, slip stitch to join.
Row 5: Ch 1, sc in first sc, * ch 3, sk 3 sc, bobble in next sc, ch 3, sk 3 sc, sc. Repeat from * across, slip stitch to join. Note: if you're in a multiple of 3 vs 6 then you'll join after the bobble instead of the sc.
Row 6: Repeat row 2.
Row 7: Repeat row 3.
Row 8: Repeat row 4.
Row 9: Repeat row 5.
Row 10: Repeat row 2.
Row 11: This is our first decrease. Repeat row 3 except don't do the last 2 chains. You'll join from your last bobble or sc (depending on if you started from 3 or 6) and slip stitch to the sc.
Row 12: Repeat row 4.
Row 13: Repeat row 5 except don't do the last 2 chains. You'll join from your last bobble or sc (depending on if you started from 3 or 6) and slip stitch to the sc.
Row 14: Repeat row 2.
Row 15: Change colors. Repeat row 3 except don't do the last 2 chains. You'll join from your last bobble or sc (depending on if you started from 3 or 6) and slip stitch to the sc.
Row 16: Repeat row 4.
Row 17: Repeat row 5 except don't do the last 2 chains. You'll join from your last bobble or sc (depending on if you started from 3 or 6) and slip stitch to the sc.
Row 18: Repeat row 2.
Row 19: Repeat row 3 except don't do the last 2 chains. You'll join from your last bobble or sc (depending on if you started from 3 or 6) and slip stitch to the sc.
Row 20: Repeat row 4.
Row 21: Repeat row 5.
Row 22: Repeat row 2.
Row 23: Repeat row 3.
Row 24: Repeat row 4.
Row 25: Repeat row 5.
Row 26: Repeat row 2.
Row 27: Repeat row 3 except don't do the last 2 chains. You'll join from your last bobble or sc (depending on if you started from 3 or 6) and slip stitch to the sc.
Row 28: Repeat row 4.
Row 29: Change colors. Repeat row 5 except don't do the last 2 chains. You'll join from your last bobble or sc (depending on if you started from 3 or 6) and slip stitch to the sc.
Row 30: Repeat row 2.
Row 31: Repeat row 3.
Row 32: Repeat row 4.
Row 33: Repeat row 5.
Row 34: Repeat row 2.
Row 35: Repeat row 3.
Row 36: Repeat row 4.
Row 37: Repeat row 5.
Row 38: Repeat row 2.
Row 39: Repeat row 3.
Row 40: Repeat row 4.
Row 41: Repeat row 5.
Row 42: Repeat row 2.
Row 43: Repeat row 3.
Row 44: ch 2, hdc in each stitch around, slip stitch to join.

Now let's work on the edging. Turn the sweater right side out, with it flat in front of you pick up the bottom right edge. Using the silver yarn chain 2. For each hole that you have in the lace you need 4 stitches. I did 1 in the "post" of the hole and then 3 in the in betweens. For this you're going to want to do the stitches into the stitches and not the chain space to make it look good as the edging. You're going to hdc up the right side, across the back and then down the left side.
Edging:
Row 1: ch 2, hdc all the way around ending on the bottom left corner
Row 2: ch 2, hdc blo all the way around
Row 3: ch 1, sc all the way around
Row 4: ch 1, sc blo all the way around
Row 5: Change colors to blues. ch 1, sc all the way around
Row 6: ch 1, sc blo all the way around

Last step now is the pockets. My original plan was to make them out of the silver since that's the panel they'll be on, but I ran out of silver. I actually really like the way it looks with the burgandy pickets, really makes them pop.
Cast on 17.
Row 1: Sc in the 2nd ch from the hook. * ch 3, sk 2 chains, bobble in next chain, ch 3, sk 2 chains, sc in the next ch. Repeat from * across.
Row 2: Ch 1, sc in the first sc, * 3 sc in the chain space, skip the bobble, 3 sc in the chain space, sc in the sc. Repeat from * across.
Row 3: Ch 2, dc in the same sc, * ch 3, sk next 3 sc, sc, ch 3, sk next 3**, bobble. Repeat from * across ending with the **, dc in last stitch.
Row 4: Ch 1, sc, *3 sc in the chain space, sc in the sc, 3 sc in the chain space, skip the bobble. Repeat from * across, sc in the last stitch.
Row 5: Ch 1, sc in first sc, * ch 3, sk 3 sc, bobble in next sc, ch 3, sk 3 sc, sc. Repeat from * across, sc in the last stitch.
Repeat row 2-5. End on row 16 (8 holes). Make 2 pockets.
I knew I didn't want the pockets to cross the color block. I ended up placing them 1 back from the edge and 2 up from the silver/burgandy color change. Sew them around.
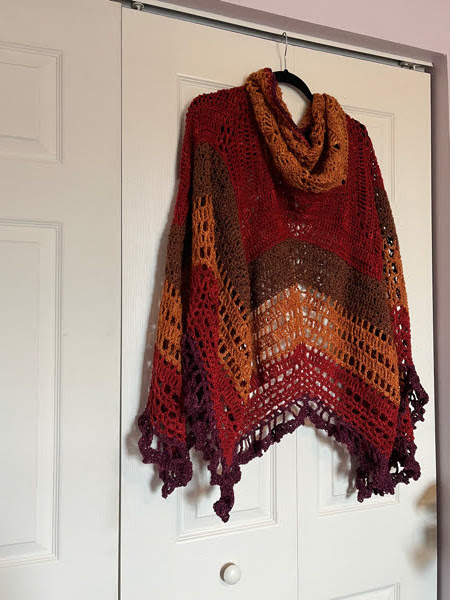
I started off wanting to make a butterfly shawl, but with these colors I think leaf is much more appropriate. This yarn is from Feederbrook Farm and is their silk DK weight yarn. I bought this at the Maryland Sheep and Wool and the colors aren't listed, but its 2 skeins of a burnt orange color, 2 of a cranberry red color, a skein of dark brown, and a skein of a nice deep purple for a total of about 1500 yards.

This didn't come out exactly perfect as the top isn't entirely flat, but once its on you'll never notice it. I think it's because of the different types of stitches that I used trying to create some different texture. The single crochets definitely aren't as wide as the other stitches. I used the same color until it ran out and always switched on rows.

This uses a 4 mm hook.
Stitches used:
ch - chain
ch sp - chain space
sc - single crochet
hdc - half double crochet
dc - double crochet
tc - treble crochet
bphdc - back post half double crochet
bpdc - back post double crochet
shell - 2 dc, 2 ch, 2 dc
v-stitch - 1 dc, 2 ch, 1 dc
sk st - skipt stitch
bobble - yarn over, pull up, yarn over, pull up, yarn over, pull up (7 loops), pull all the way through
picot - chain 3, insert the hook into the same stitch and pull it through
Start with a magic ring with the orange
Row 1: ch3, 7 dc, 1 trb
Row 2: ch3, 1dc in same st, *2dc in next st*. Repeat from *. In the last stich 1 dc and 1 trb
Row 3: ch5, sk st, *1 dc in next 4 sts, ch 2, sk st. Repeat from * 1 tc in last st
Row 4: ch3, in the chain space (1dc, 2ch, 2dc), *sk st, 1 dc, ch2, 1 dc, sk st, shell in the next ch space *,
Repeat from * once. Sk st, 1 dc, ch 2, 1 dc, sk st, in next ch sp 2dc, 2ch, 1dc, 1trb in last st
Row 5: ch3, sk st, * in next ch sp shell, 1 dc, sk st in the next 2 sts, in next ch sp v-stitch, sk next 2 sts, 1 dc. Repeat from *. In the last ch sp shell, sk st, 1 tc in the last stitch
Row 6: ch3, sk st, 1 dc, *In next ch sp shell, dc, dc, sk 2 sts, v-stitch, sk 2 sts, dc, dc. Repeat until end with a tr in the last stitch.
Ok so here is the pattern to follow for the rest of the shawl - in row 5 there was 1 dc between the shell and the v, in row 6 there were 2, in row 7 there will be 3....are you seeing the pattern here? The number of stitches between the shell and the v increases by 1 every row from now on. That's the big secret for this. Like I said before I decided to make it texturally interesting so I experimented with different stitches. You can follow my path or create your own.

Row 7-9: dc
Row 10: alternate dc with 3 dc in the same stitch
Row 11: dc
ROw 12: alternate dc with 3 dc in the same stitch
Row 13: dc
ROw 14: alternate dc with 3 dc in the same stitch
Row 15: dc
Row 16: hdc
Change colors - red
Row 17: sc
Row 18-20: sc, ch
Row 21: hdc
Row 22: dc
Row 23: hdc
Row 24: sc
Row 25: bp hdc
Row 26: bp dc
Row 27: bp hdc
Row 28: sc
Change colors - brown
Row 29-30: 2 hdc in the same stitch, sk st
Row 31: dc
Row 32-33: 2 hdc in the same stitch, sk st
Row 34: sc
Change colors - orange
Row 35: dc, ch
Row 36: 2 dc in the same stitch, sk st
Row 37: dc, ch
Row 38: 2 dc in the same stitch, sk st
Row 39: dc, ch
Row 40: sc
Change colors - red
Row 41: hdc, ch
Row 42: dc
Row 43: hdc, ch
Row 44: 2 hdc in the same stitch, sk st
Row 45: hdc, ch
Row 46: 2 hdc in the same stitch, sk st
Row 47: hdc, ch

Continue to use the red at this point to do a sc across the flat top. This helps to even it out if it hasn't been even.
Change colors - purple
Row 48: bobble, ch
Row 49: tc, ch 3. In the shell spaces ch 5 instead of ch 3
Row 50: * sc, hdc, dc, hdc. Repeat from *. In the shell space - sc, hdc, dc, tc, dc, hdc. For the v-stitch make sure you still sk a stitch then just sc in the 2 chains
Row 51: sc in the sc and hdc stitches. Picot in all the dc stitches (and in the tr for the shells)
When you get to the end sc across the top again.
This yarn is so gorgeous it almost didn't need a pattern at all. It is "Textured" Handpsun Yarn from Windsong Farm. It's only about 18 yards. I hesitate to even call this a pattern since it's so simple, but it did take me a bit to figure out what I wanted to do with this yarn so maybe it helps someone else.
I used a 12 mm hook and chained 40. That felt like the right length that if I needed to loop it twice I could, but I could also just wear it as a necklace.
Row 1: join the loop using a slip stitch making sure that there are no twists. *Chain 3, skip 2 stitches, sc. Repeat from * slip stitch to join.
Row 2: *ch 3, sc in the chain space. Repeat from *. This will not make it all the way around. Weave in when you run out of yarn.
You'll see in the picture above that there is clearly a place where there is an extra row. When you double loop it (below) then I think it really pops. When you're done pull out the extra hangy bits that got caught up as you were crocheting. I feel like this will lay really nicely over a long sleeve shirt, once again looking forward to colder weather for this.

Also, don't forget about the Bel Air Festival for the Arts tomorrow Sunday September 18th. I'm in booth 220.
The sides and back of this sweater are made all in one piece. It makes for really nice panels in the front that you can wrap around yourself. We went up to Chaumont for the holiday weekend and the weather was chilly so I got to wear this sweater earlier than I thought I would. I think I might add some buttons so that when it gets real cold it will stay in place.
I did a good amount of frogging working out this sweater. When I make a shirt or sweater to sew I usually aim for the back to be about 23-24 inches. I did that with this sweater and found that I was swimming in it. Since it's made all in once piece it was closer to 14 inches when it felt right. I'm not entirely sure why that is, but the sweater fits great so I'm going with it. I'll ponder that more and see if I can come up with a reason why it's true.
This pattern uses 4 skeins of Yowsa from Miss Babs in Bewitching for about 2200 yards of yarn.

This pattern uses a 5.5 mm hook.
Stitches used:
ch - chain
sl - slip stitch
sk - skip stitch
sc - single crochet
hdc - half double crochet
dc - double crochet
bobble - yarn over, pull a stitch through, yarn over, pull a stitch through, yarn over, pull all the stitches through (7 loops at once)
X - skip a stitch, dc, go back to the stitch you skipped and behind your new stitch dc
picot - sc, ch 3, sc into the right side of your sc
ch 119
Row 1: sc in the second stitch from the hook, ch, sk - all the way across. End on a sc
Row 2-5: ch 2, sc in the chain space, ch - all the way across. End on a sc
Row 6: ch 3, bobble in the chain space, ch - all the way across. hdc in the last stitch
Row 7-16: ch 2, sc in the chain space, ch - all the way across. End on a sc
Row 17: ch 2, bobble in the chain space, ch - all the way across. hdc in the last stitch
Row 18: - 27: ch 1, 2 sc in the space, sk - all the way across.
Row 28: ch 3, X stitch - all the way across. dc in the last stitch
Row 29-37: ch 2 hdc all the way across
Row 38: ch 2, hdc in the first 22 stitches, ch 22 (we are making the first arm opening here), sk stitches 23-30, hdc in the 40th stitch and all the way to the end. Option: if you want to create a flap between the front panel and the back panel then instead of going to the end ch 10 at the end and skip the last 10 stitches
Row 39: ch 3, X stitch - all the way across. dc in the last stitch
Row 40-44: ch 2, hdc all the way across
Row 45: ch 3, X stitch - all the way across. dc in the last stitch
Row 46: ch 2, sk, sc, ch, sk - all the way across. End on a sc
Row 47-50: ch 2, sc in the chain space, ch - all the way across. End on a sc
Row 51: ch 3, bobble in the chain space, ch - all the way across. hdc in the last stitch
Row 52-56: ch 2, sc in the chain space, ch - all the way across. End on a sc
Row 57: ch 3, X stitch - all the way across. dc in the last stitch
Row 58-62: ch 2, hdc all the way across
Row 63: ch 3, X stitch - all the way across. dc in the last stitch
Row 64: ch 2, hdc in the first 22 stitches, ch 22 (we are making the first arm opening here), sk stitches 23-30, hdc in the 40th stitch and all the way to the end. Option: if you want to create a flap between the front panel and the back panel then instead of going to the end ch 10 at the end and skip the last 10 stitches
Row 65-73: ch 2, hdc all the way across
Row 74: ch 3, X stitch - all the way across. dc in the last stitch
Row 75-84: ch 1, 2 sc, sk - all the way across.
Row 85: ch 2, bobble in the chain space, ch - all the way across. hdc in the last stitch
Row 86-95: ch 2, sc in the chain space, ch - all the way across. End on a sc
Row 96: ch 2, bobble in the chain space, ch - all the way across. hdc in the last stitch
Row 97-101: ch 2, sc in the chain space, ch - all the way across. End on a sc

This will give you your back and front panels. The front panels will drape nicely down. I decided that this needed a border all the way around.
Row 1: start at the bottom right edge. ch 2 bobble, ch. When you get to the corners - 2 hdc in the corner stitch, ch 2, 2 hdc in the corner stitch. You'll end on a corner, but only need to do 1 hdc since your ch 2 will cound as the second hdc. Join via a slip stitch to the ch 2.
Row 2: ch 1, sc, picot in the ch between the bobbles, sc into the bobble. When you get to the corners - sc into the first hdc, 2 sc into the second hdc, ch 2, 2 sc into the 1st hdc on the other side of the corner, sc into the second hdc. Then keep going with your picots. Slip stitch to join and then tie off
I decided I wanted to make my sleeves end about 3 inches back from my wrist. If you want your sleeves longer or shorter just add in a few rows.
Row 1: starting at the bottom of the armhole (the underarm section) ch 2, hdc around, sl stitch to join. I picked up 45 stitches. The exact number doesn't matter to me as long as it doesn't look like I have any holes and I pick up the same number on the second sleeve.
Row 2-3: ch 2, hdc around, sl stitch to join.
Row 4-10: ch 2, hdc around, in the last 2 stitches hdc together, sl stitch to join
Row 11: ch 3, X stitch - all the way across , sl stitch to join
Row 12-16: ch, sc into the chain stitch, sk stitch, 2 sc. Repeat until the end, sl stitch to join
Row 17: ch 2, bobble in the chain space, ch - all the way across, sl stitch to join
Row 18-22: ch 2, sc in the chain space, ch - all the way across, sl stitch to join
Row 23: ch 2, bobble in the chain space, ch - all the way across, sl stitch to join
Row 24: ch 1, picot in the ch between the bobbles, sc into the bobble - all the way across, sl stich to join and tie off
I'm not super careful about counting my stiches in the arms. I know I want it rather wide on the top and then the same width for the forearms. If you want looser or tighter arms play with the number of stitches.

Pockets (make 2):
ch 20
Row 1: sc in the second stitch from the hook, ch, sk - all the way across. End on a sc
Row 2-10: ch 2, sc in the chain space, ch - all the way across. End on a sc
Row 11: ch 3, bobble in the chain space, ch - all the way across. hdc in the last stitch
Row 12-21: ch 2, sc in the chain space, ch - all the way across. End on a sc
Turn so now your side becomes the top.
Top Row 1: ch 2, bobble in the chain space, ch - all the way across, sl stitch to join (I had 13 bobbles)
Top Row 2: ch 1, picot in the ch between the bobbles, sc into the bobble - all the way across, sc in the last stitch and tie off
Sew on the pockets on the front panel just above where the arms end. Remember the sweater will stretch.
This project took multiple turns. It all started because I decided that I wanted to learn the basket weave stitch. I had seen pictures of crocheted items with it for a while and it always looked amazing. I don't know why, but I assumed that it would be hard to do. In reality it's easy - as long as you keep track of your stitches. This ruana involved a lot of frogging.
This yarn is Fourth of July by Briar Rose. I started off thinking that this would make a great sweater, but midway through the first skein I knew it wanted to be something different. At first I thought that it wanted to be a poncho, but then it hit me - ruana. It drapes perfectly and it will be super warm once the cool weather comes.

This pattern uses 4 skeins of Fourth of July for a total of about 2200 yards. It uses a 5 mm hook.
Stitches:
ch - chain
hdc - half double crochet
dc - double crochet
fpdc - front post double crochet
bpdc - back post double crochet
The basket weave stitch cast on is in mulitples of 4 + 2. I cast on 70 stitches because this was originally going to be a sweater and I wanted it to be about 24 inches wide.

Row 1: ch 2, dc all the way across, hdc in the last stitch
Row 2: ch 2, *fbpdc in each of the next 4 dc, bpdc in each of the next 4 dc. Repeat from * hdc in the last stitch.
Ok here's the trick to this pattern. When you cast on you did it in multiples of 4. If you do it in an even multiple then row 3 (and all the odd rows) will be the same as row 2. If you do it in an odd multiple then row 3 (and all the odd rows) will be the opposite of row 2. The important thing is to pay attention - for a series of 4 rows you want the posts to be on the same side. I have 17 which is an odd number so it goes back and forth.
Row 3: ch 2, *bpdc in each of the next 4 dc, fpdc in each of the next 4 dc. Repeat from * hdc in the last stitch.
Row 4: ch 2, *fbpdc in each of the next 4 dc, bpdc in each of the next 4 dc. Repeat from * hdc in the last stitch.
Now here comes the switch. Anywhere that you were fp will now be a bp and anywhere that was a bp will be a front post.
Row 5: ch 2, *fbpdc in each of the next 4 dc, bpdc in each of the next 4 dc. Repeat from * hdc in the last stitch.
Row 6: ch 2, *bpdc in each of the next 4 dc, fpdc in each of the next 4 dc. Repeat from * hdc in the last stitch.
Row 7: ch 2, *fbpdc in each of the next 4 dc, bpdc in each of the next 4 dc. Repeat from * hdc in the last stitch.
Row 8: ch 2, *bpdc in each of the next 4 dc, fpdc in each of the next 4 dc. Repeat from * hdc in the last stitch.
Ok now repeat until you reached your desired lenth. I used almost all of the 2 skeins. Mine ended up being 68 rows long.
Make 2 of these

Line the two panels up. You want to make sure that where the panels line up the basket weave switches from the fp to the bp.
Sew halfway up. I sewed about 36 rows up. Weave in your ends and you're done.

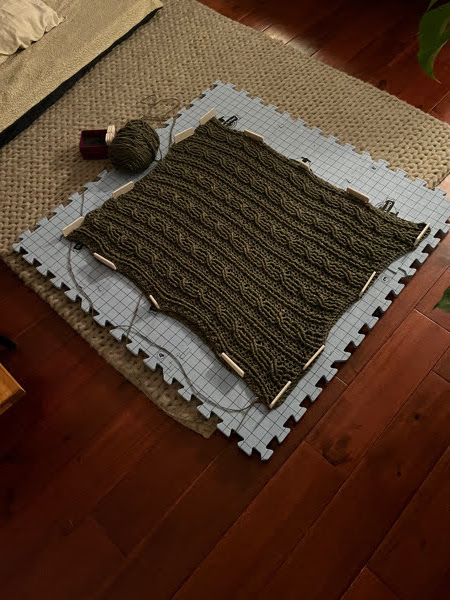
I purchased some Turin yarn at Hobby Lobby while it was on clearance in Antique Rose. They only had 3 skeins and I bought them all. I had pinned this Chunky Cabled Throw from All About Ami and I've wanted to make it for a while.

I started making the blanked and I assumed I'd just be able to get more yarn, even if it was at full price. Except that when I went online to look for it - it told me it was sold out and on clearance. Then the next day it was gone entirely. I googled for it and found that there were 5 skeins was available on Etsy from Carolynique. Initially when I put it in my cart the shipping was exhorbitant, but I messaged Carolynique and we worked out exact shipping which enabled me to finish.

I don't want to write a pattern because I mostly followed the one from All About Ami. I did want to make it longer so I modified it slightly. My pattern has 2 fp dc sections on either side instead of one to begin and I have 5 cable sections instead of 3. If you see a pattern you like, but its not quite what you had in mind - alter it. I wrote the pattern out on paper and then figured out how many stitches I needed to cast on with my updated pattern.

I had never done cabled before because I thought they'd be a little daunting, but it was so easy. It's basically just 3 repeating rows. All About Ami has amazing pictures with detailed instructions on how to do them.

Side view of the cables.


I did change up the edging from the pattern. For my blanket I hdc one row around the edge. In the corners I did 2 hdc, ch 2, 2 hdc. For the second row I did hdc, ch 1, sk st all the way around (using the same corners as the last row). For the last row I did a picot. Initially I did a 3 ch picot, but I got to the last side and was going to run out of yarn (fail at yarn chicken). I really liked the way it look so I modified it to be a ch 2 picot and was able to finish with just a bit to spare. This took 8 skeins of the Turin yarn. I don't know if Hobby Lobby will bring it back, but the skeins were a super bulky 270 yards. I used a 10 mm hook for the whole thing.
I got this yarn at the Maryland Sheep and Wool. It is was a show colorway from Kim Dyes Yarn. I bought 3 skeins - or at least I thought I did. I accidentally bought 2 skeins in a fingering weight and only 1 in the Brioche DK. When I got home and was looking at what I bought I realized my mistake. I contacted Kim and she sent me 2 skeins of the DK so that I would have 3. I haven't figured out yet what I'm going to make with the 2 skeins of fingering, but I know it's going to be gorgeous - because this yarn is gorgeous! It's inspired by Monet's water lilies.
This pattern uses a lot of yarn for the shells. Normally a shirt like this only takes 2 skeins, but this one used almost all of the 3.

Use a 5.5 mm hook
Stitches:
ch - chain
sk st - skip stitch
sc - single crochet
dc - double crochet
shell - 5 dc in the next ch 3 space

The pattern works with a cast on in multiples of 5 + 2. I cast on 72. I wanted this top to be a bit wider so that I could make the sleeves capped.
Row 1: Sc in the 2nd chain from the hook, sc in the next ch, * ch 3, sk 2 ch, sc, sc, sc. Repeat from * across. The last stitch will be a single sc
Row 2: Ch 1, sc in the first sc, * sk next sc, shell (5 dc in the chain space), sk next sc, sc in the next sc. Repeat from * across ending with a sc.
Row 3: Ch 3, sk next dc, * sc in the next 3 dc, ch 3, sk the first dc, sc in the next 3 dc, ch 3 and sk the last dc. Repeat from * across. At the end of the last shell ch 1, hdc in the last stitch.
Row 4: Ch 3, 2 dc in the first ch 1 space, * sk next sc, shell. Repeat from * across, for the last shell only do 3 dc in the turning chain.
Row 5: Ch 1, sc in the frist dc, sc in the next dc, * ch 3, sk next (dc, sc, dc), sc in the next 3 dc. Repeat from * across ending with the ch 3 and then dc in th e last 2 stitches.
Repeat rows 2-5 until you get to your desired length. I made mine 19 rows. Make 2 panels

Sew from the shoulder to the neck hole. I made my neck hole 11 inches wide.
Now for the sides. I wanted there to be some capped sleeves, but I didn't exactly know how to do it so I played with it until I figured out a way that I liked.
First make sure that the top is turned right side out. You're going to pin from the shoulder down how big you want your arm hole (mine is 8 inches) and then an inch in from the edge. Start sewing from that inch in and move to the edge. When you get to the edge flip the top inside out and then sew the seam normally. I left about 2 inches at the bottom unsewed because I like that look.


