
I always have fun making gnomes. Whether they are for the garden or just the small ones for around the house they just make me smile. Originally this female gnome was going to have two braids, but I draped this across her head and it just worked so I went with it.
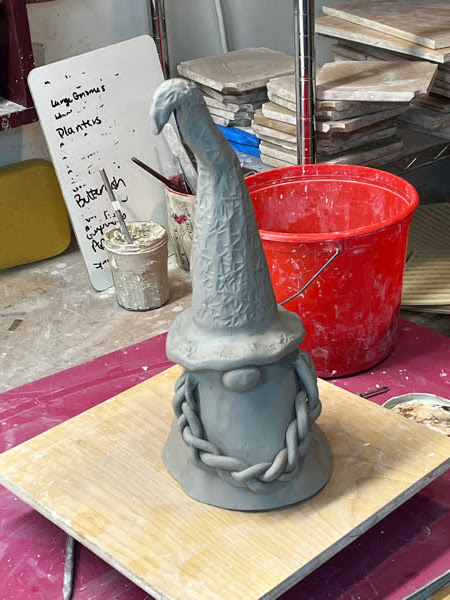
I think I want to glaze them similar so that its clear that they are a pair.

While I was working with the elephant ears I decided I also wanted to do something with Hosta leaves. These vases are made with two different size hosta leaves.

The one in the back is a bigger leaf and slightly different variety than the 3 in the front. It took me a few tries (and some smooshed vases) to come up with a plan on how to do this. I really wanted these to be just the leaf without having to add a separate bottom.

I think it's amazing that all of these are made from the same two leaves, but each has it's own personality.

I used to have elephant ears in the front of my house by my stoop, but a few years ago we had a really cold winter and after that they never came back. I've been looking for years at Home Depot, but every time I saw them the box was already empty. I went to a local market this spring and they had them! I wish I took a picture of the seed because it was enormous. I got a large planter figuring that I can bring it in for the winter so it won't be affected by the cold. I was worried it was a dud because nothing grew for a few weeks, but after a trip to Chaumont I came home and we had elephant ears.
With all the heat the last few weeks a few of the leaves were dying off so I cut off two and decided to make pots.

I wanted to try to make a birdbath so I did it two different ways. This first one I cut up a pool noodle and propped it on all 4 sides to create the shape I wanted.

For the second one I used my large bowl mold and started it upside down. This gave me a bit more of a bowl shape which I liked.

What I did not think to do, however, was add a foot so it is a bit wobbly. I do really like the shape.

I also took a smaller leave and made a bowl with that.

Once again I forgot the foot. There is a 4th one I made on this same smaller form that I remembered the foot on. All of these were made using Laguna 66 because I wanted to be able to have them outside and deal with the elements.
First snowmen and now pumpkins. I have several shows coming up in the fall and I want to be prepared. I feel like I need to do a lot now because once the fairs start I won't have as many weekends to be able to make stuff. I thought that some pumpkin appetizer/tapas plates would be cute. I used the template from Clayshare and then sized it to the size I wanted to be able to press the GR forms in the middle.
These pumpkins are more tall.

The other pumpkins were more squat and round.

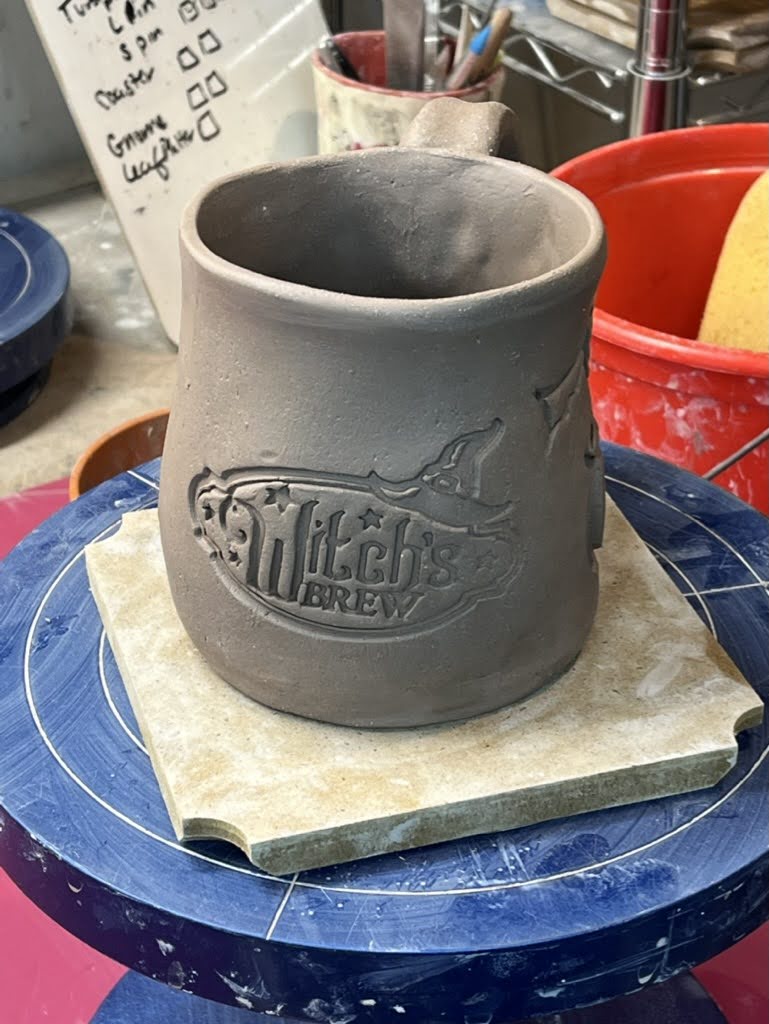
I got into the halloween spirit and decided to make some mugs too. Who wants some dragon's blood?

I even made the handle look like a dragon's claw.

Or how about some witches brew?
I know that it's August and the weather is very hot, but I was feeling a snowman so I made one. This form might look familiar because it starts the same as the pumpkin, but there are 3 of them stacked. I think these are going to be popular and need to make more of them.

This project took multiple turns. It all started because I decided that I wanted to learn the basket weave stitch. I had seen pictures of crocheted items with it for a while and it always looked amazing. I don't know why, but I assumed that it would be hard to do. In reality it's easy - as long as you keep track of your stitches. This ruana involved a lot of frogging.
This yarn is Fourth of July by Briar Rose. I started off thinking that this would make a great sweater, but midway through the first skein I knew it wanted to be something different. At first I thought that it wanted to be a poncho, but then it hit me - ruana. It drapes perfectly and it will be super warm once the cool weather comes.

This pattern uses 4 skeins of Fourth of July for a total of about 2200 yards. It uses a 5 mm hook.
Stitches:
ch - chain
hdc - half double crochet
dc - double crochet
fpdc - front post double crochet
bpdc - back post double crochet
The basket weave stitch cast on is in mulitples of 4 + 2. I cast on 70 stitches because this was originally going to be a sweater and I wanted it to be about 24 inches wide.

Row 1: ch 2, dc all the way across, hdc in the last stitch
Row 2: ch 2, *fbpdc in each of the next 4 dc, bpdc in each of the next 4 dc. Repeat from * hdc in the last stitch.
Ok here's the trick to this pattern. When you cast on you did it in multiples of 4. If you do it in an even multiple then row 3 (and all the odd rows) will be the same as row 2. If you do it in an odd multiple then row 3 (and all the odd rows) will be the opposite of row 2. The important thing is to pay attention - for a series of 4 rows you want the posts to be on the same side. I have 17 which is an odd number so it goes back and forth.
Row 3: ch 2, *bpdc in each of the next 4 dc, fpdc in each of the next 4 dc. Repeat from * hdc in the last stitch.
Row 4: ch 2, *fbpdc in each of the next 4 dc, bpdc in each of the next 4 dc. Repeat from * hdc in the last stitch.
Now here comes the switch. Anywhere that you were fp will now be a bp and anywhere that was a bp will be a front post.
Row 5: ch 2, *fbpdc in each of the next 4 dc, bpdc in each of the next 4 dc. Repeat from * hdc in the last stitch.
Row 6: ch 2, *bpdc in each of the next 4 dc, fpdc in each of the next 4 dc. Repeat from * hdc in the last stitch.
Row 7: ch 2, *fbpdc in each of the next 4 dc, bpdc in each of the next 4 dc. Repeat from * hdc in the last stitch.
Row 8: ch 2, *bpdc in each of the next 4 dc, fpdc in each of the next 4 dc. Repeat from * hdc in the last stitch.
Ok now repeat until you reached your desired lenth. I used almost all of the 2 skeins. Mine ended up being 68 rows long.
Make 2 of these

Line the two panels up. You want to make sure that where the panels line up the basket weave switches from the fp to the bp.
Sew halfway up. I sewed about 36 rows up. Weave in your ends and you're done.


